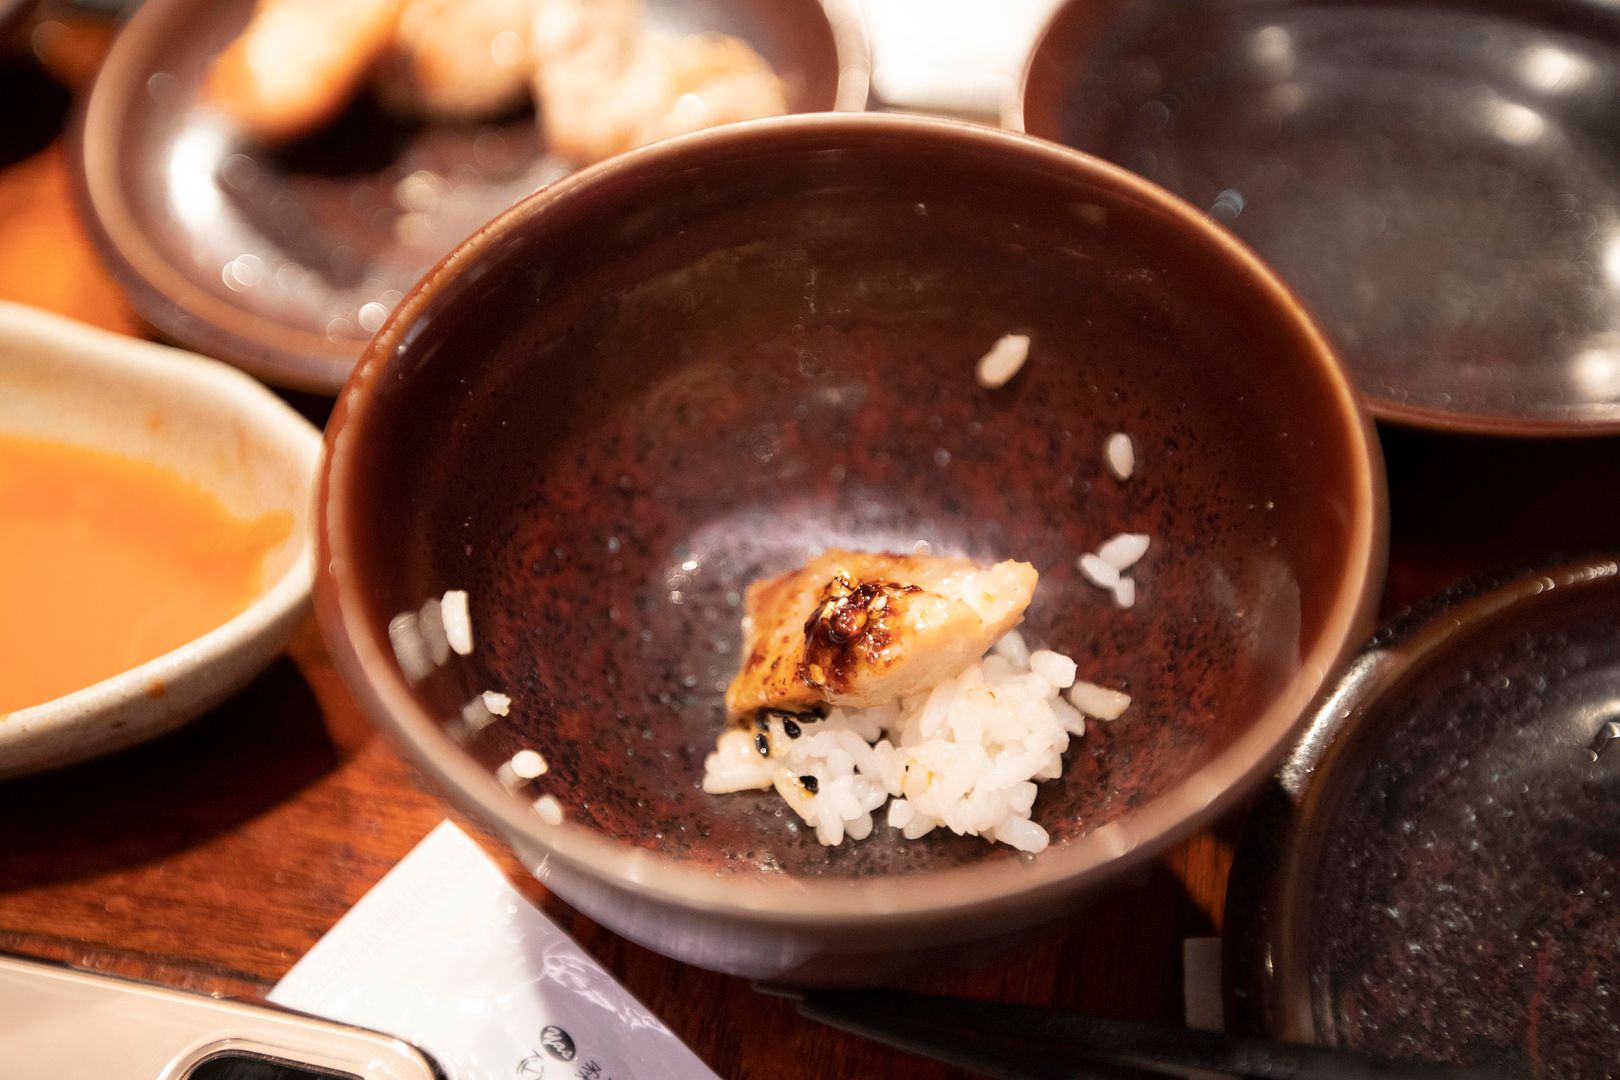
Shouldn't I be craving for something like a burger or boba milk tea? Squid instead? What's going on?
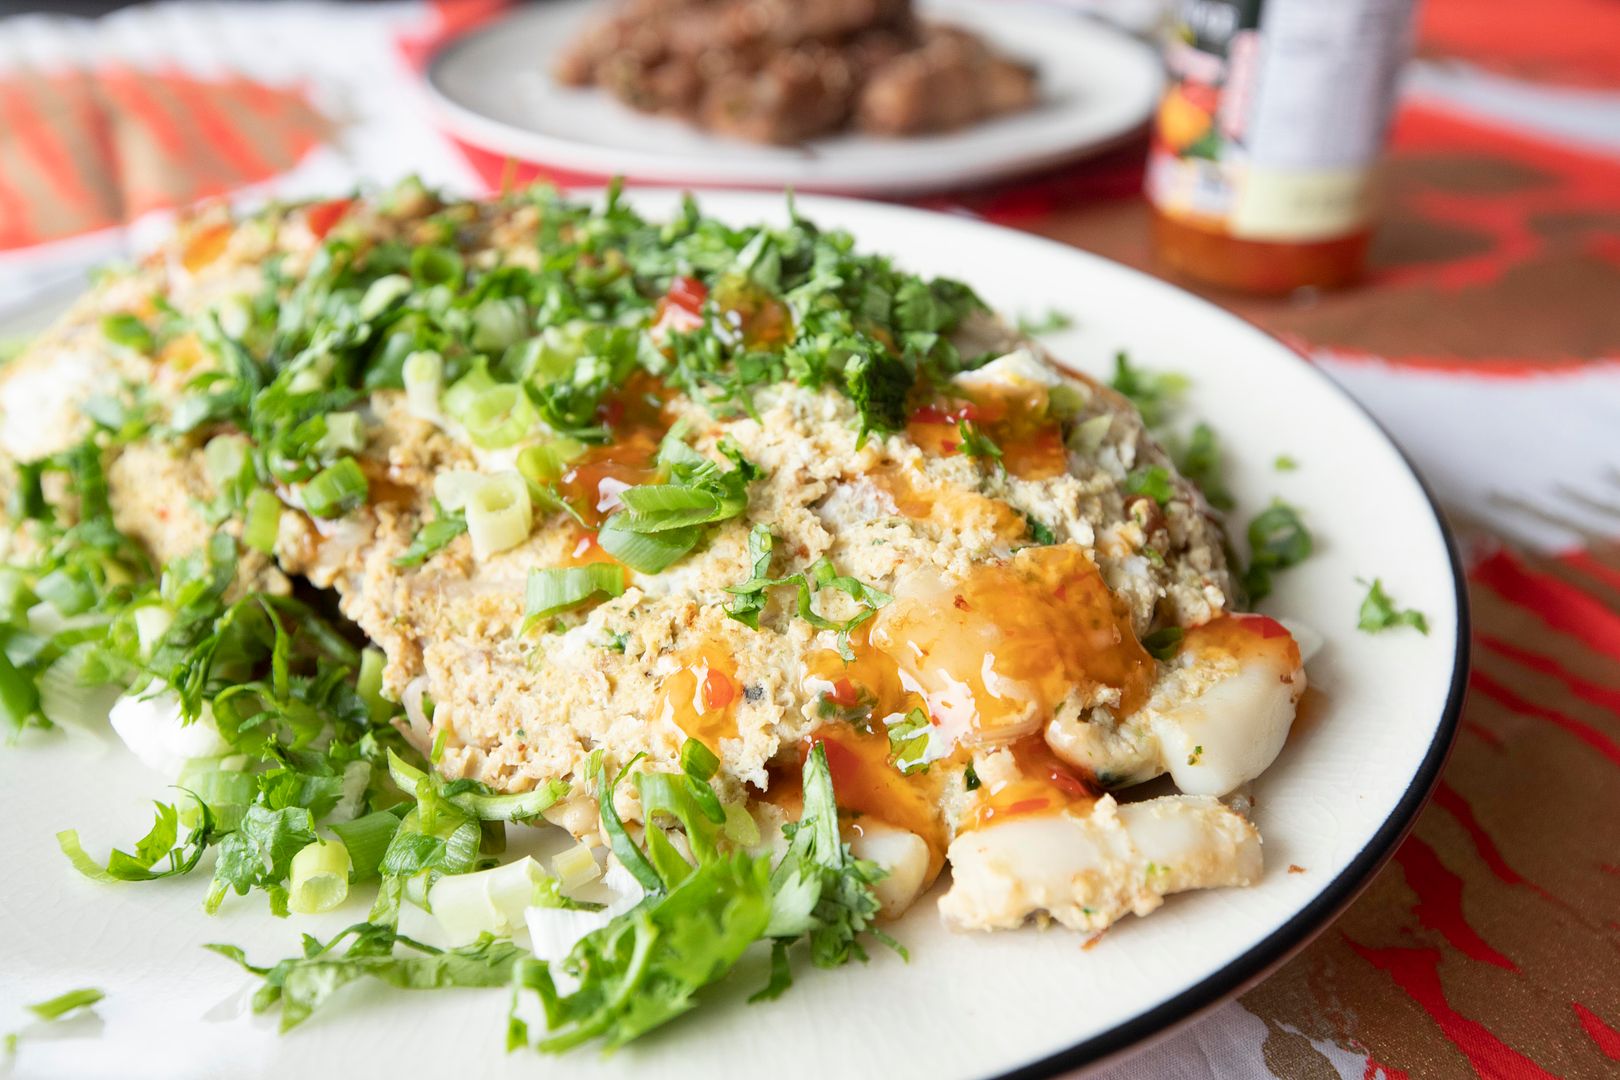
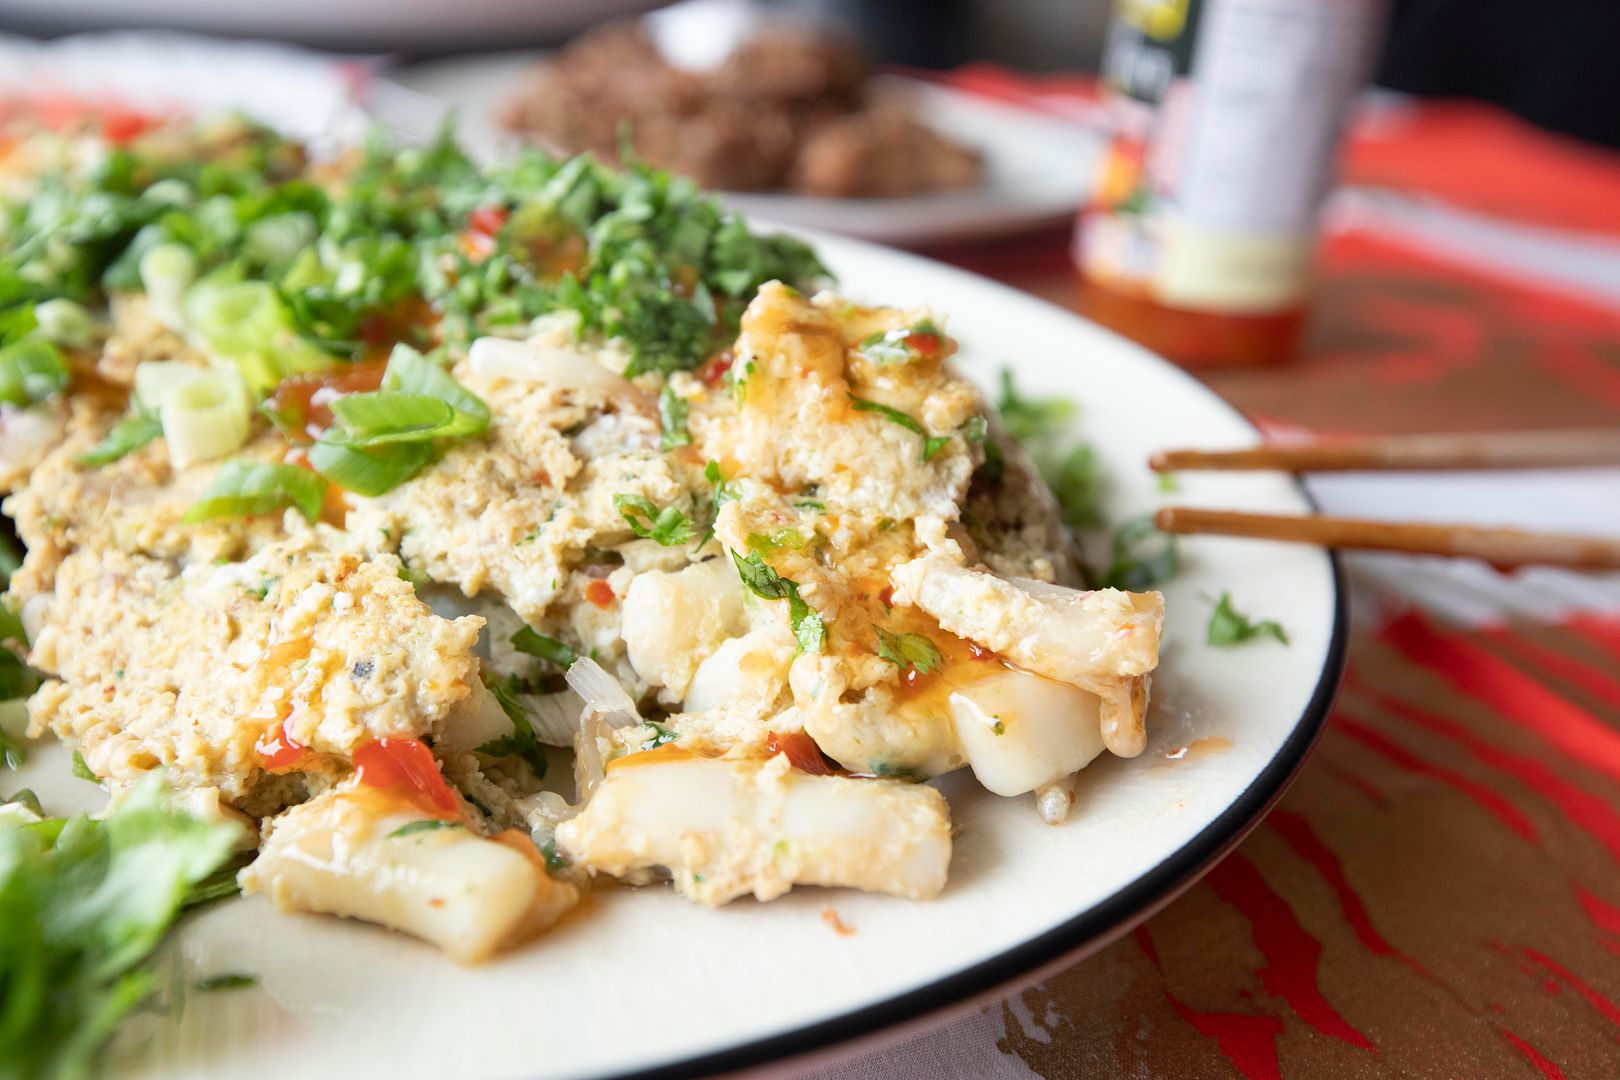
Thai style seafood omelet -
Ingredients?
- 12 shrimps (peeled and deveined)
- 120 grams squid
- 2 cups bean sprouts
- 8 eggs
- 3 to 4 garlic cloves
- 2 stalks scallion
- 1 bundle cilantro
- 1 red chili
- 2 tablespoons olive oil
- 1/2 tablespoon drinkable water
- 2 teaspoons fish sauce
- 1 teaspoon grated ginger
- Some salt
- Some black pepper
- Some sweet chili sauce
How?
Remove the tips and roots from bean sprouts. Peel and finely chop the garlic cloves. Destem and finely chop the red chili. Destem scallion stalks and chop the remaining section. Chop the cilantro too. Peel and grate the ginger.
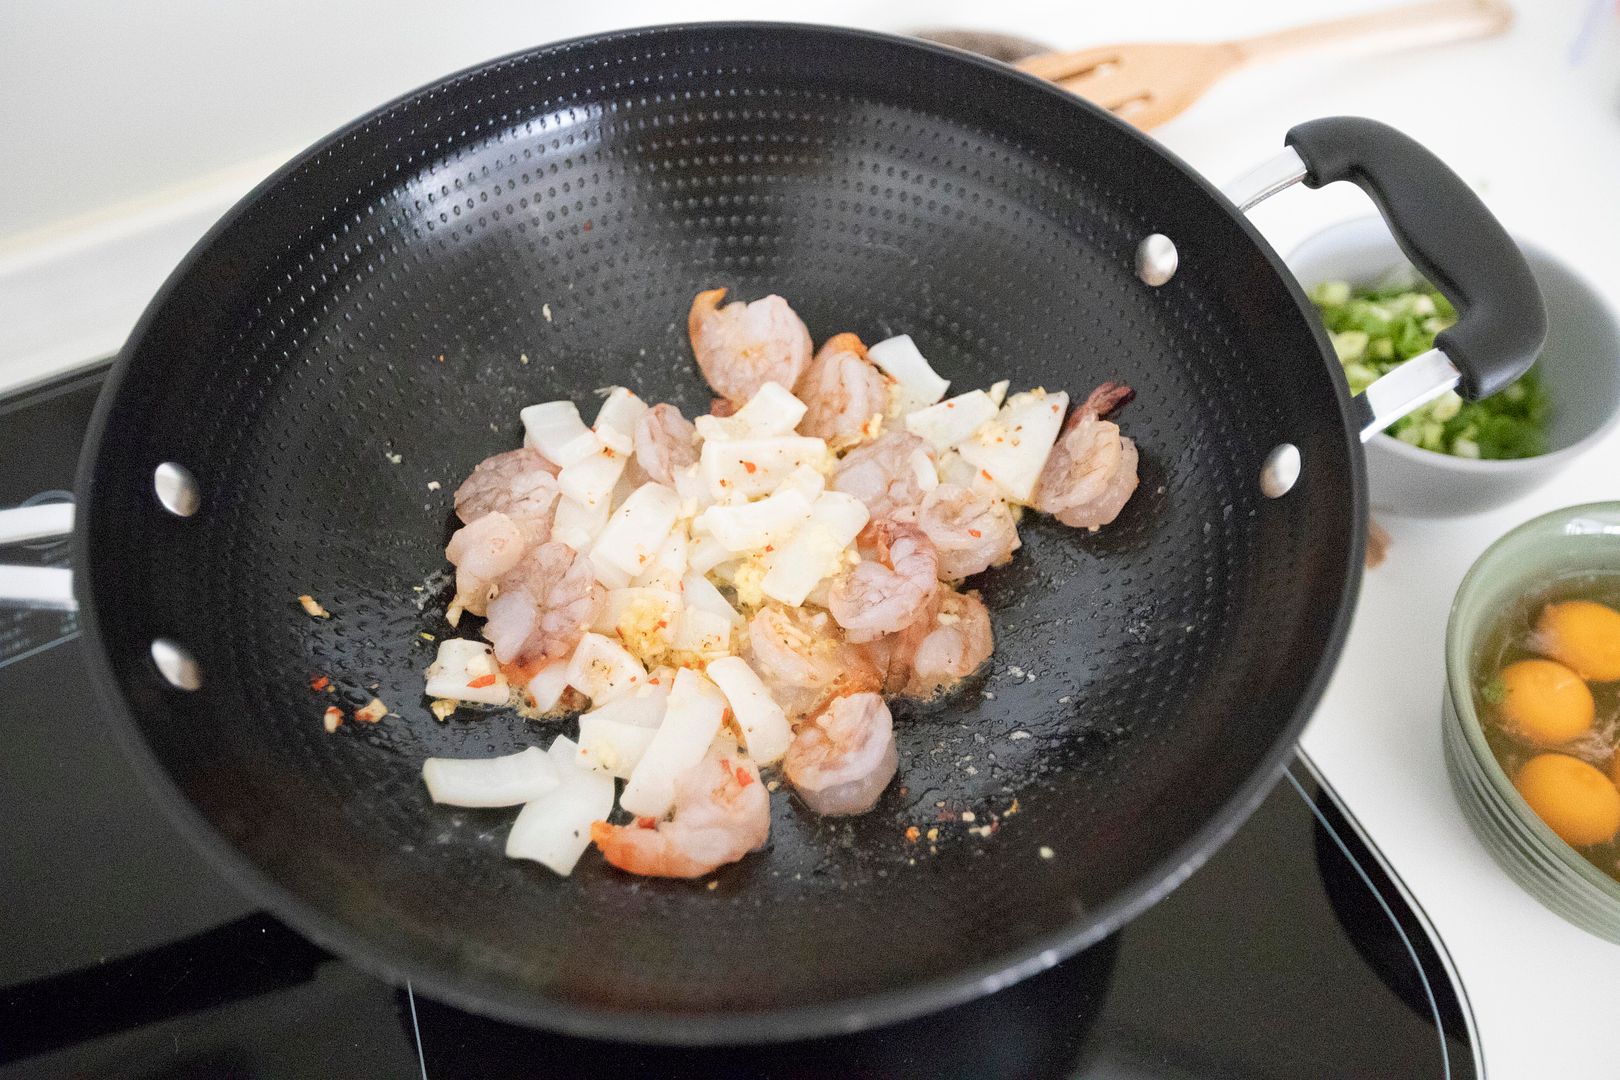
Peel and devein the shrimps. Cut the squid into bite size pieces.
Beat the eggs with 1/2 tablespoon of water and a tiny pinch of salt.
Drizzle some olive oil to a wok, or preferable a non-stick pan, it'll make sure the eggs won't stick to the surface. Use high heat, add in garlic and chili, along with 1/4 teaspoon of salt and 1/4 teaspoon of black pepper. Cook till garlic turns slightly browned but not burnt.
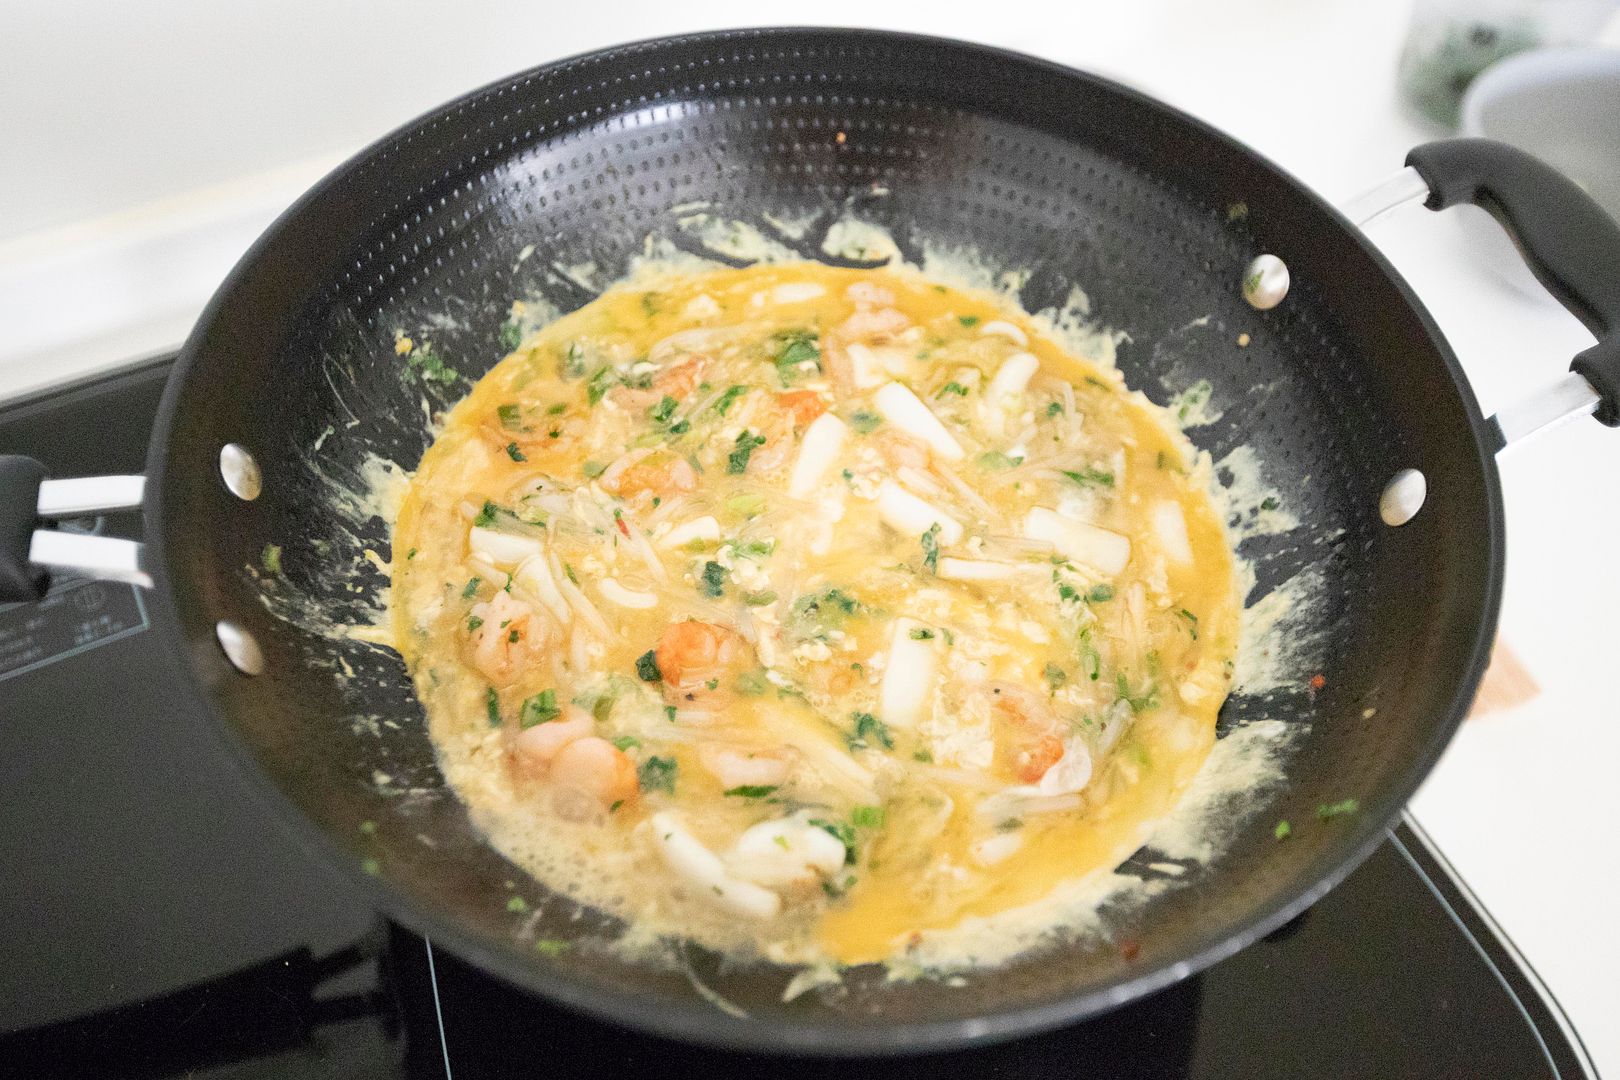
Transfer shrimps and squid over and add in grated ginger. Cook till slightly colored, then quickly add in bean sprouts, 2/3 of chopped scallion, about 1/2 cup of chopped cilantro. Also pour in 2 teaspoons of fish sauce. Give it a quick stir, till shrimps and squid nearly cooked through.
Pour in beaten egg mixture. Stir slightly in the beginning then just let the bottom of the egg mixture to firm up. The whole thing should be fairly thick now, instead of laying out like a thin wrap.
Once the bottom seemed to set, fold half of the mixture over to form a half moon omelet. It can be tricky here, just try your best. If the shape doesn't look perfect, it's fine, we can always cover it up with sweet chili sauce (wink).
Keep searing till colored. You can try to flip the whole thing again, but it can be a daunting job and making all the ingredients falling apart. Or you can simply cover the wok with lid, let the trapped heat finish cooking the rest. Less seared mark and aroma that way, but at least everything is intact.
Once done, flip the omelet onto a serving plate, or just slide to the plate. Pour some sweet chili sauce over and garnish with remaining chopped scallion and cilantro.
After a few bites, I think I kind of know why I was craving for squid.
Usually I'll be searching for boba, which is also slightly chewy like squid. Perhaps that's what happened when my sweets cravings turned into savory dishes. From boba to squid, who'd have thought there's something connected between the two.
Other Thai style dishes:
Just to be honest, days before making this butter and soy sauce fried rice, I went overboard on eating, actually too much junk food. It was time to cut back, so no fancy ingredients, no meats, just the old butter and soy sauce combo, and served with some mixed veggies on the side. It's a compensation kind of thing.
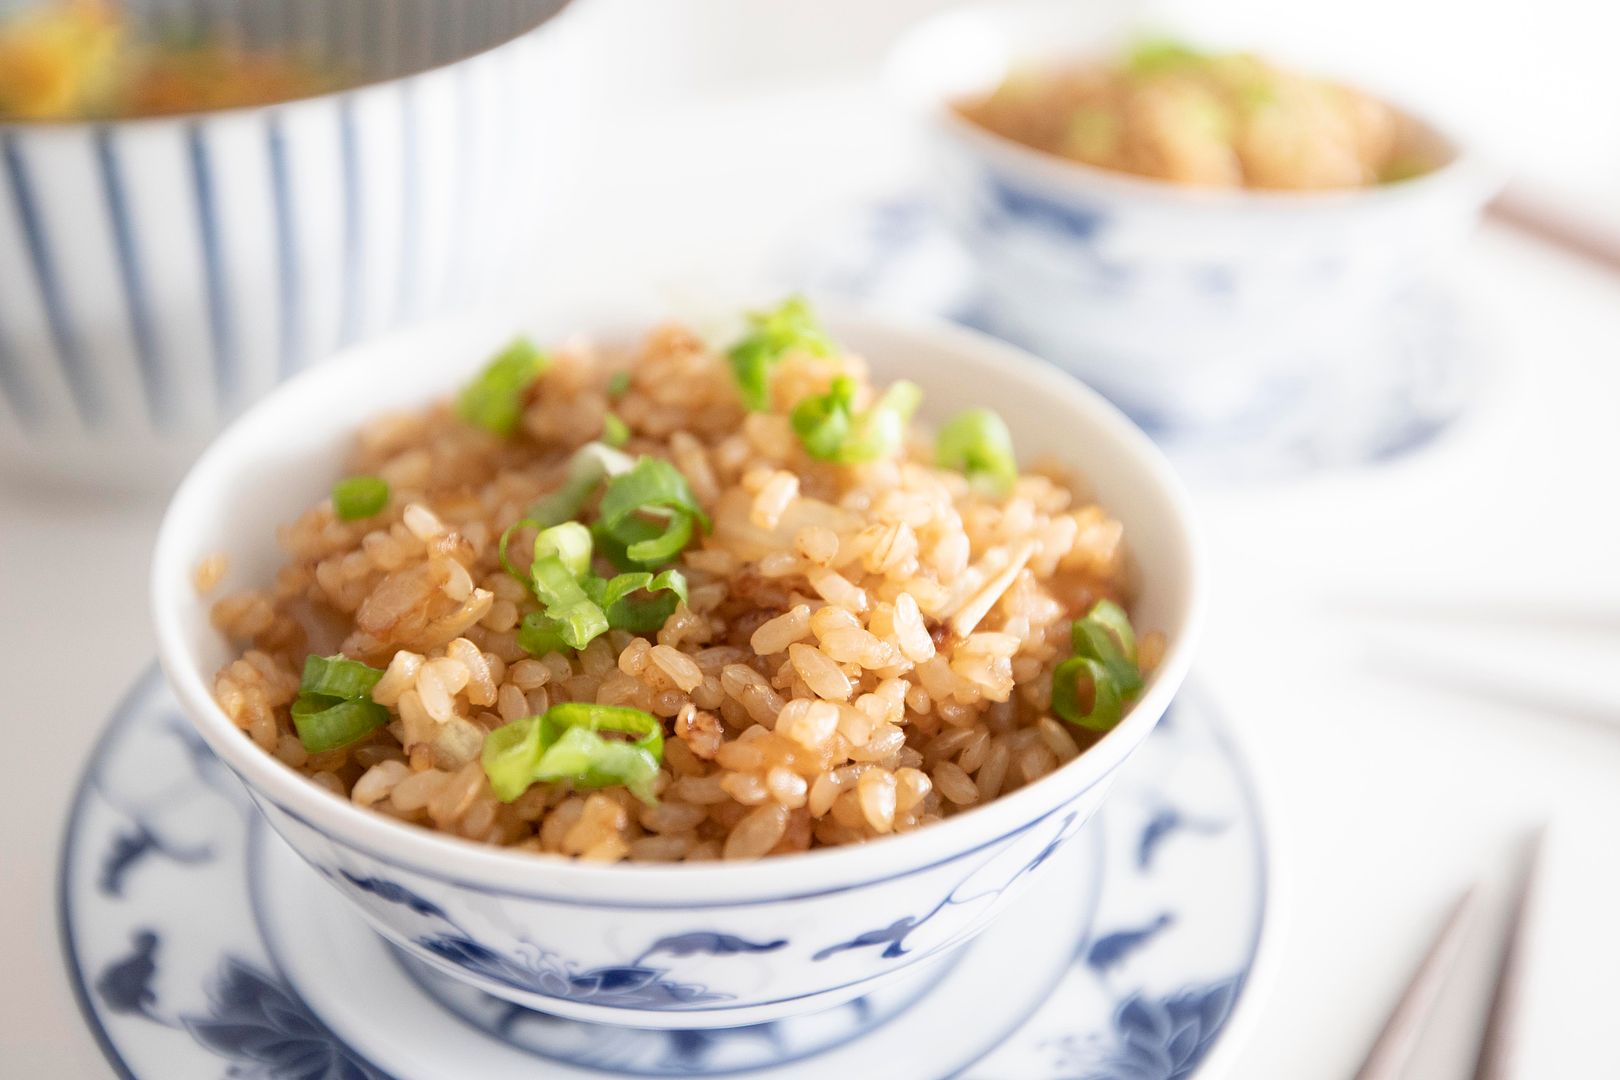
Butter and soy sauce fried rice 奶油醬油炒飯 -
Ingredients (about 3 to 4 portions)?
- 3 rice cups uncooked brown rice
- 1/2 onion
- 1 stalk scallion
- 1/4 teaspoon grated ginger
- 3 tablespoons unsalted butter
- 3 tablespoons soy sauce
- 1/4 teaspoon salt
How?
Cook the rice first, or even make it the day before. Use less water than usual since it's going to be made into fried rice. Be sure to measure the rice using rice cups, not the regular measuring cups.
Destem and chop the scallion. Peel and cube the onion. Grate the ginger.
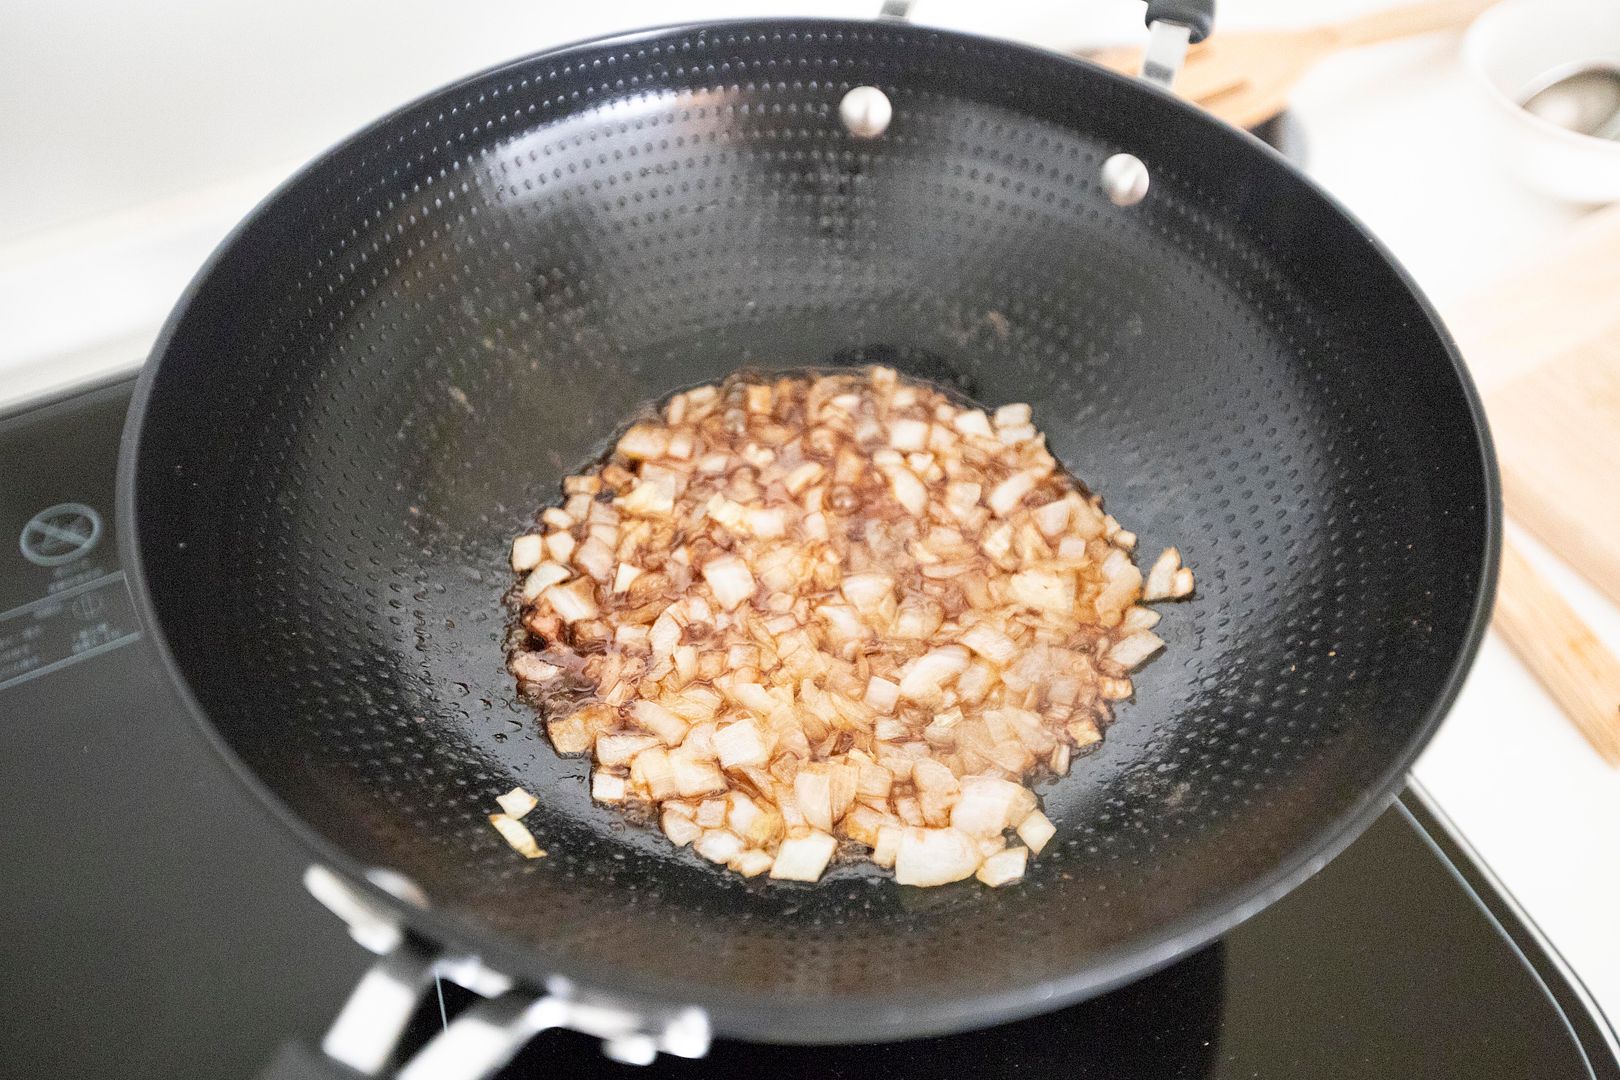
Transfer the butter to a big pan or use a wok. Turn to medium high heat. Add in diced onion, grated ginger, and 1/4 teaspoon of salt.
Give it a stir and cook till the onion turns slightly browned on the edges.
Pour in about 3 tablespoons of soy sauce, cook for a little bit so the heat can further bring out that distinct aroma, should be less than one minute. The soy sauce will reduce a little under such high heat, it's ok, just make sure it won't dry up. If that's the case, use more soy sauce, at least enough to coat the grains later on.
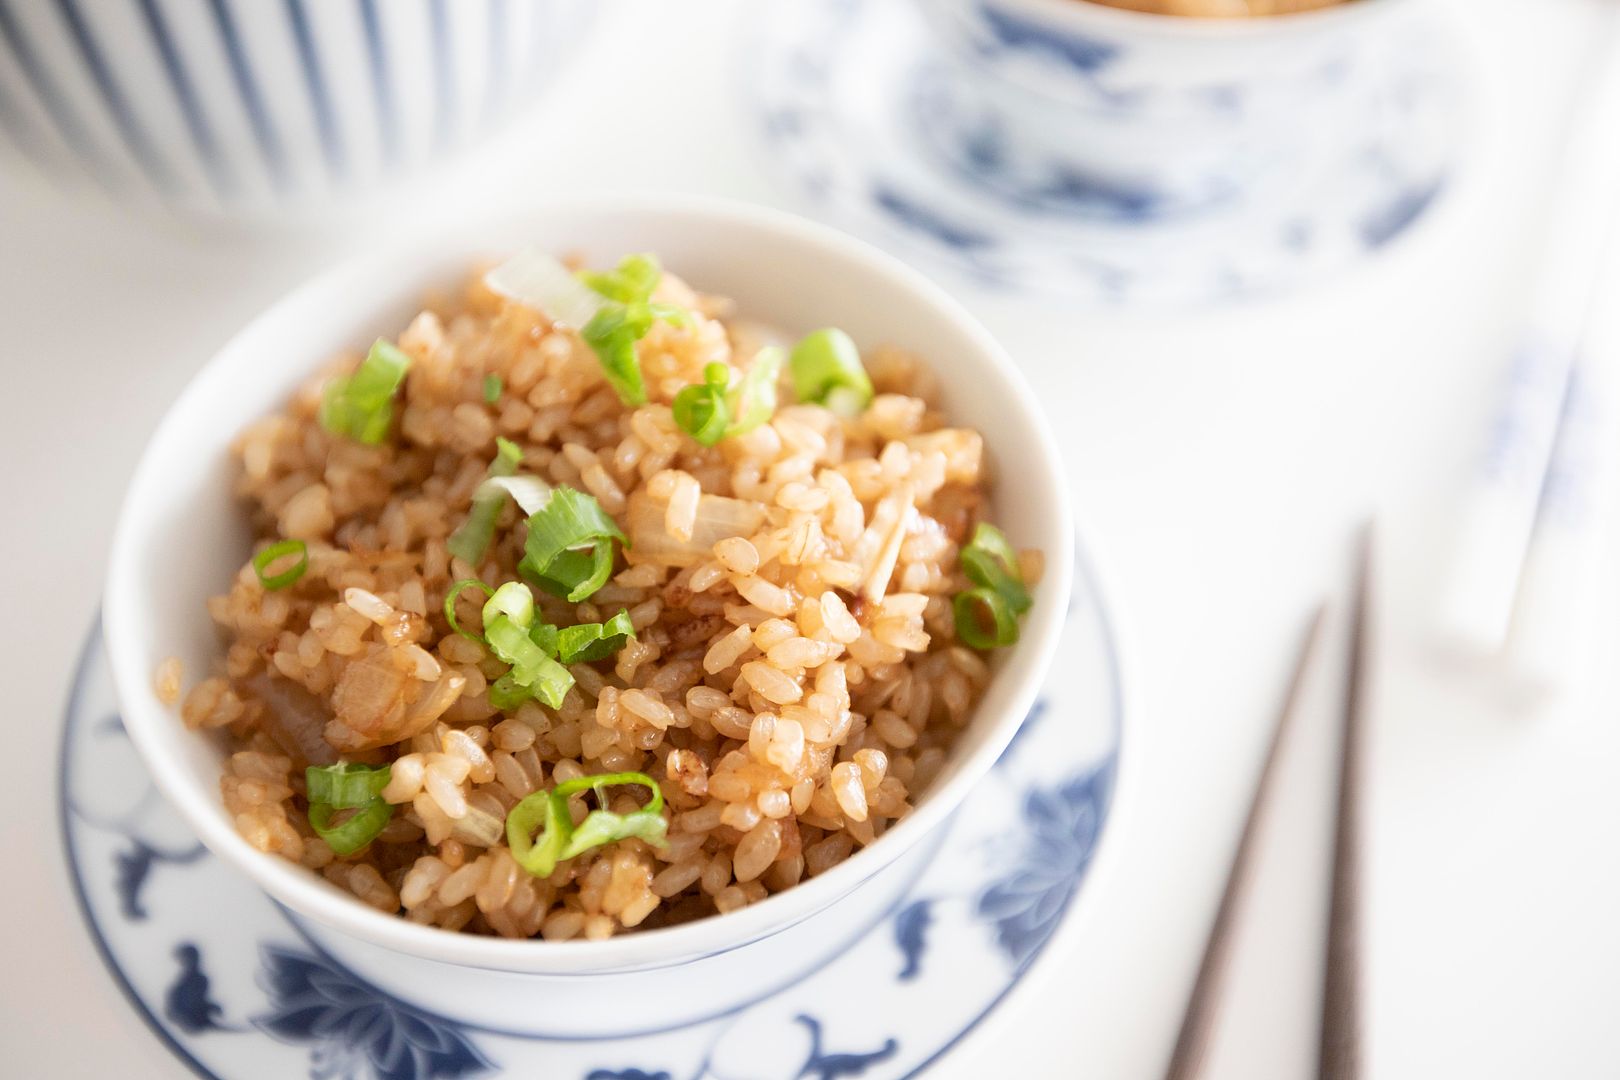
Transfer cooked rice over in two batches. Mix before adding in the second batch. Mix and make sure every grain is coated with our seasoning. Cook till nearly all dried up, the grains should be fluffy and separated in a way.
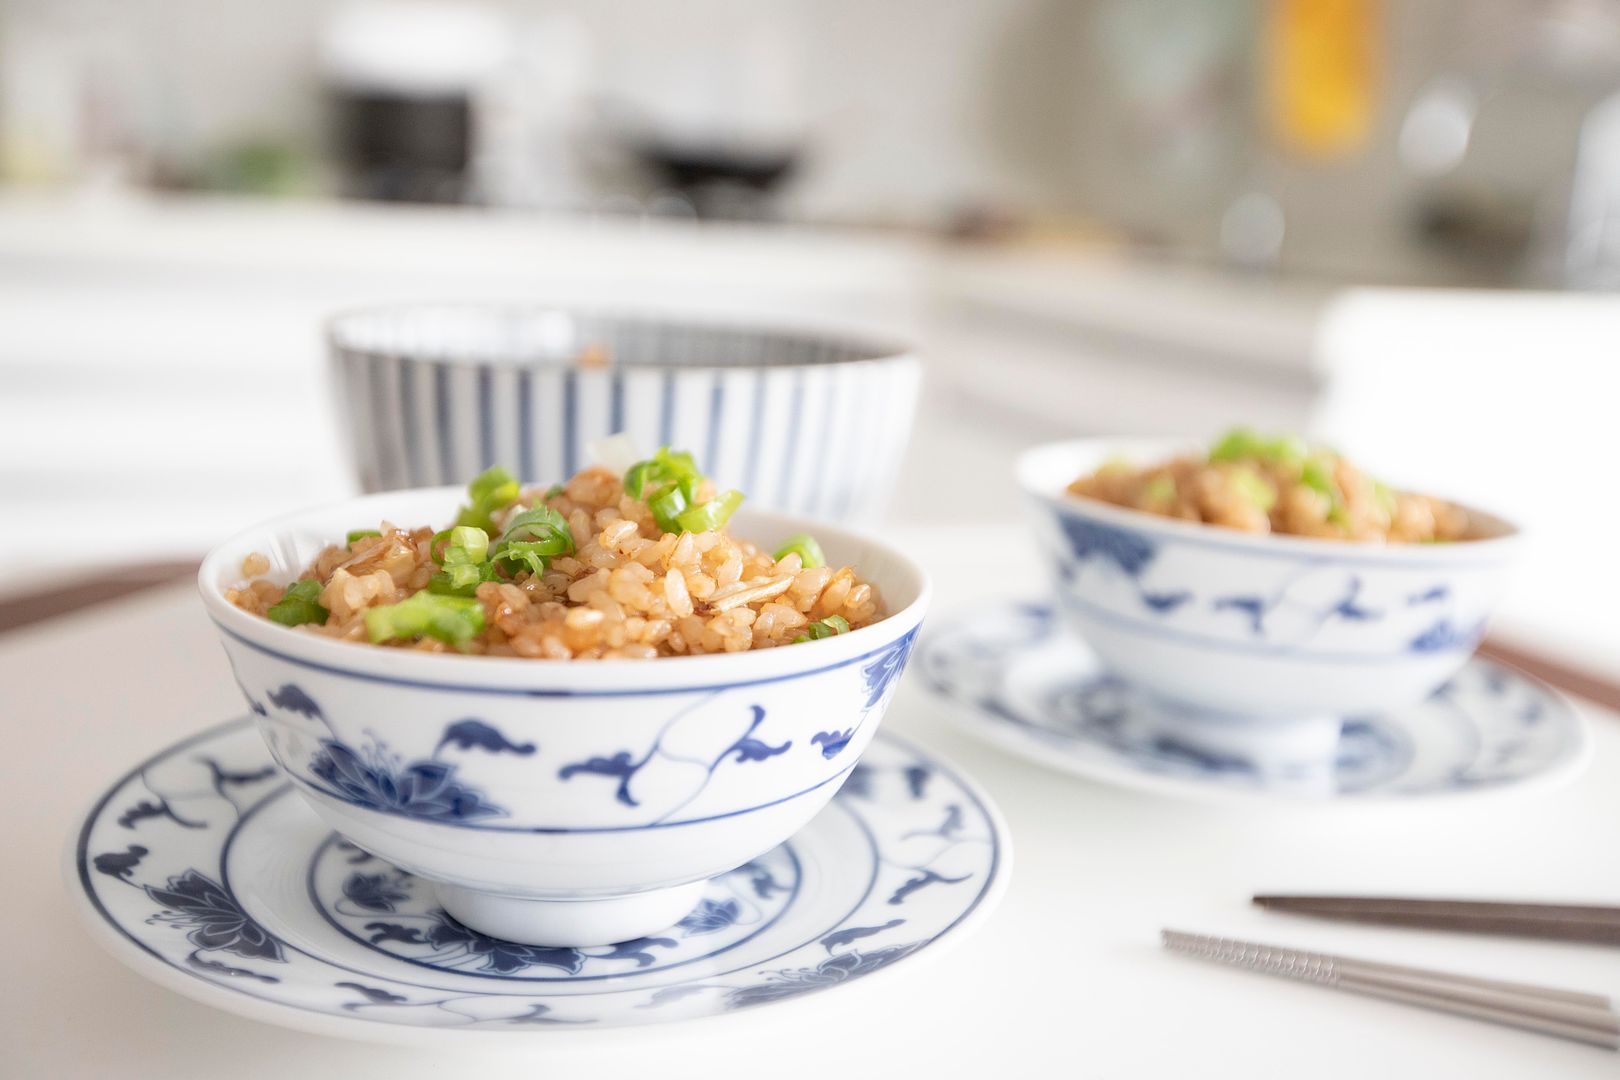
Transfer this simple fried rice to serving bowls and sprinkle with chopped scallion.
Sounds easy, but it can be even harder to get the aroma out. Make sure to fully sear the onion till slightly browned, and let the soy sauce bubbling away to intensify the flavor even more.
Nostalgic it is. Be sure to prep some dishes on the side. Per my case, braised mixed veggies. Something needs to be done to offset my earlier junk food binge.
Other Asian rice recipes:
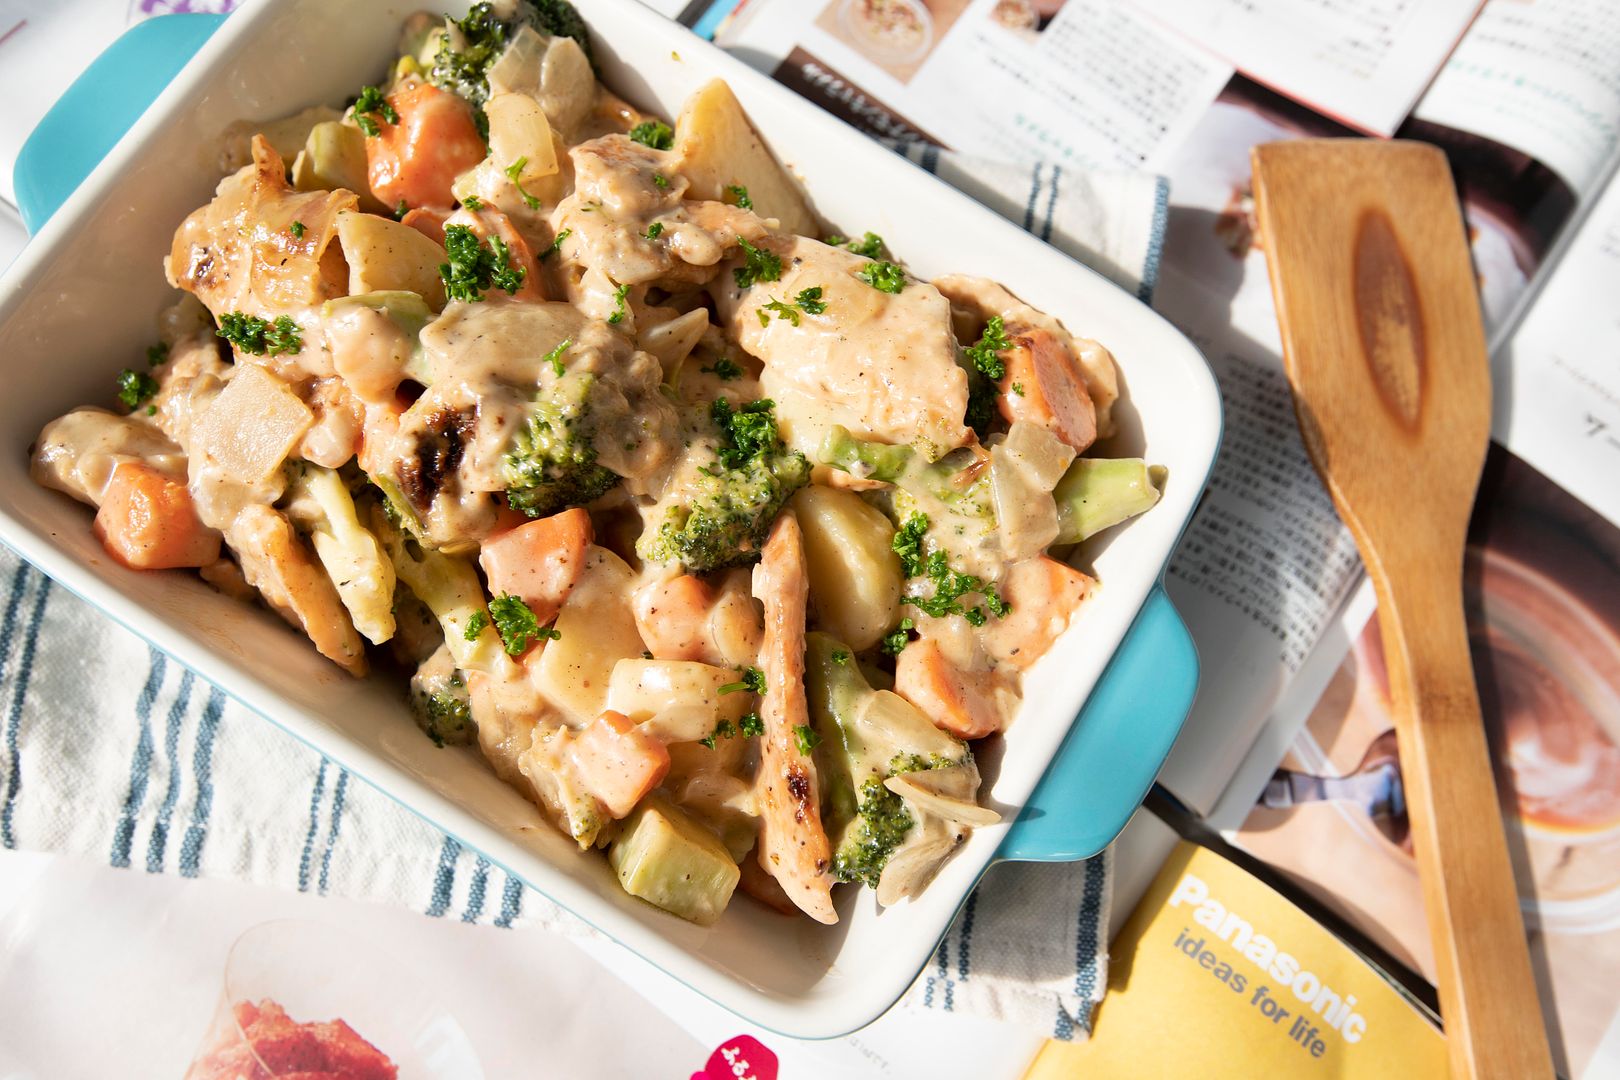
White stew (ホワイトシチュー), a Japanese style stew starting with roux and finished off with heavy whipping cream. However, I feel uneasy calling my version "white" stew, since the result came out somewhat brownish. Maybe not as pretty as a purely "white" stew, but trust me, this darkened version is packed with flavor and will not disappoint.
Japanese salmon stew -
Ingredients?
- 200 grams salmon (fillet preferred, but slices will do too)
- 1 onion
- 2 garlic cloves
- 1 medium/small broccoli
- 2 medium/small carrot
- 3 small potatoes
- 1 cup heavy whipping cream
- 1/2 cup chicken stock
- 4 tablespoons unsalted butter
- Small pinch nutmeg
- Some parsley
- Some flour
- Some salt
- Some black pepper
- Some white wine (optional)
How?
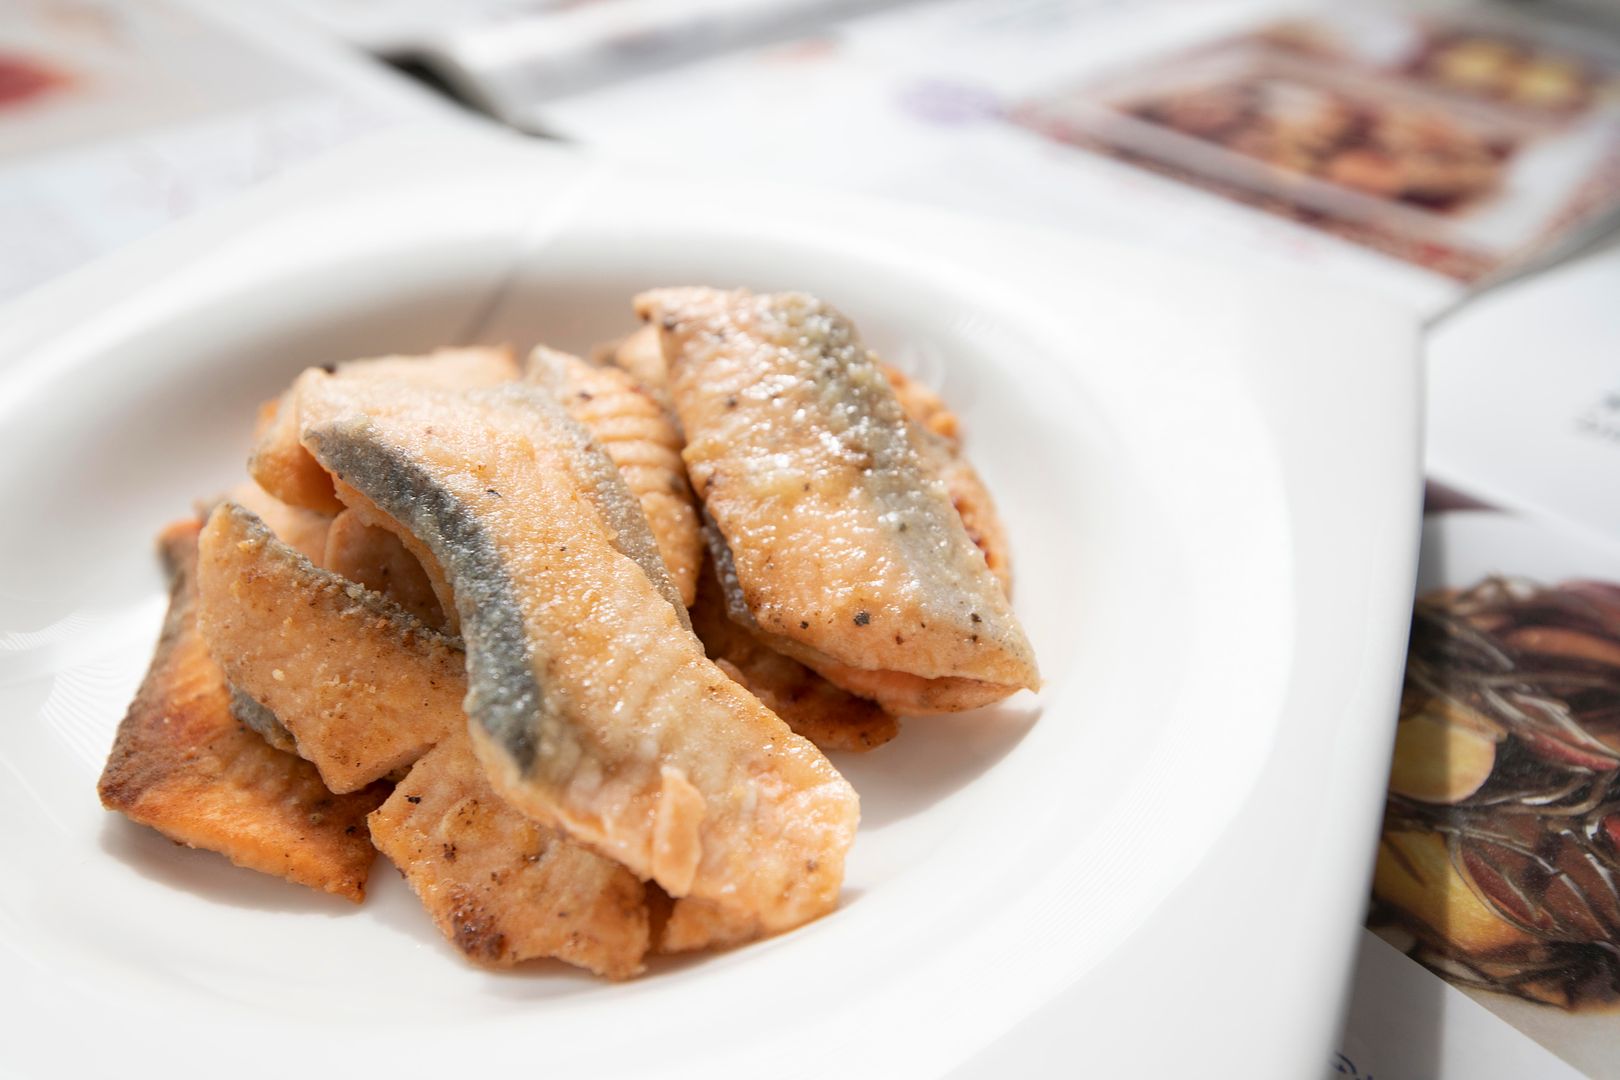
Chunky salmon is preferred, cut into large bite size pieces. I couldn't get a hold of salmon fillet, so had to adapt with thinner slices instead.
Sprinkle some salt and pepper to the fish, then dust with flour.
Add 2 tablespoons of butter to the pot and turn to medium high heat. Once melted, sear the fish till both sides turned slightly browned. Remove from heat and set aside for later use.
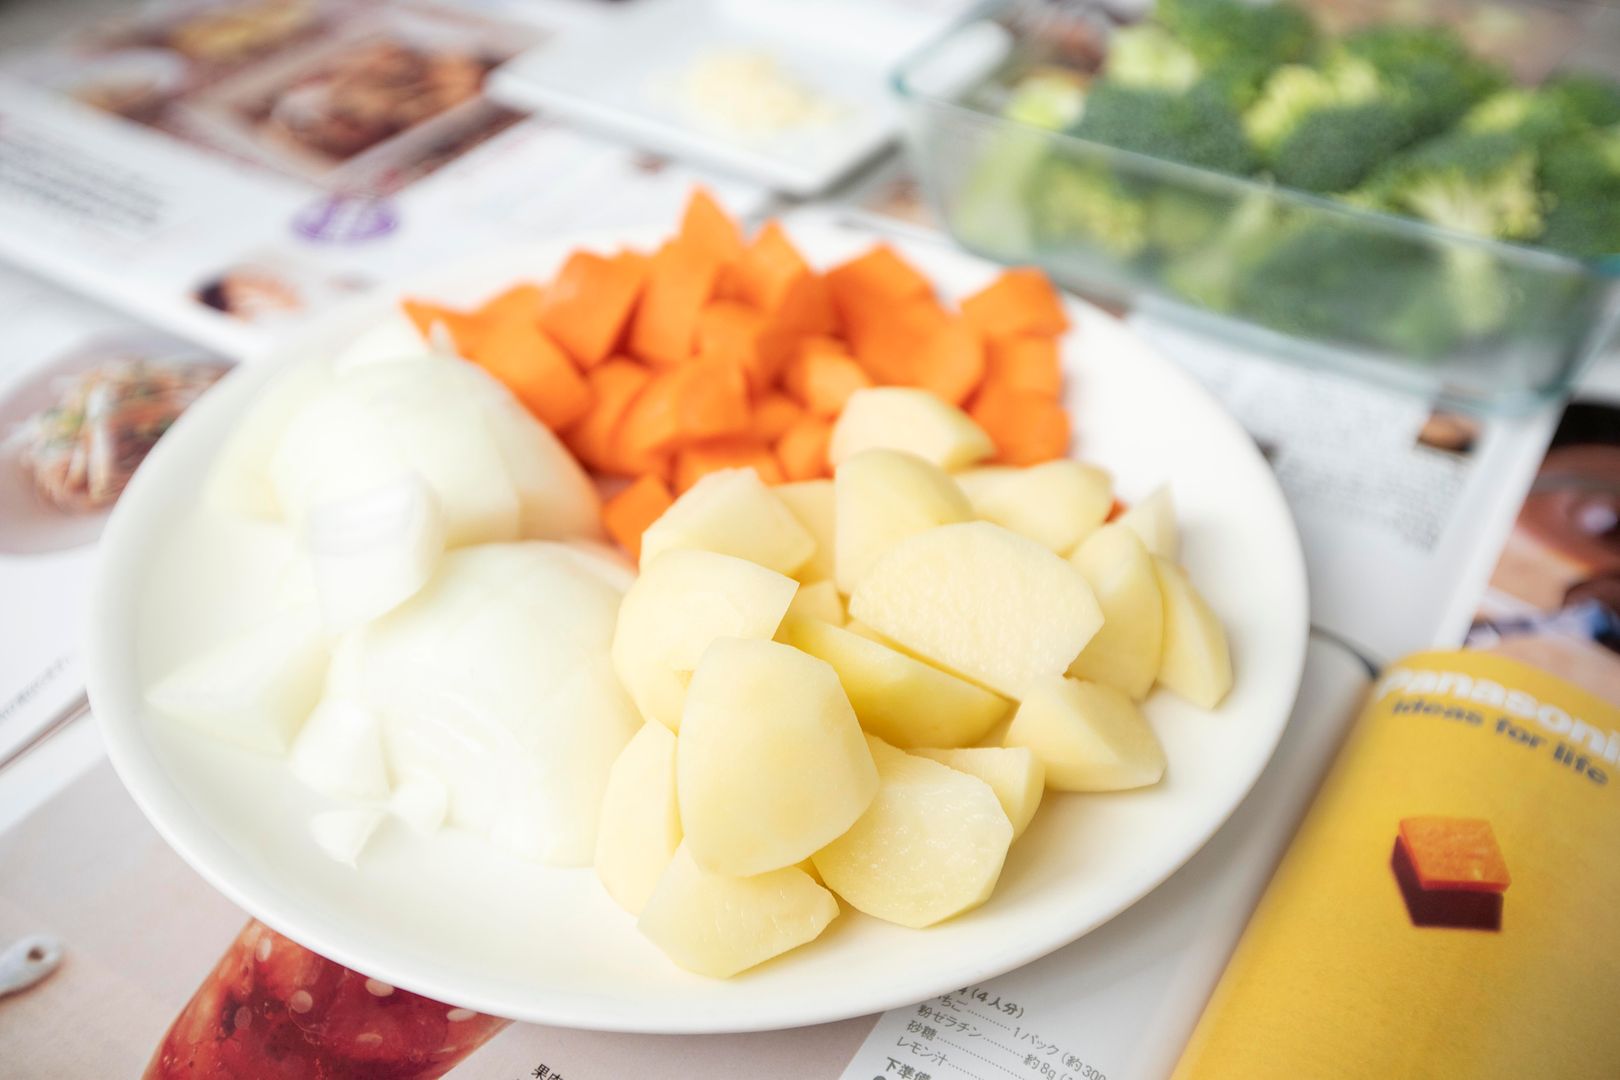
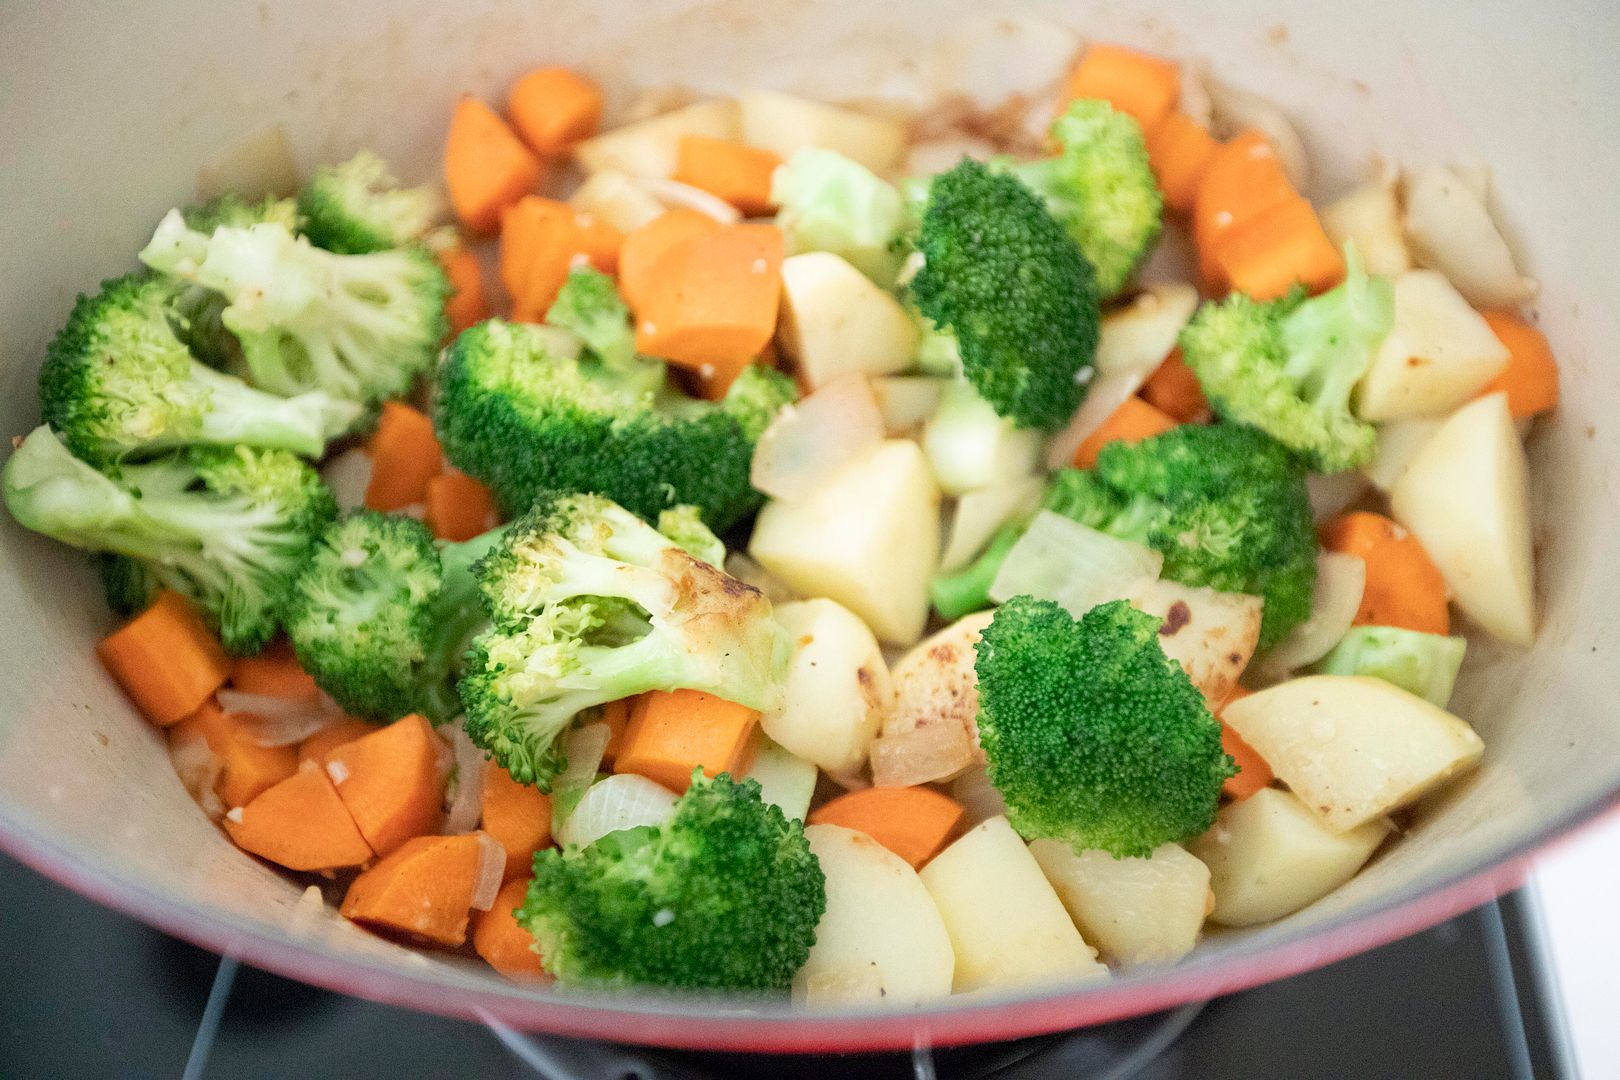
Break the broccoli into smaller pieces. Do not discard the stem, peel away tougher layer then cut into chunks too. Peel and cut the carrot into smaller chunks, do the same with potatoes. Peel and dice the onion. Peel and finely chop garlic cloves. Finely chop some parsley.
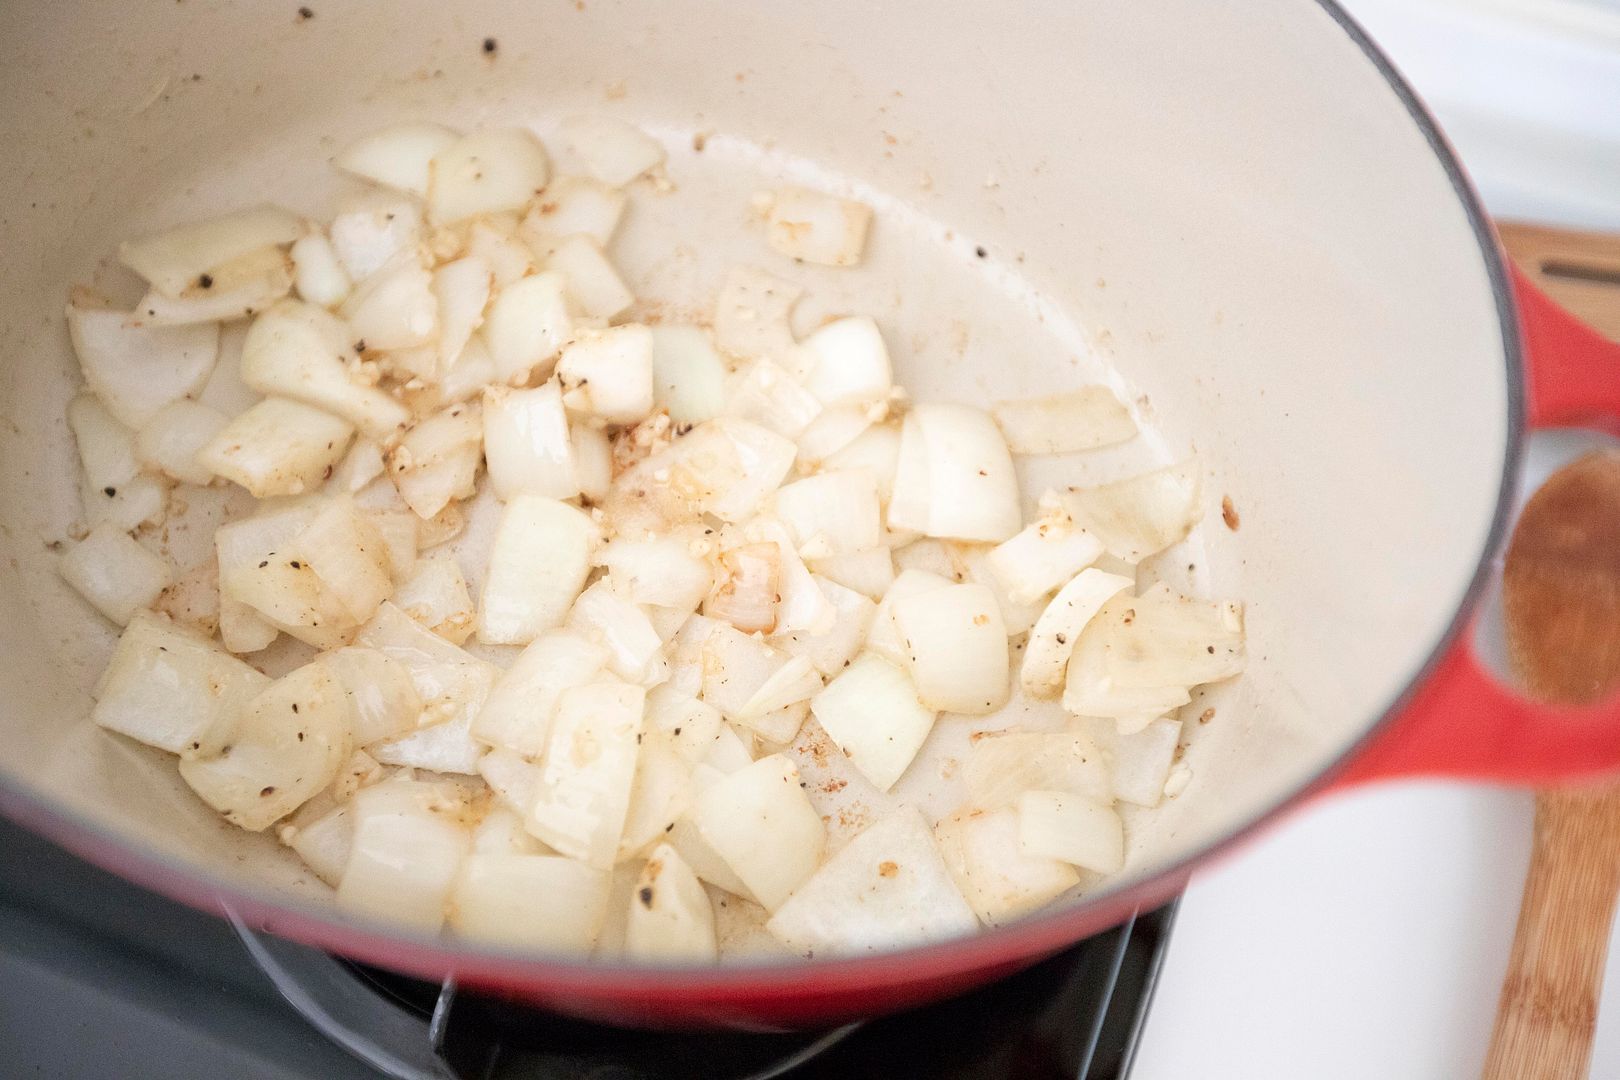
Use the same pot, add in 2 more tablespoons of butter and turn to medium high heat. Transfer chopped onion over along with 1 teaspoon of salt and 1/4 teaspoon of black pepper. Cook till the onion turns translucent. Add in garlic and cook for another 30 seconds or so.
Transfer broccoli, carrot, and potatoes over. Sear and wait till they get slightly softened, it can take up to 10 minutes or so.
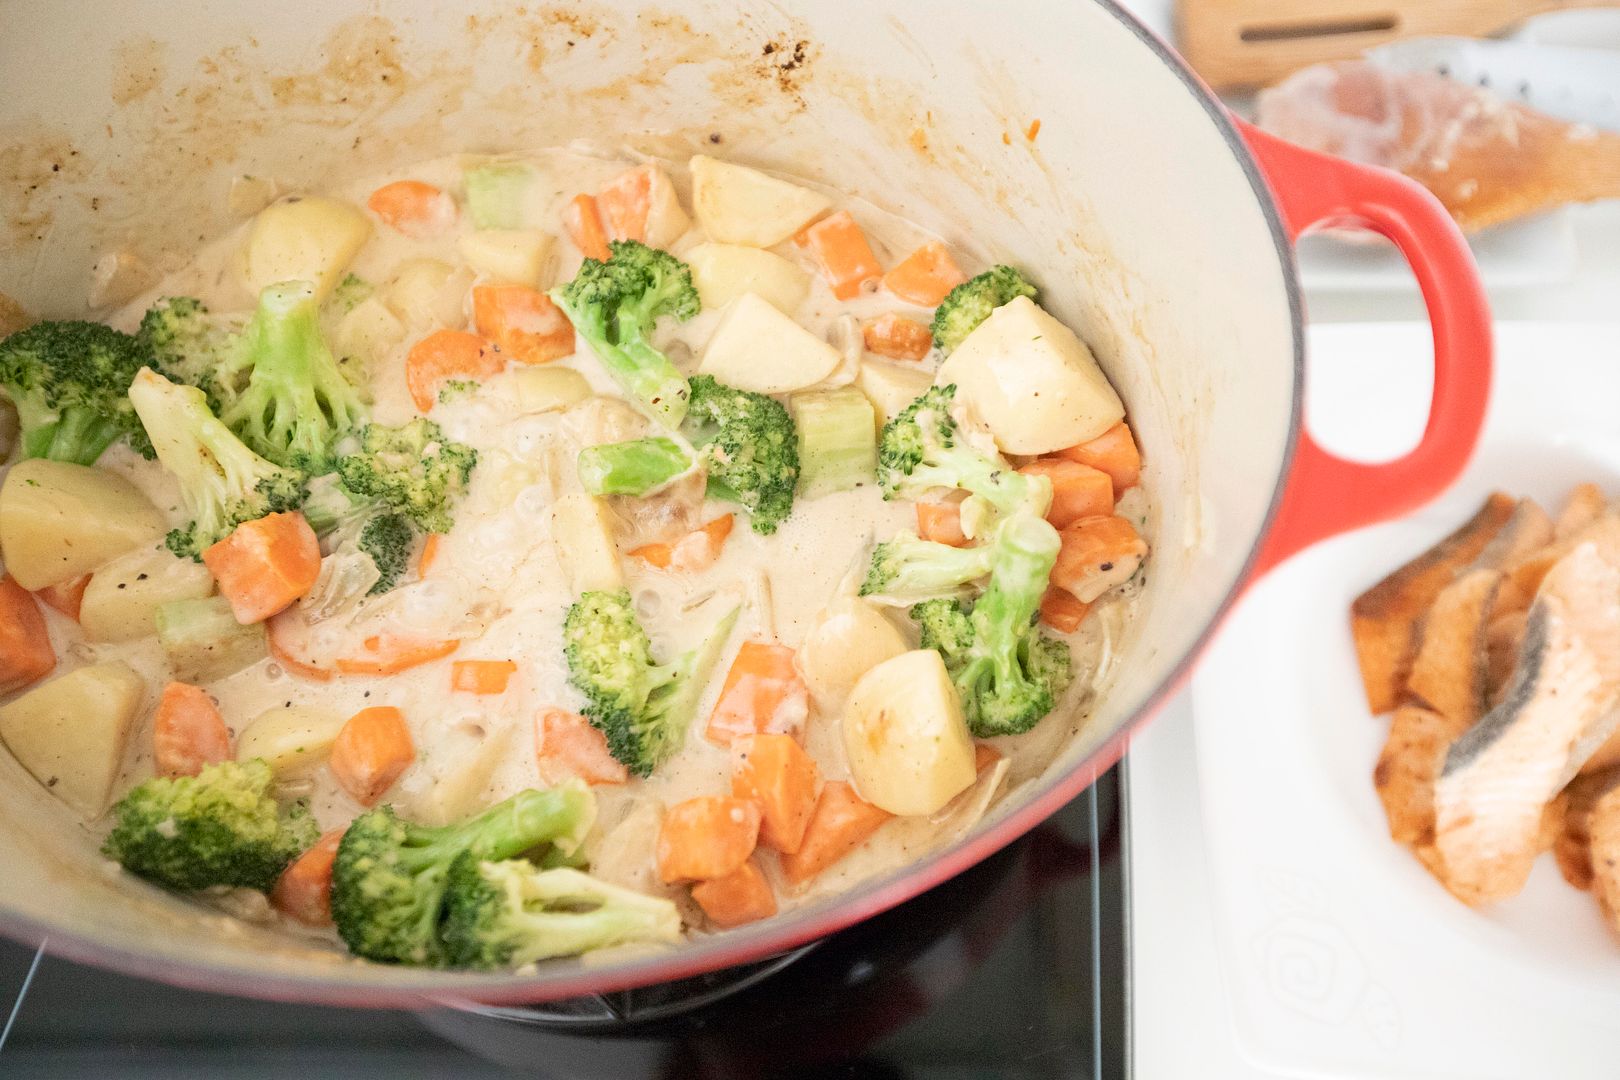
Add in about 2 tablespoons of flour and give it a quick mix, a thicker roux will start to form. Pour in chicken stock, also few splashes of wine if using. Cook for couple minutes.
Pour in heavy whipping cream and bring the whole pot to a slight boil, then keep it at a simmer. Taste and adjust with salt if needed.
Salmon goes in now, also small pinch of nutmeg. Simmer for another 20 to 25 minutes.
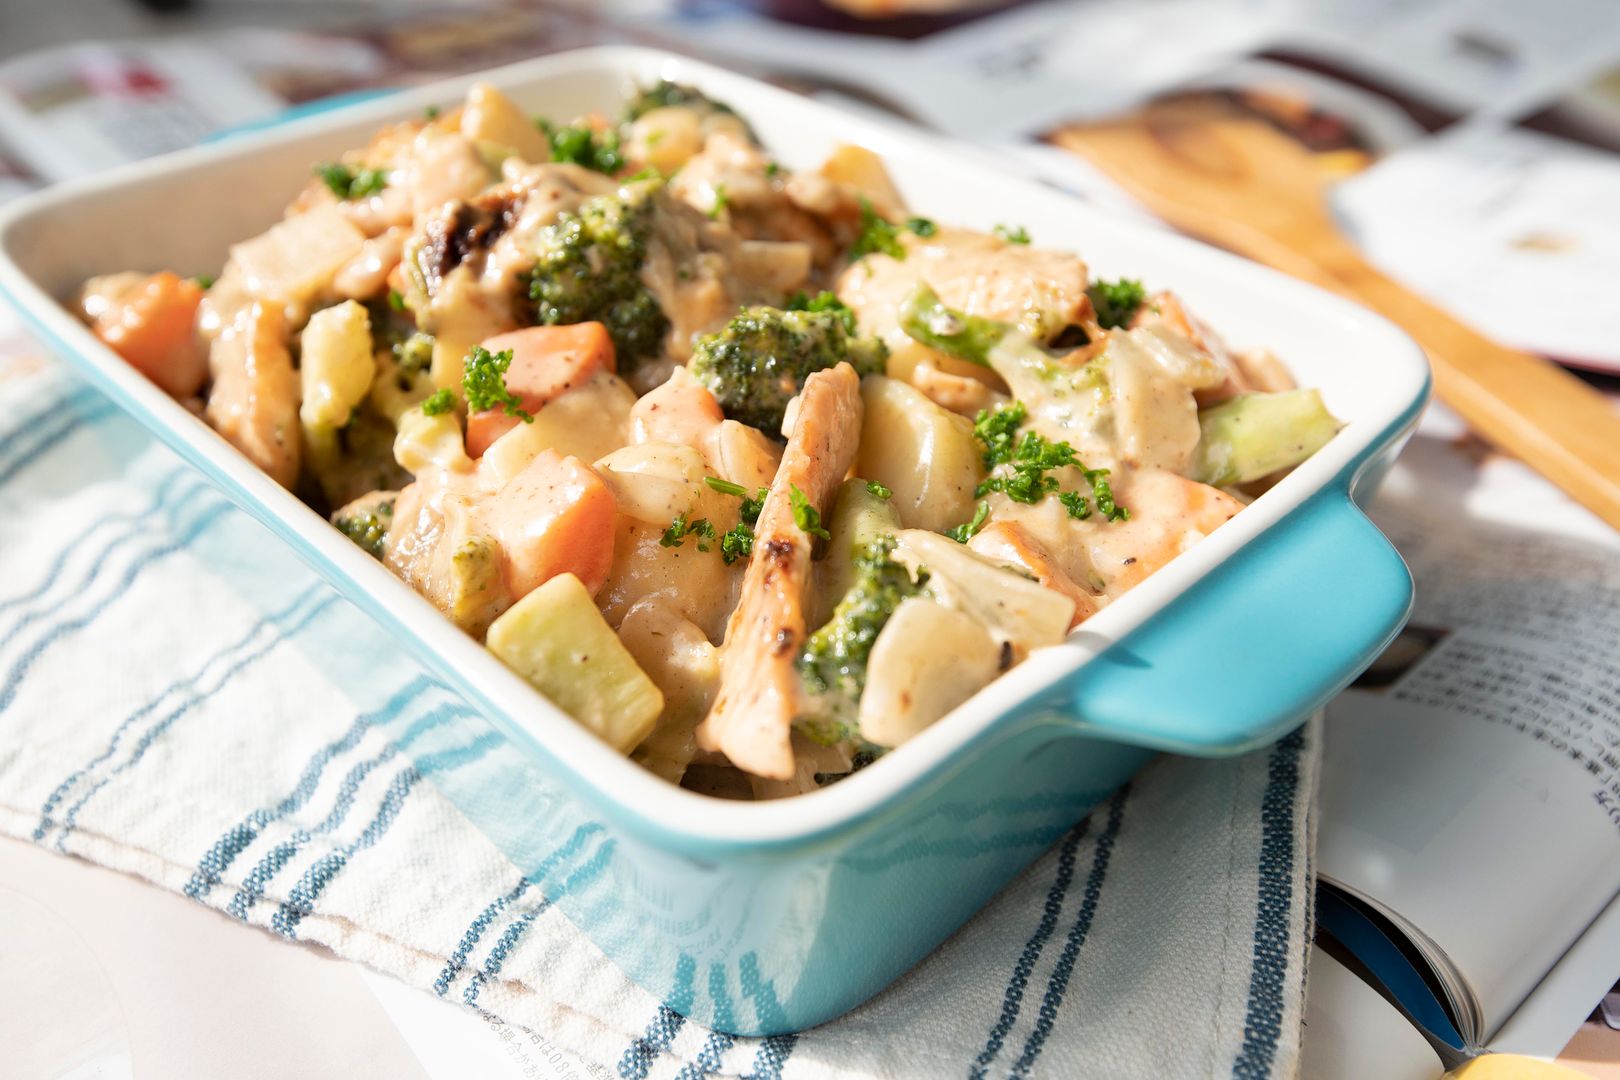
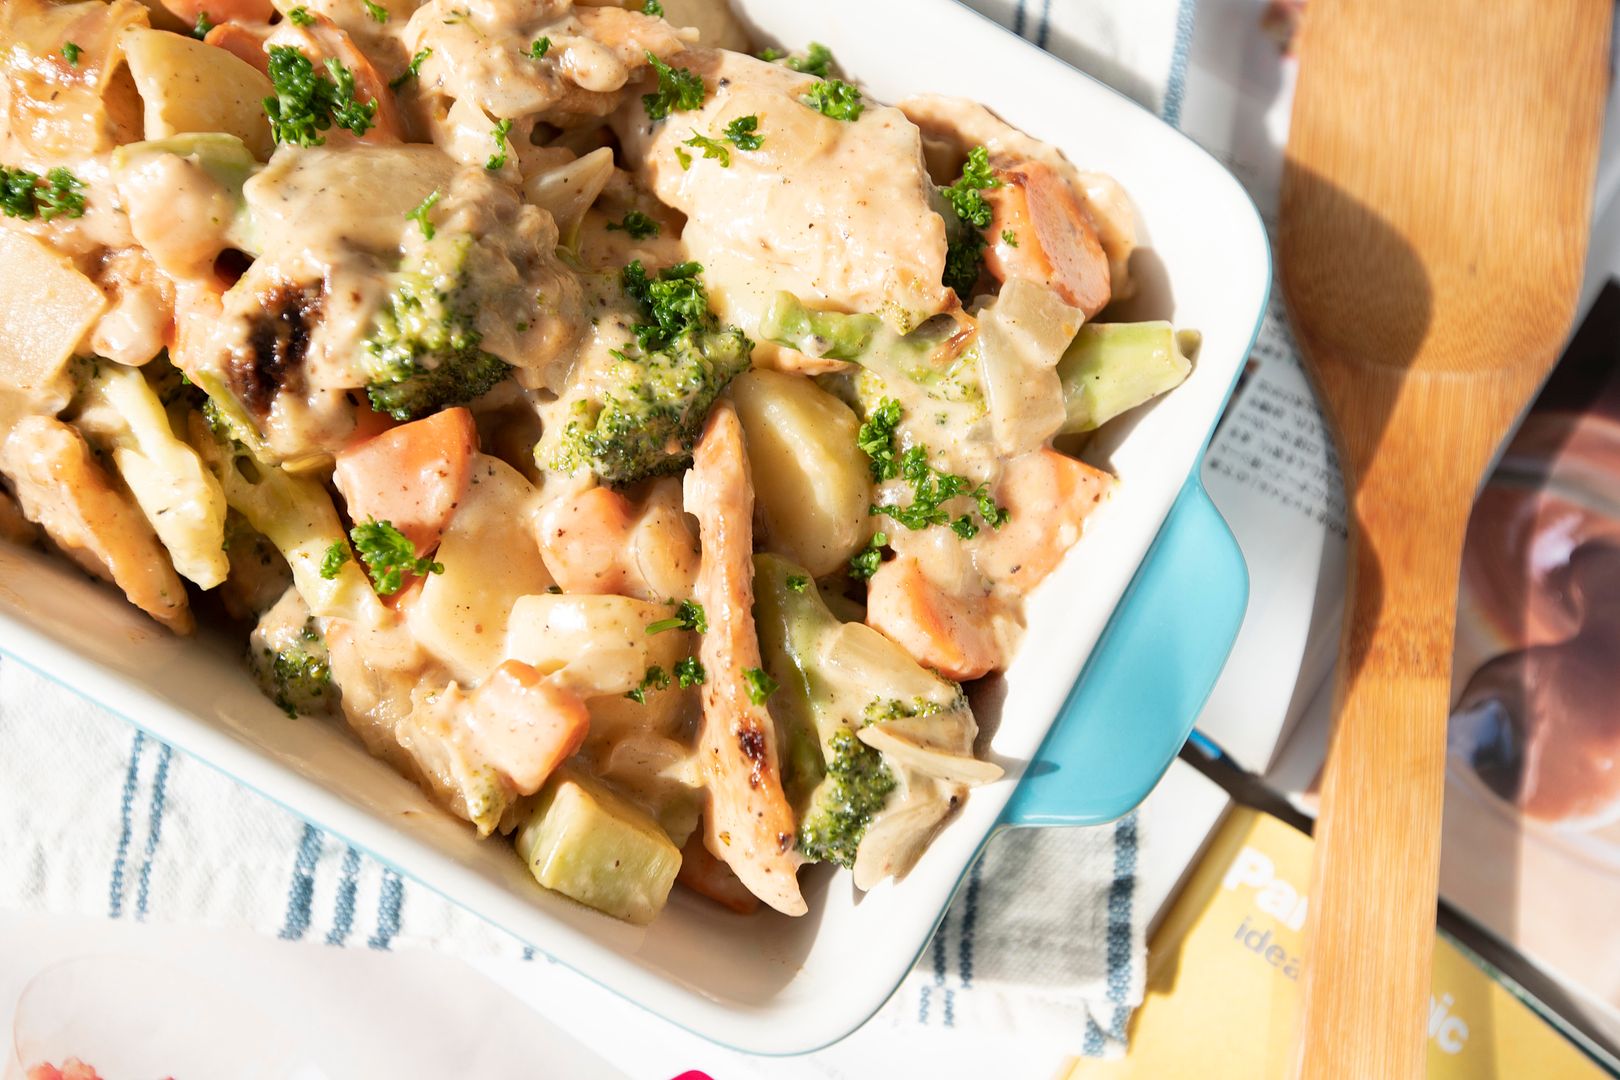
Once ready, transfer to a serving dish if desired. Garnish with chopped parsley right before serving.
One tip here, dice these root vegetables to even smaller pieces to speed up the cooking time.
My finished dish should be more like a braise than stew, but I'll stick with its Japanese origin and kept the name "stew." Either way, as long as it tastes good, don't bother with such details.
Other stew recipes:
This recipe is adapted from another blog LiveLoveLaughFood. The original recipe calls for Gorgonzola, but I use Bavarian blue, another type of blue cheese instead. Also there are some variations on the amount of ingredients applied. But mostly, I've taken on the method used to make the cheese cream for the savory tart, the end result was better than expected, very addicting so to speak.
Blue cheese and asparagus tart -
Ingredients (makes about 6 pieces)?
- Some frozen puff pastry (enough to cover the area of a baking sheet)
- 4 ounces or 114 grams Bavarian blue cheese
- 114 grams or about 2 dozen asparagus (medium thickness)
- 1/2 cup heavy whipping cream
- 1 egg
- Some aged Parmigiano Reggiano
- Some olive oil
- Some salt
- Some black pepper
How?
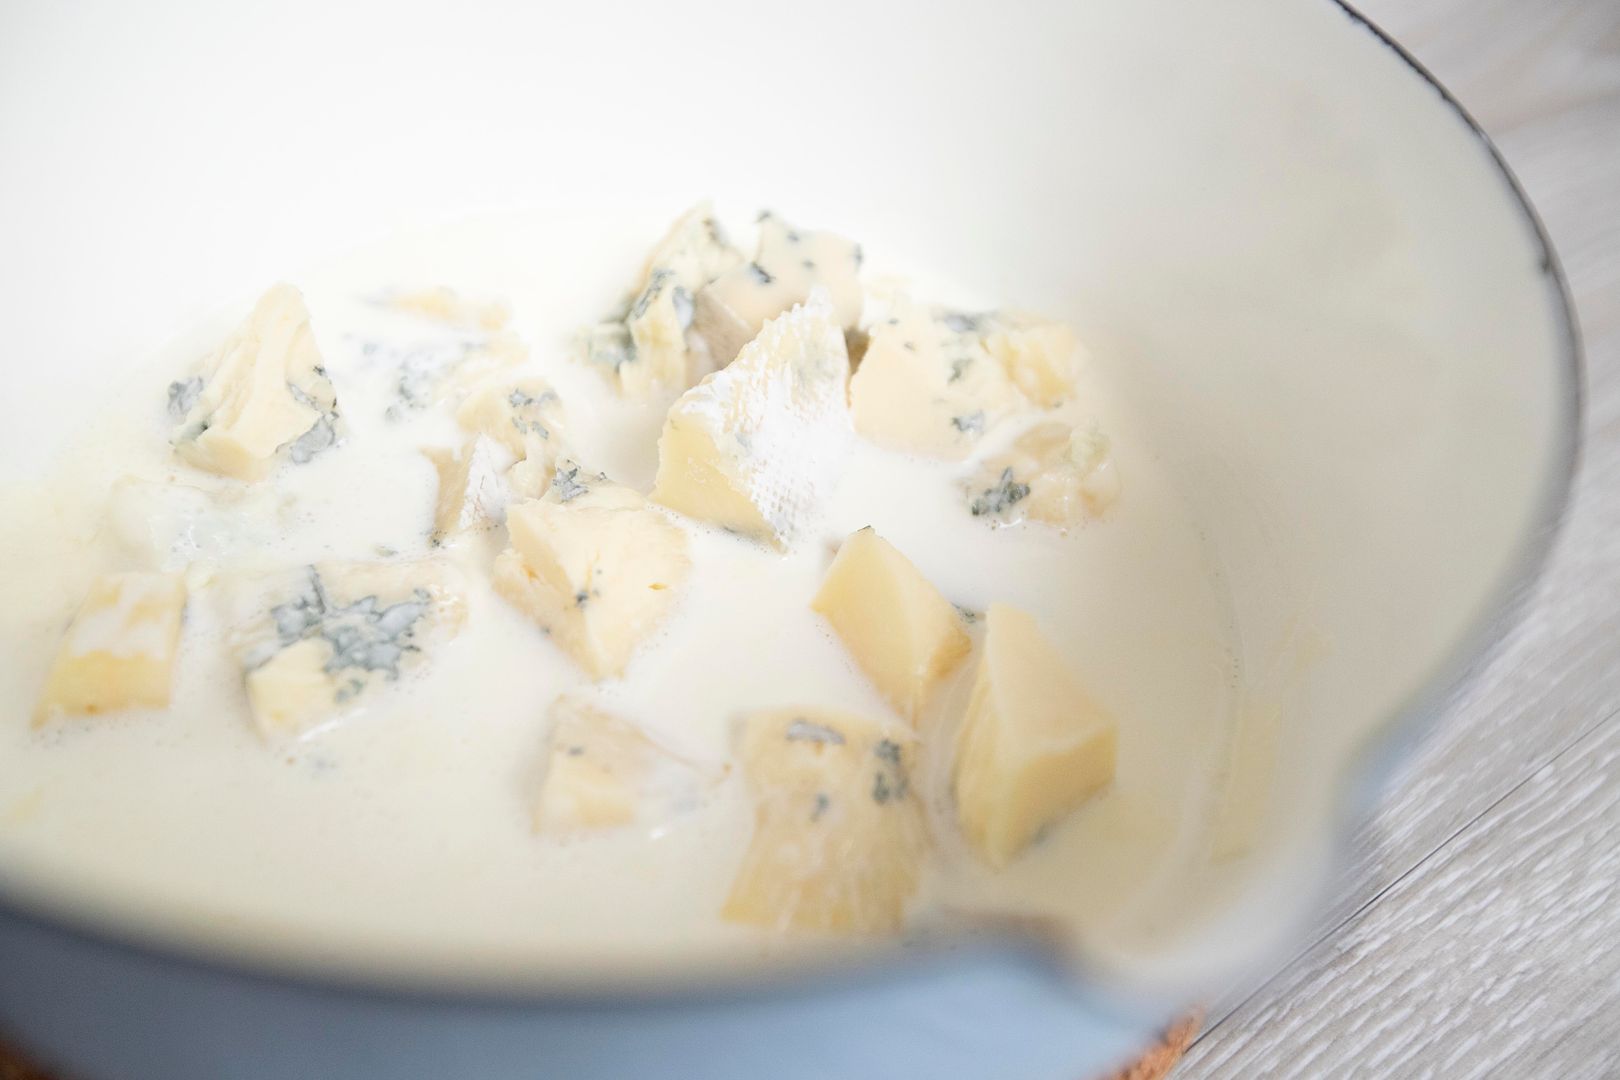
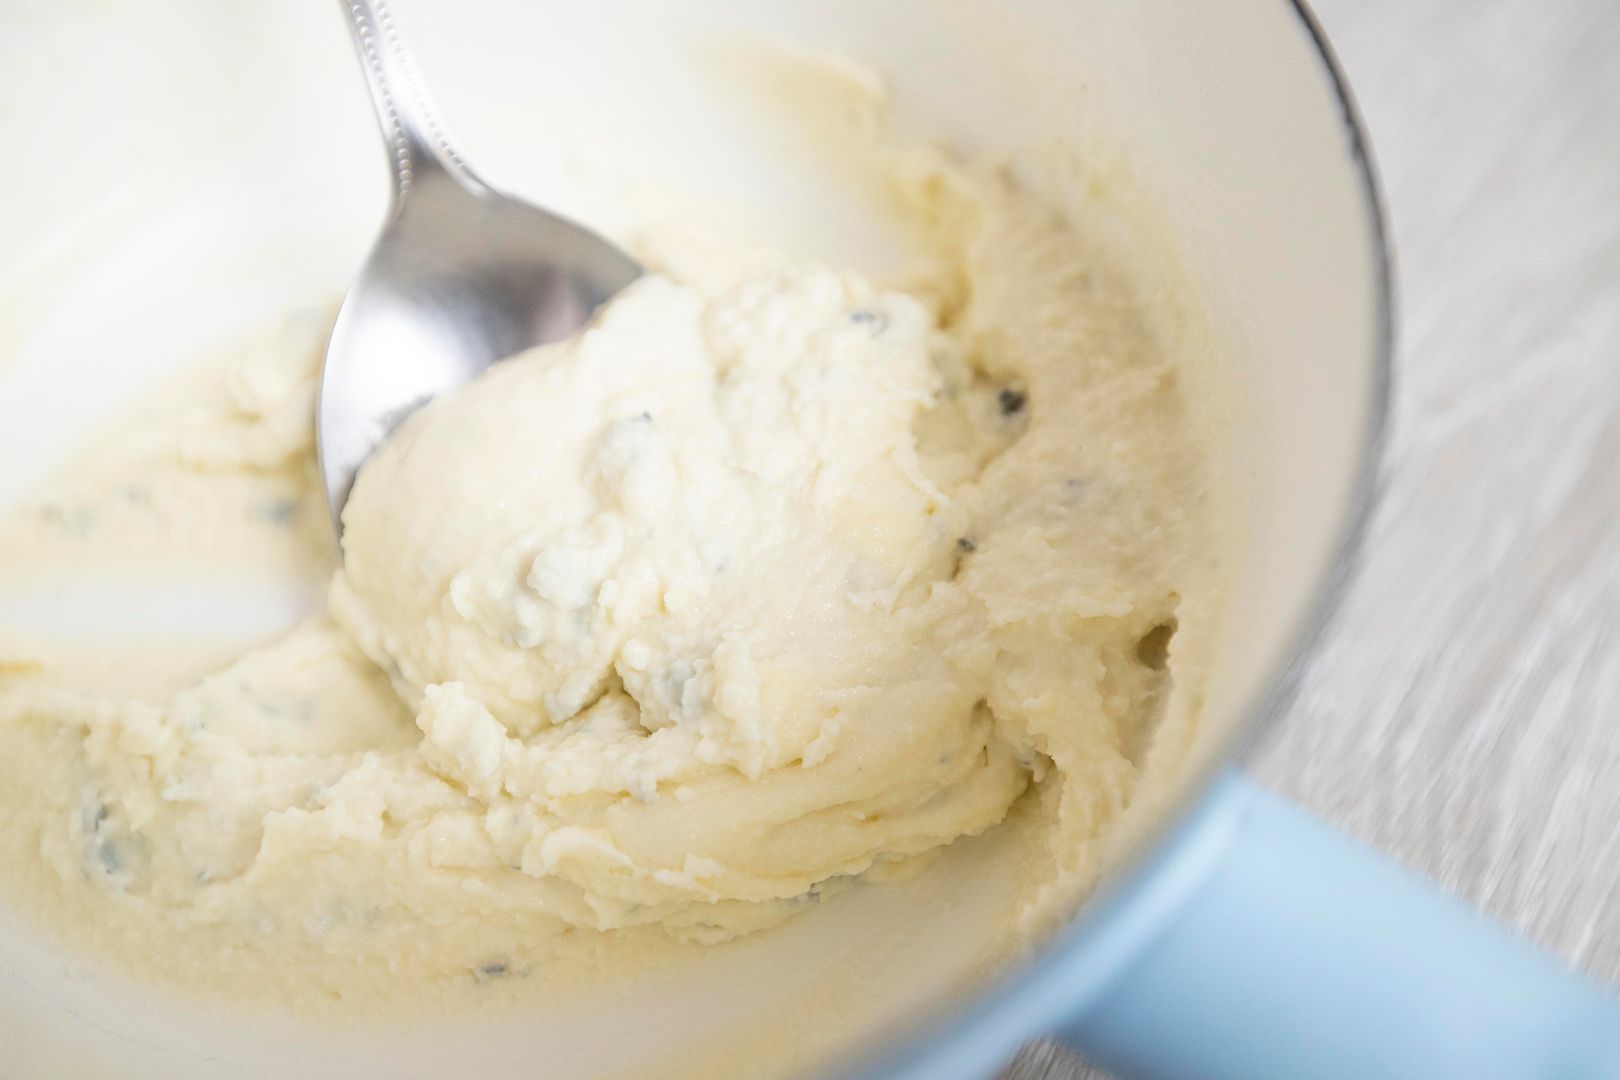
Melt the cheese ahead of time since it needs to cool down again in the fridge for about an hour. Fill a pot with heavy whipping cream and bring to a simmer. Break the cheese into the pot and turn to medium low heat. Keep whisking and wait till the cheese has been nearly melted and incorporate with the cream.
Cover with foil and transfer the whole thing into the fridge. Wait till the cheese and cream mixture firms up a little, with texture similar to a very thick paste, about one hour.
Preheat the oven to 400 degrees Fahrenheit or 204 degrees Celsius. Line a baking sheet with parchment paper.
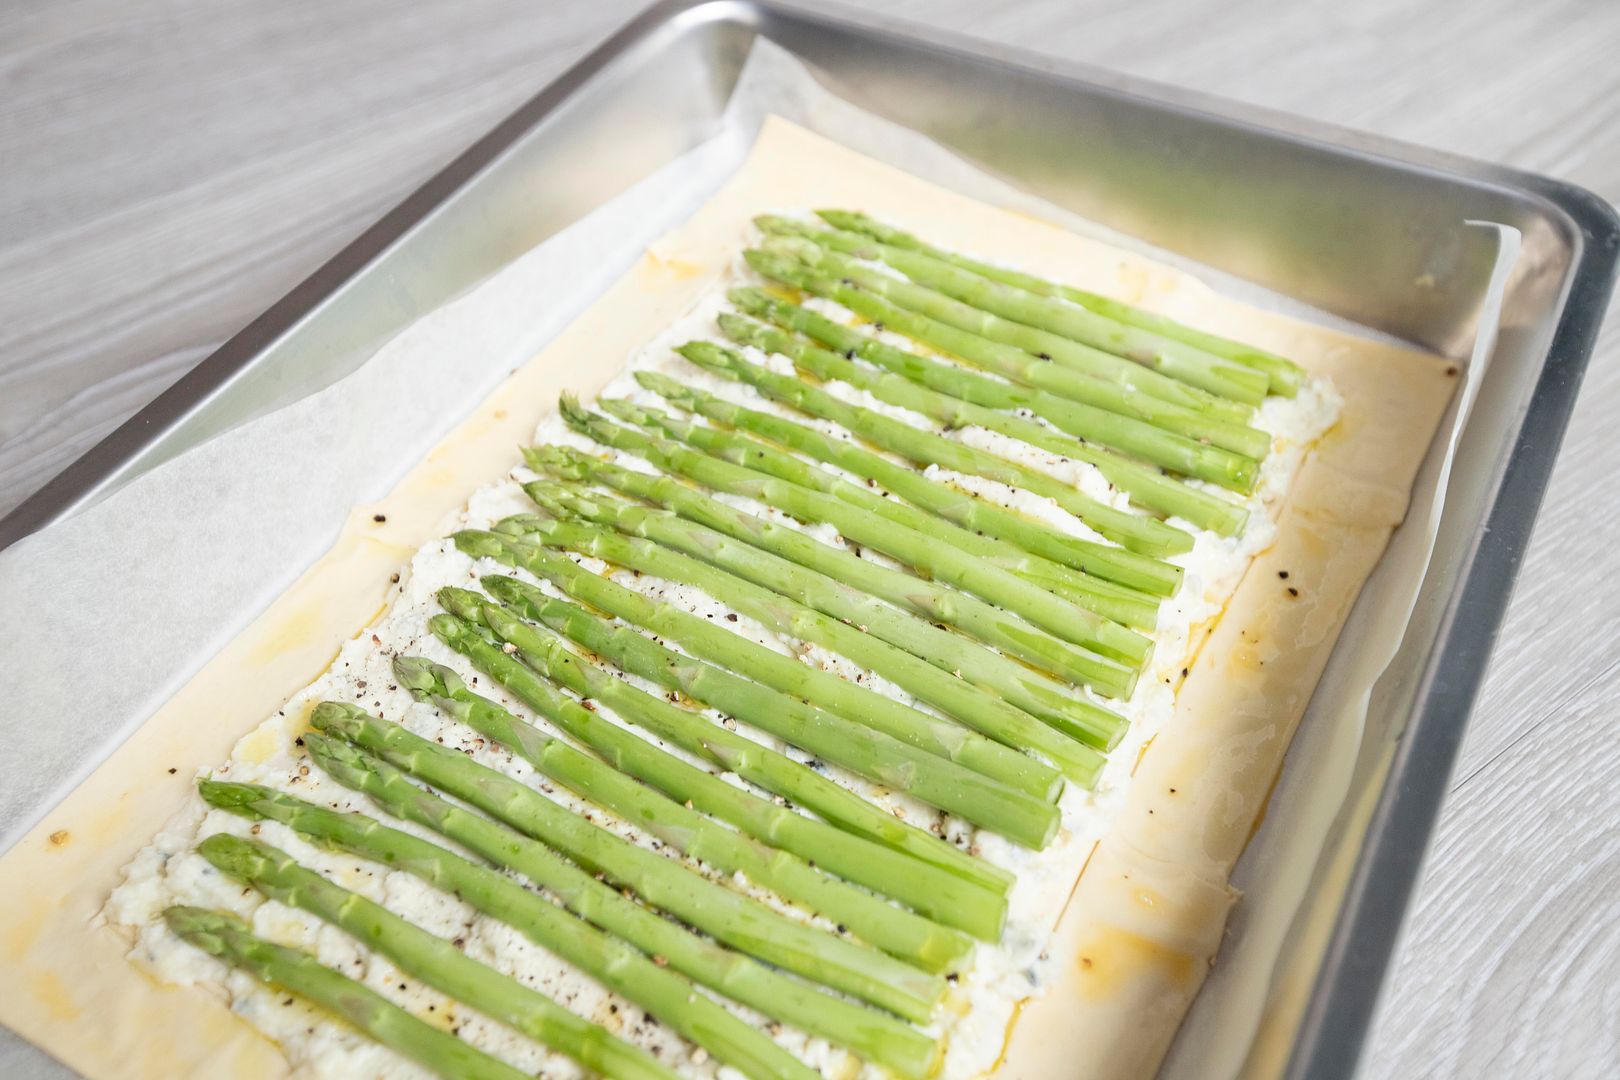
Thaw the frozen puff pastry according to package instruction. Beat one egg as egg wash and set aside for later use. Trim the asparagus if needed, also trim off the very end that might be too tough to chew on.
Transfer the puff pastry to the baking sheet, shape into one single rectangular layer. The pastry size might not be the same as baking sheet, so some trimming or sealing work are required. Score about one-inch border around the pastry with the back of the knife, be careful not to cut all the way down.
Cut the asparagus into suitable length, which should fit within our pastry border just created.
Spread the cheese and cream mixture within the pastry border.
Place asparagus on top. Drizzle some olive oil over the asparagus and sprinkle with some salt and black pepper. Depending on the cheese used, some can be quite salty so not to over-salt the tart. Taste and adjust.
Brush the edge of the tart with egg wash.
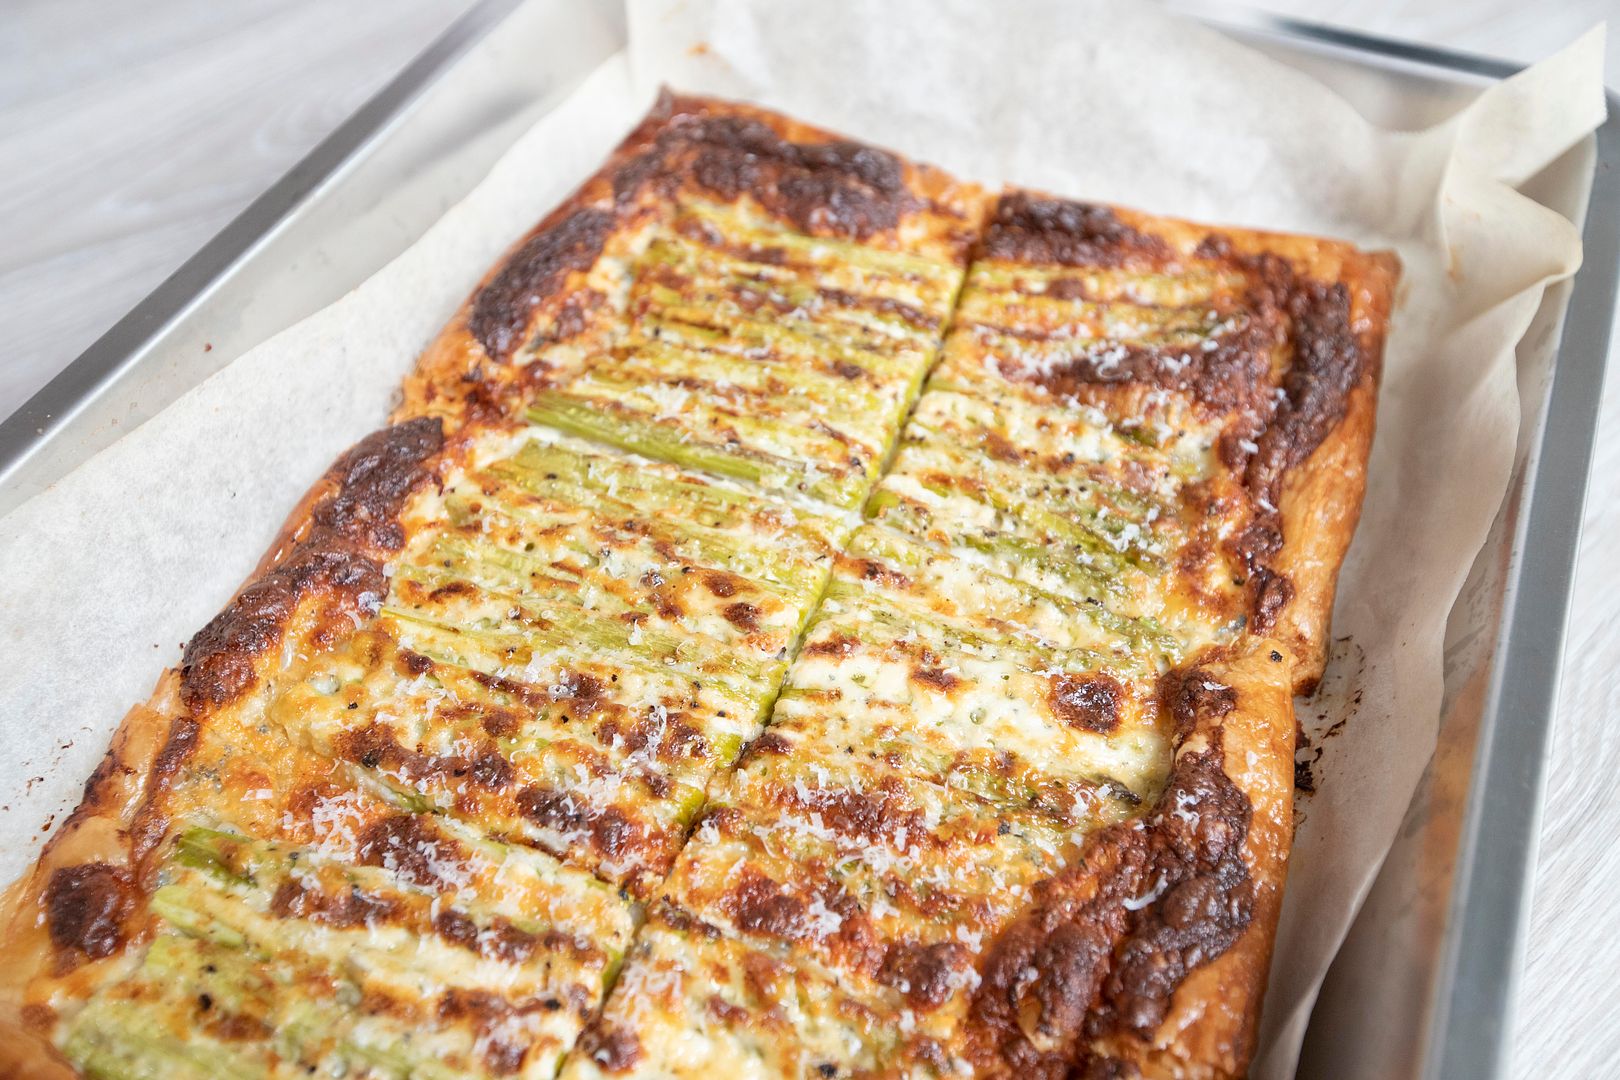
Into the oven for 30 to 35 minutes, or till the edge turned golden browned.
Remove from heat and let cool. Cut into smaller pieces.
Grate some aged Parmigiano Reggiano right before serving.
The blue cheese used can be salty already, then we finished off the tart with even more grated Parmigiano Reggiano. So really need to watch out on the salt used when sprinkle over the asparagus. Better safe than sorry. If the tart ended up not salty enough, it's always a great excuse to grate even more Parmigiano Reggiano all over.
If there's any leftover Chinese chives after making this recipe, just turn it into one other side dish. Perhaps add a few more ingredients such as bean curd strips or bean sprouts. Nothing goes to waste.
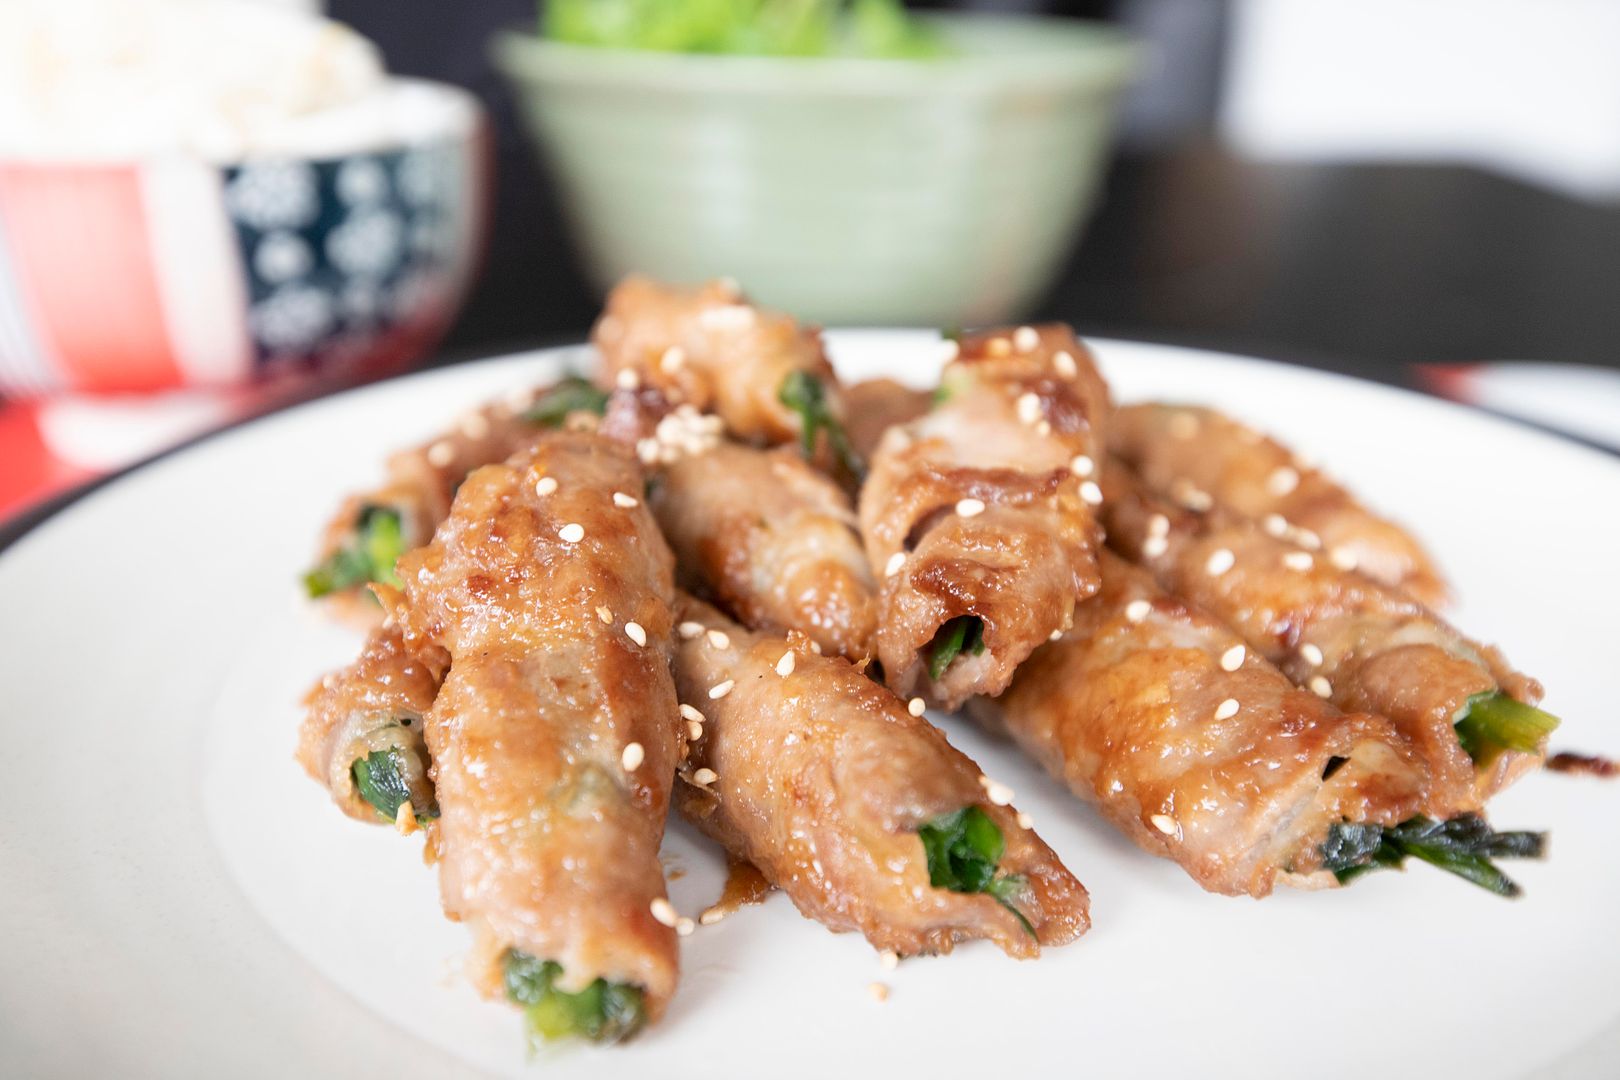
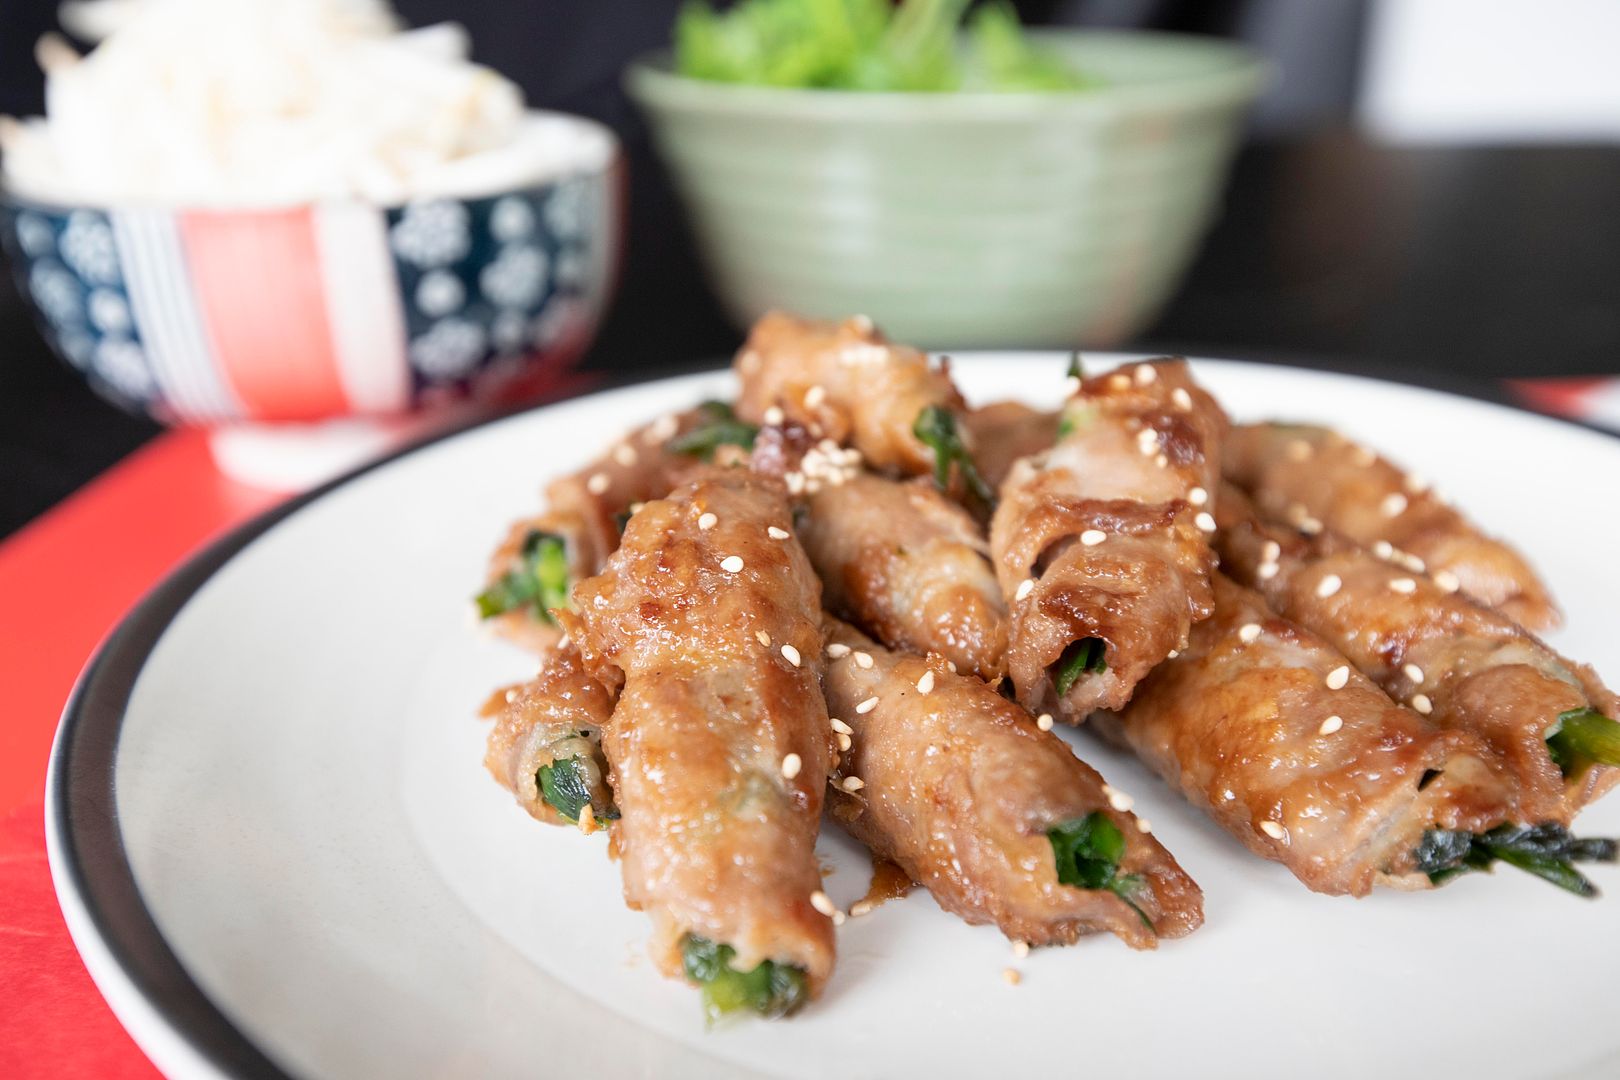
Pork and Chinese Chive Rolls 韭菜豬肉捲 -
Ingredients?
- 1 bundle of Chinese chives
- 12 to 14 pork slices
- 2 to 3 garlic cloves
- 1 to 2 tablespoons olive oil
- Small pinch salt
- Small pinch black pepper
- Some flour
- Some toasted white sesame seeds
Sauce -
- 2 tablespoons soy sauce
- 1 tablespoon mirin
- 1 teaspoon sugar
- 1/2 teaspoon grated ginger
How?
Peel and finely chop the garlic cloves. Mix all the sauce ingredients in a bowl and make sure the sugar is fully dissolved.
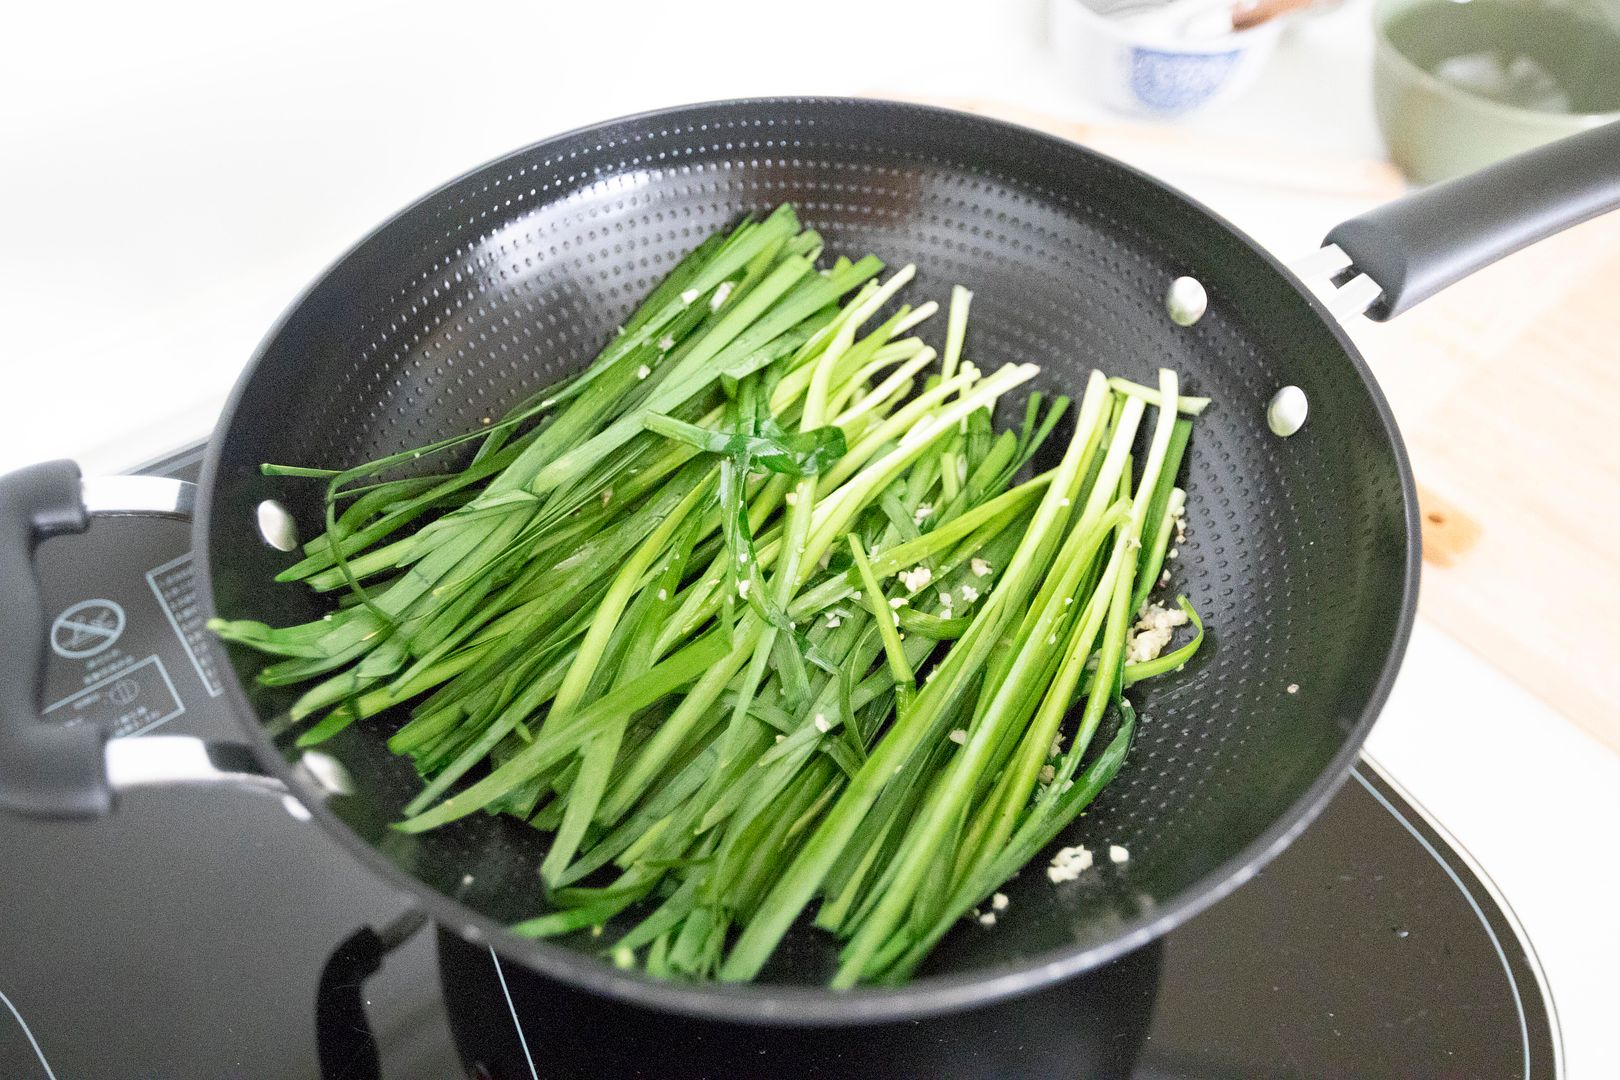
Trim off the very end of Chinese chives and cut in half if needed, as long as the whole chives can fit in the stir-fry pan or a wok.
Drizzle enough olive oil to evenly coat the bottom of the pan and turn to high heat. Add in garlic, salt, and black pepper. Give it a quick stir then transfer Chinese chives over. Cook for about 2 minutes the most, scoop out and set aside.
Once the Chinese chives are cool enough to handle by hand, cut into shorter sections, about 2 inches or slightly shorter, so the sections can fit within the width of pork slices.
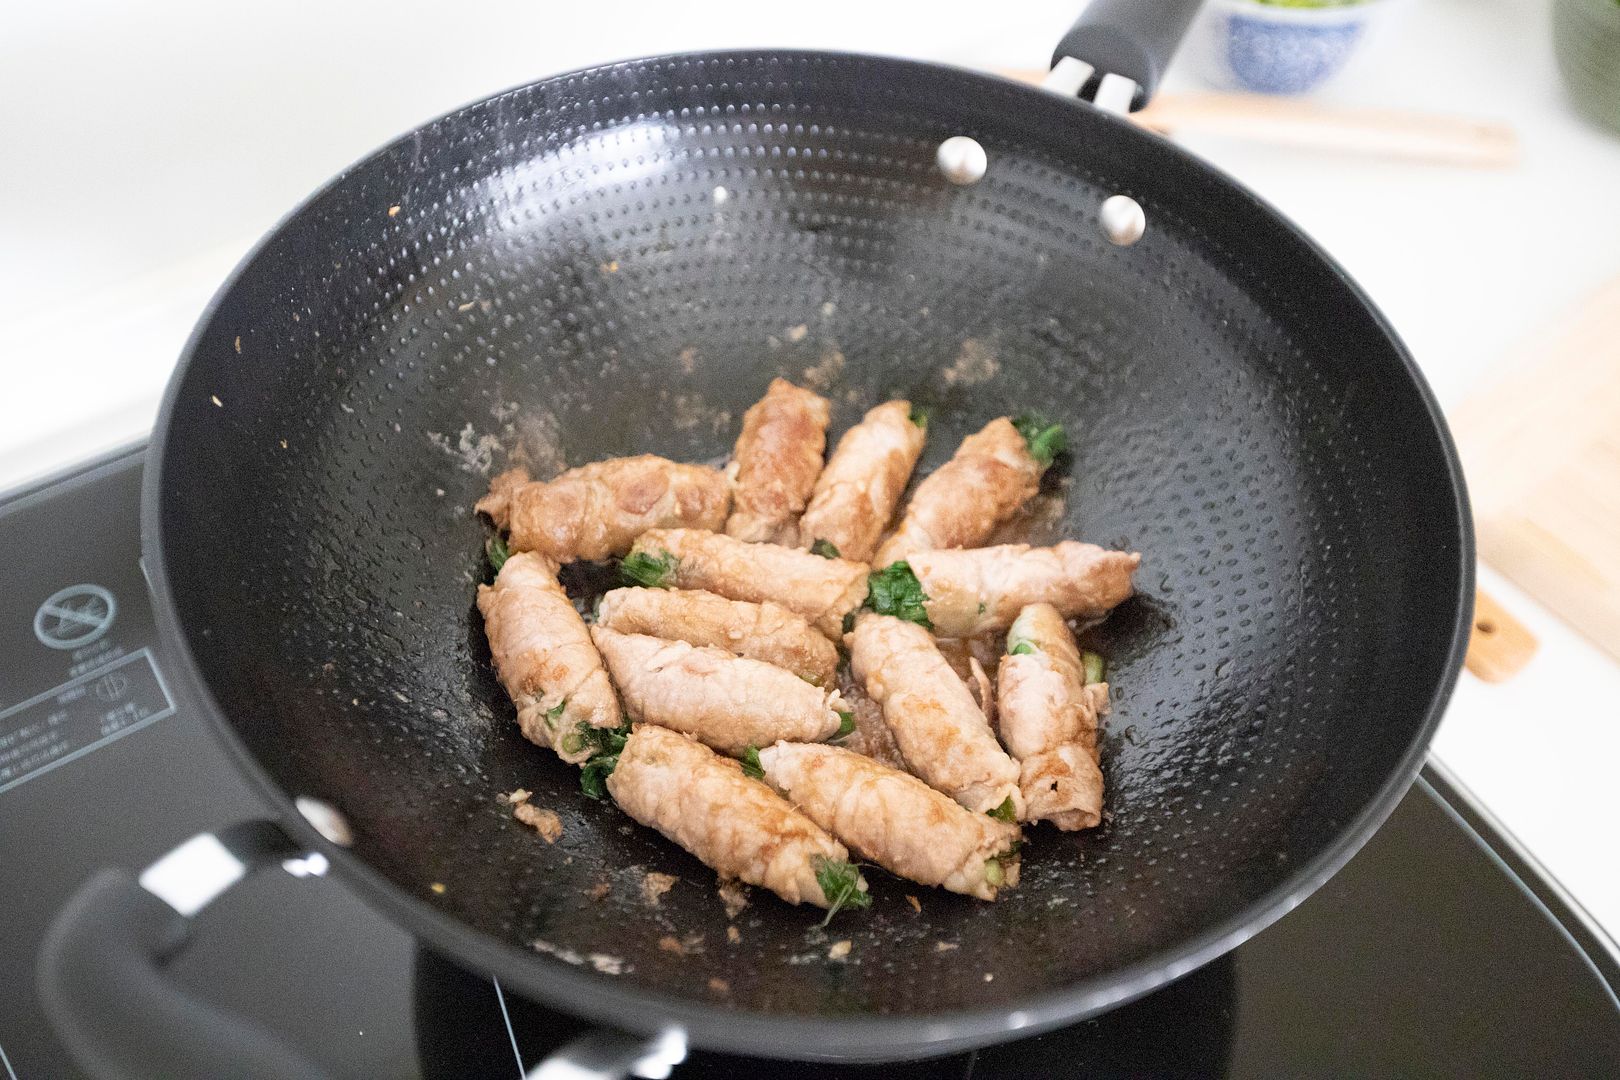
Wrap the Chinese chives with pork slices and seal the end with some flour. Also coat or dust the whole pork roll with some flour too.
No need to add more oil, simply transfer pork rolls over to the same pan and use medium heat this time. Sear till slightly browned on all sides.
Pour in prepared sauce and bring to a boil. Lower the heat just a little and continue to reduce the sauce. Move the pork rolls around to get even color on all sides.
Once nearly dried up, transfer to serving plate and sprinkle with toasted white sesame seeds.
It's not absolutely necessary to cook the Chinese chives first, but it does yield a tenderer bite and easier to eat. On top of that, perhaps give the chives one more chop, break them into two shorter sections then wrap with pork slices. That way the Chinese chives can easily pull apart when biting the pork rolls in half.
As for me, I just eat the whole roll in one bite, like a beast.
Other recipes using Chinese chives:
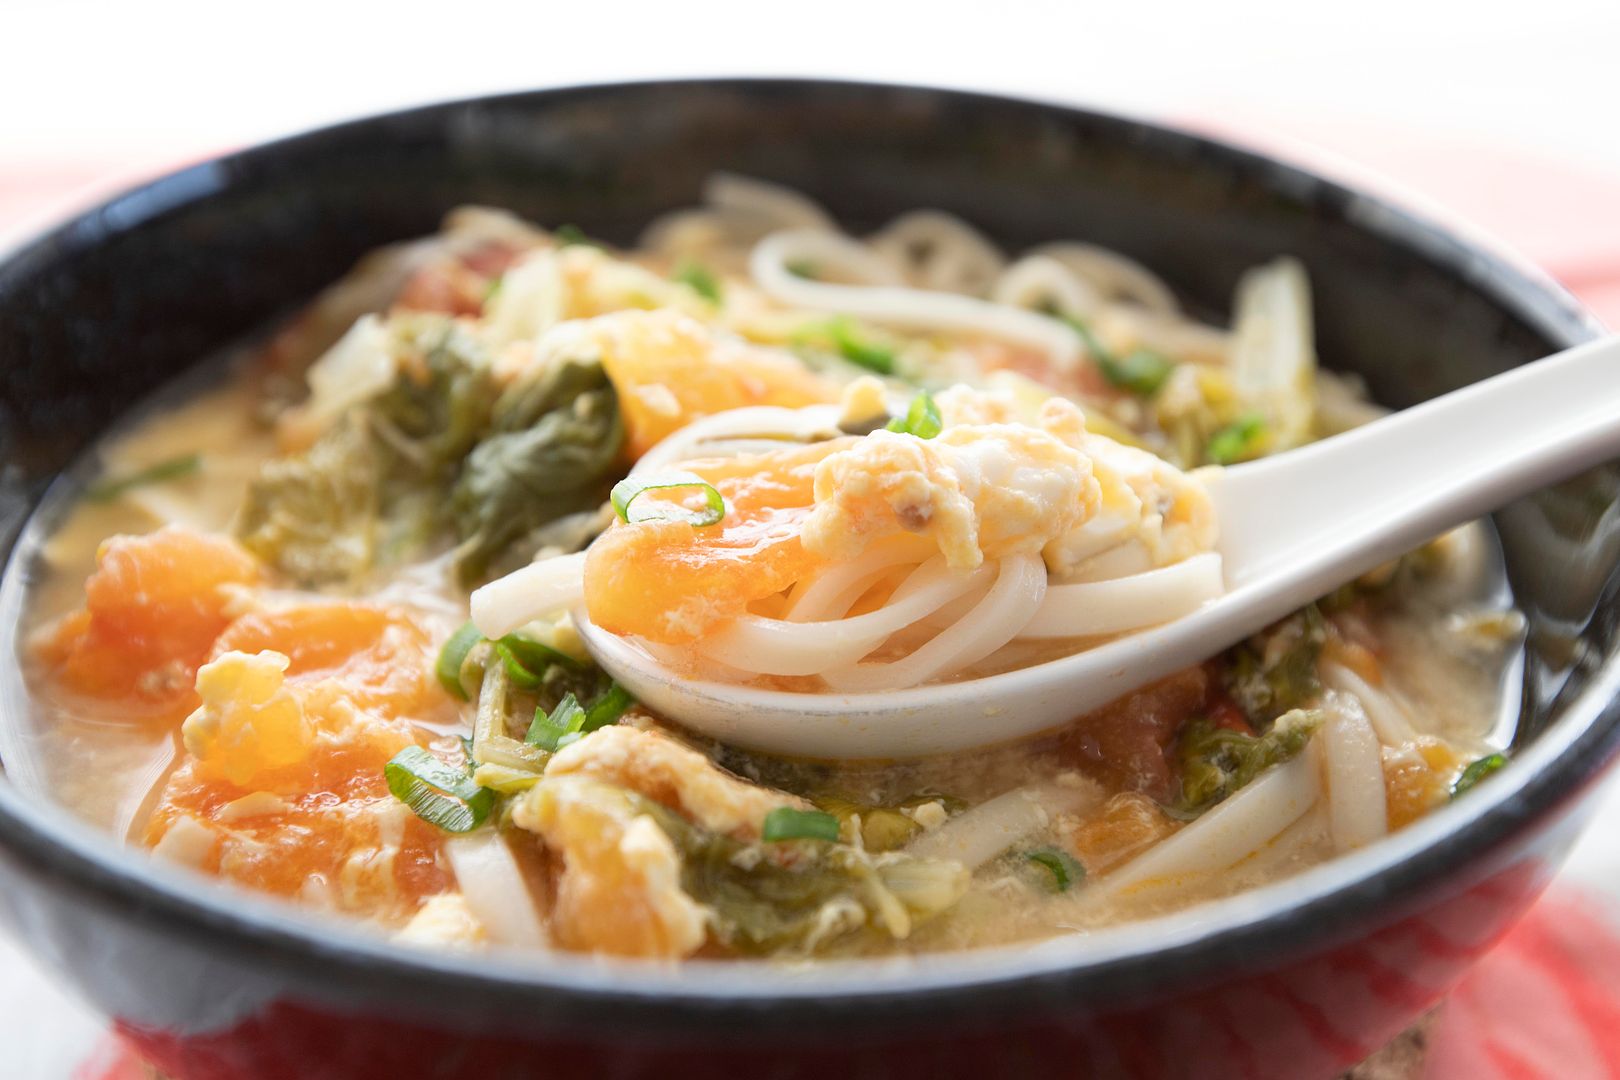
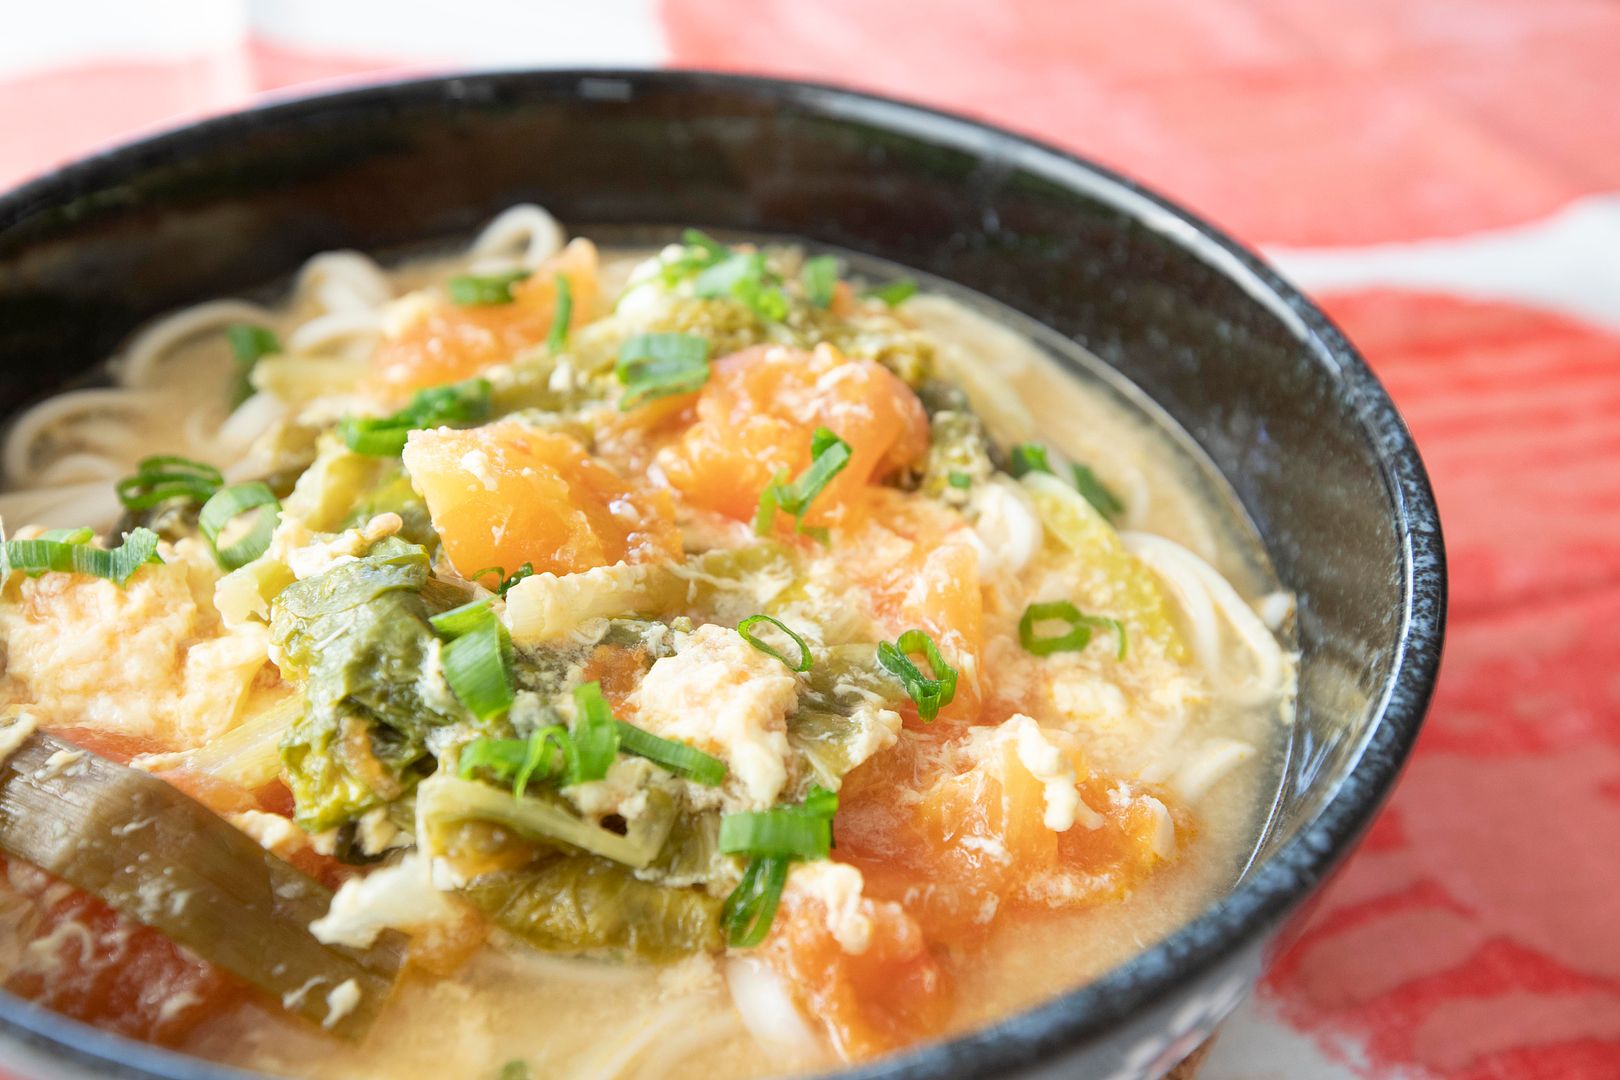
Not quite the traditional tomato egg drop noodle soup. On top of lighter version chicken soup, I also infused some katsuobushi (bonito flakes) and lemon juice. In a way, it's my refreshing version of tomato egg drop noodle soup.
Tomato egg drop noodle soup -
Ingredients (about 3 to 4 portions)?
- 6 cups chicken stock
- 5 grams katsuobushi
- 6 eggs
- 4 cups chopped ripe tomatoes
- 2 stalks scallion
- 2 garlic cloves
- 1 small bundle Chinese cabbage (smaller kind similar to bok choi)
- 1 tablespoon grated ginger
- 2 tablespoons lemon juice
- 2 tablespoons olive oil
- Some salt
- Some white pepper powder
- 3 to 4 portions round noodles
How?
Heat up the chicken stock but keep it just about to simmer. Soak in katsuobushi/bonito flakes for about 10 minutes. Some like to keep the stove on low heat, but I turned off the heat right away. Once ready, filter out the katsuobushi and set the stock aside.
Peel and grate the ginger. Peel and finely chop the garlic cloves. Remove tougher ends and cut the Chinese cabbage into shorter sections. Destem the scallion, cut the whiter part into shorter sections and chop the greens.
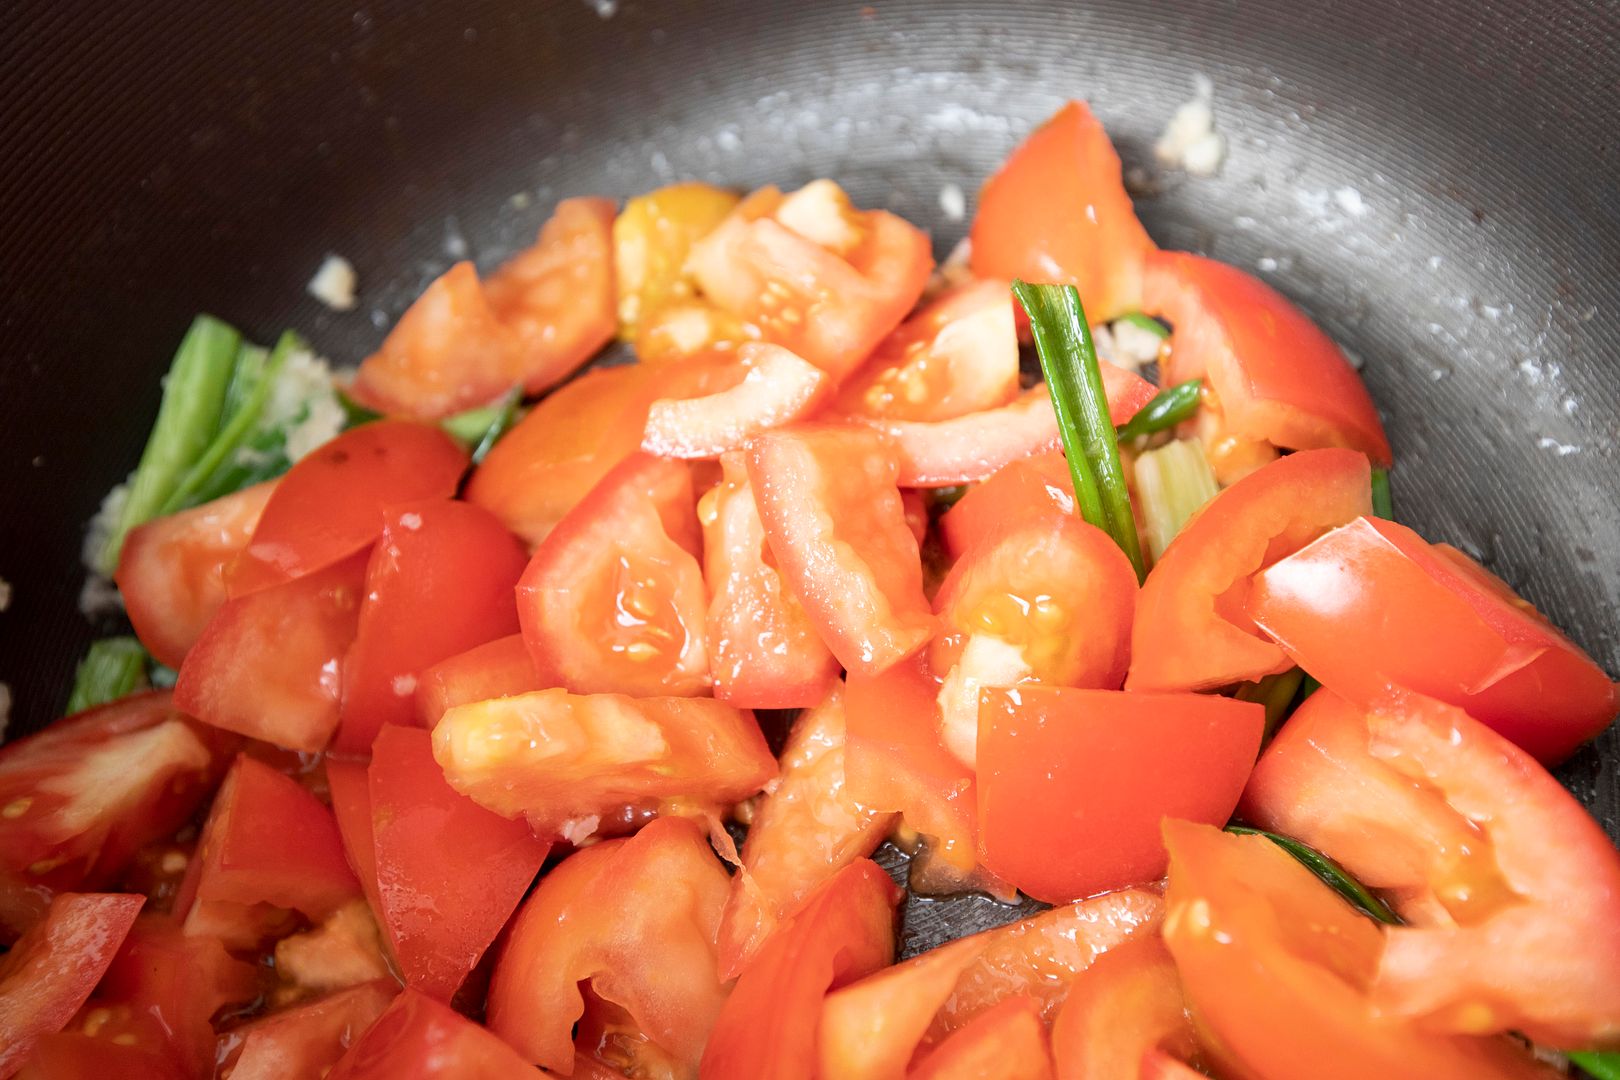
Cut the tomatoes into large chunks, no need to remove the seeds and juice. Also no need to remove the skin first. Just gradually picking out the skin during the cooking process, less stuff to wash that way (wink).
Beat the eggs and set aside for later use.
Take a deep pot, drizzle in some olive oil and turn to medium high heat. Add in chopped garlic, scallion sections, grated ginger, and 1 teaspoon of salt. Cook till aromatic but not burning the garlic.
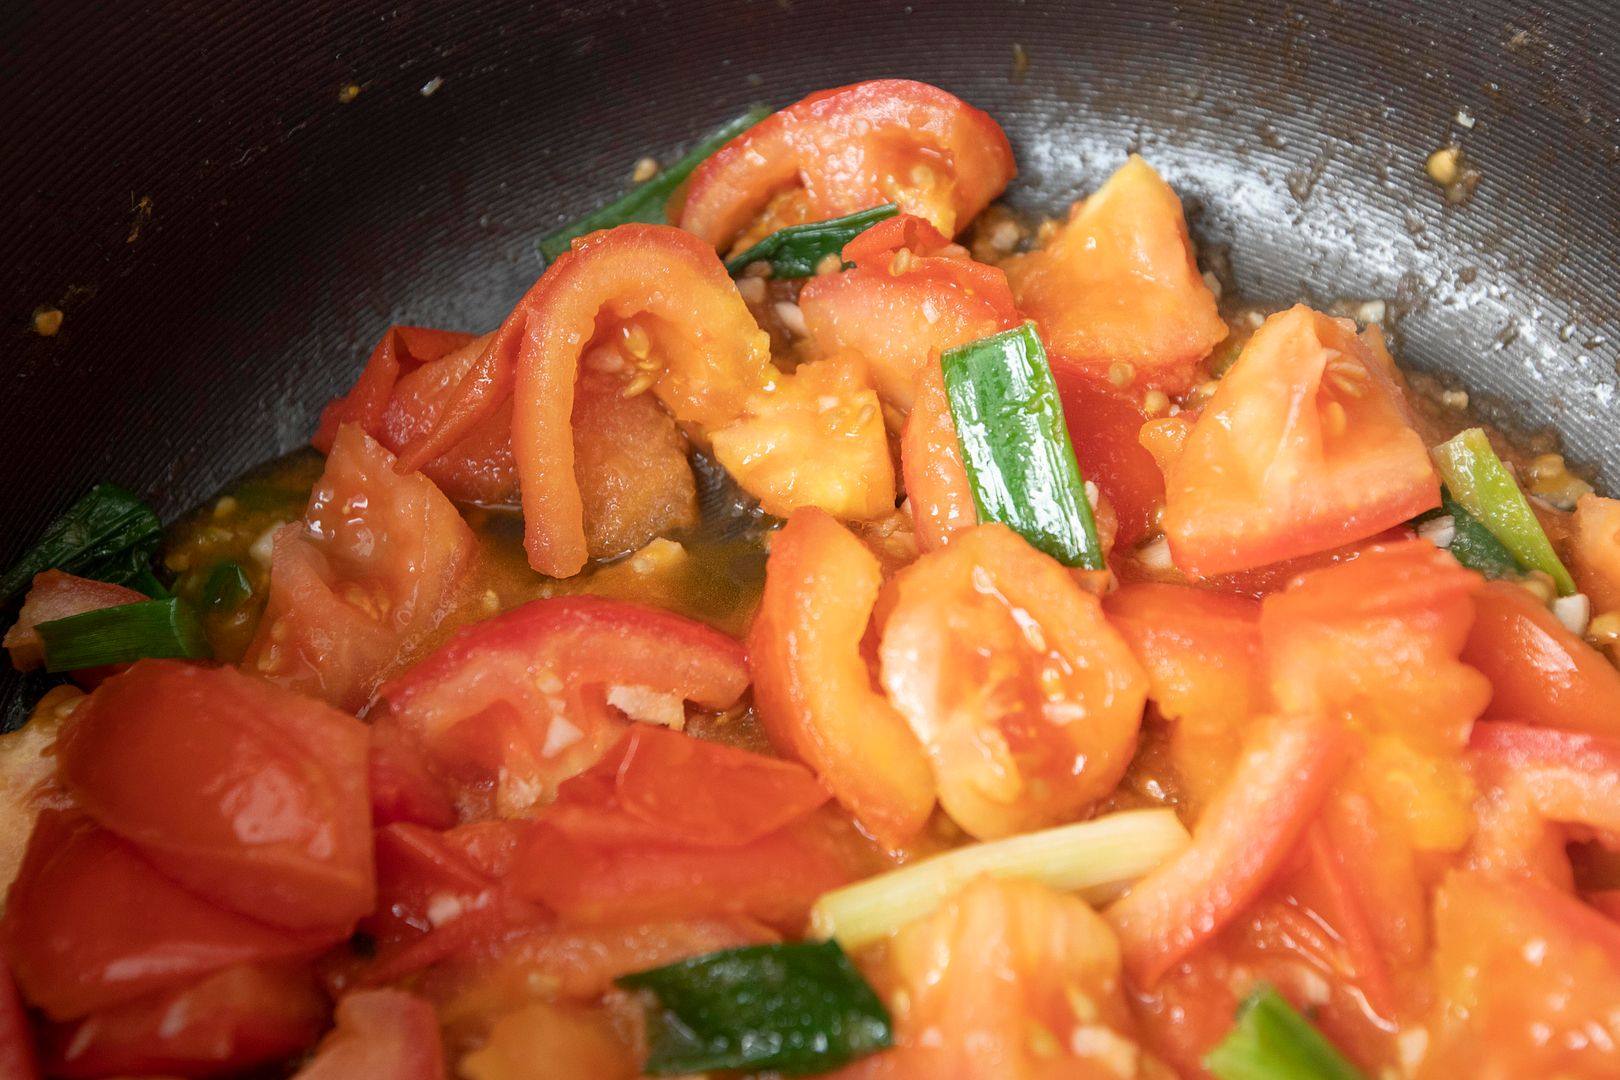
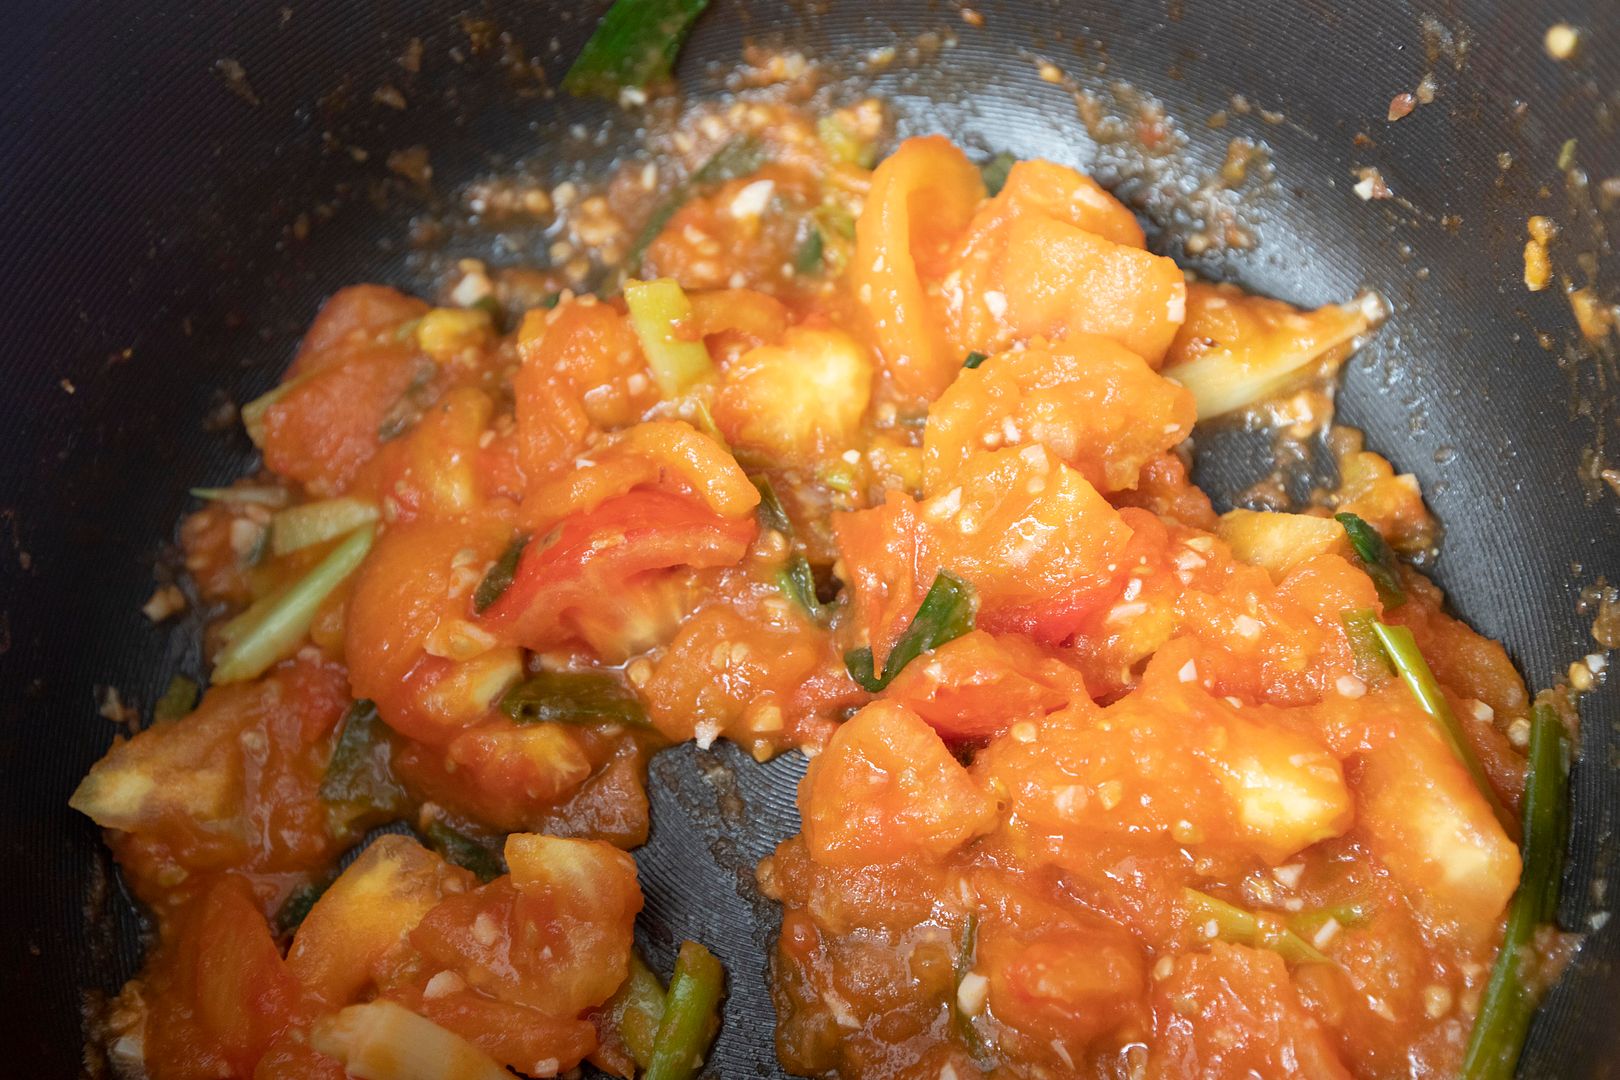
Transfer chopped tomatoes over and stir-fry till the skin start to fall apart. Be careful of splashing oil during this process. That's why I highly recommend to use a deep pot, it can serve as your wall of protection.
Meanwhile, pick out the skin while waiting for the tomatoes to cook down, it should be slightly gooey with chunks remain. Lower the heat a little if need more time here.
Pour in prepared stock. Bring to a boil then lower the heat to a simmer.
Add in Chinese cabbage and cook till preferred texture. Add a few pinches of white pepper powder. Taste and see if more salt is needed.
Stir and pour in beaten egg, also add in some freshly squeezed lemon juice.
While prepping the soup, take another pot of water to cook the noodles. Scoop some tomato egg drop soup to serving bowls. Once the noodles are ready, drain and transfer to these bowls. Scoop more soup to the bowls and top with chopped scallion.
Such a comforting meal, it got the flavors from the land - chicken, and flavors from the sea - bonito flakes. Then the whole dish further brightens up by the acidity from the tomatoes and lemon. Lastly, rounded out by soft beaten eggs.
It works really well as flu diet too. Easy to eat and warms up your body (and soul).
Other noodles recipes:
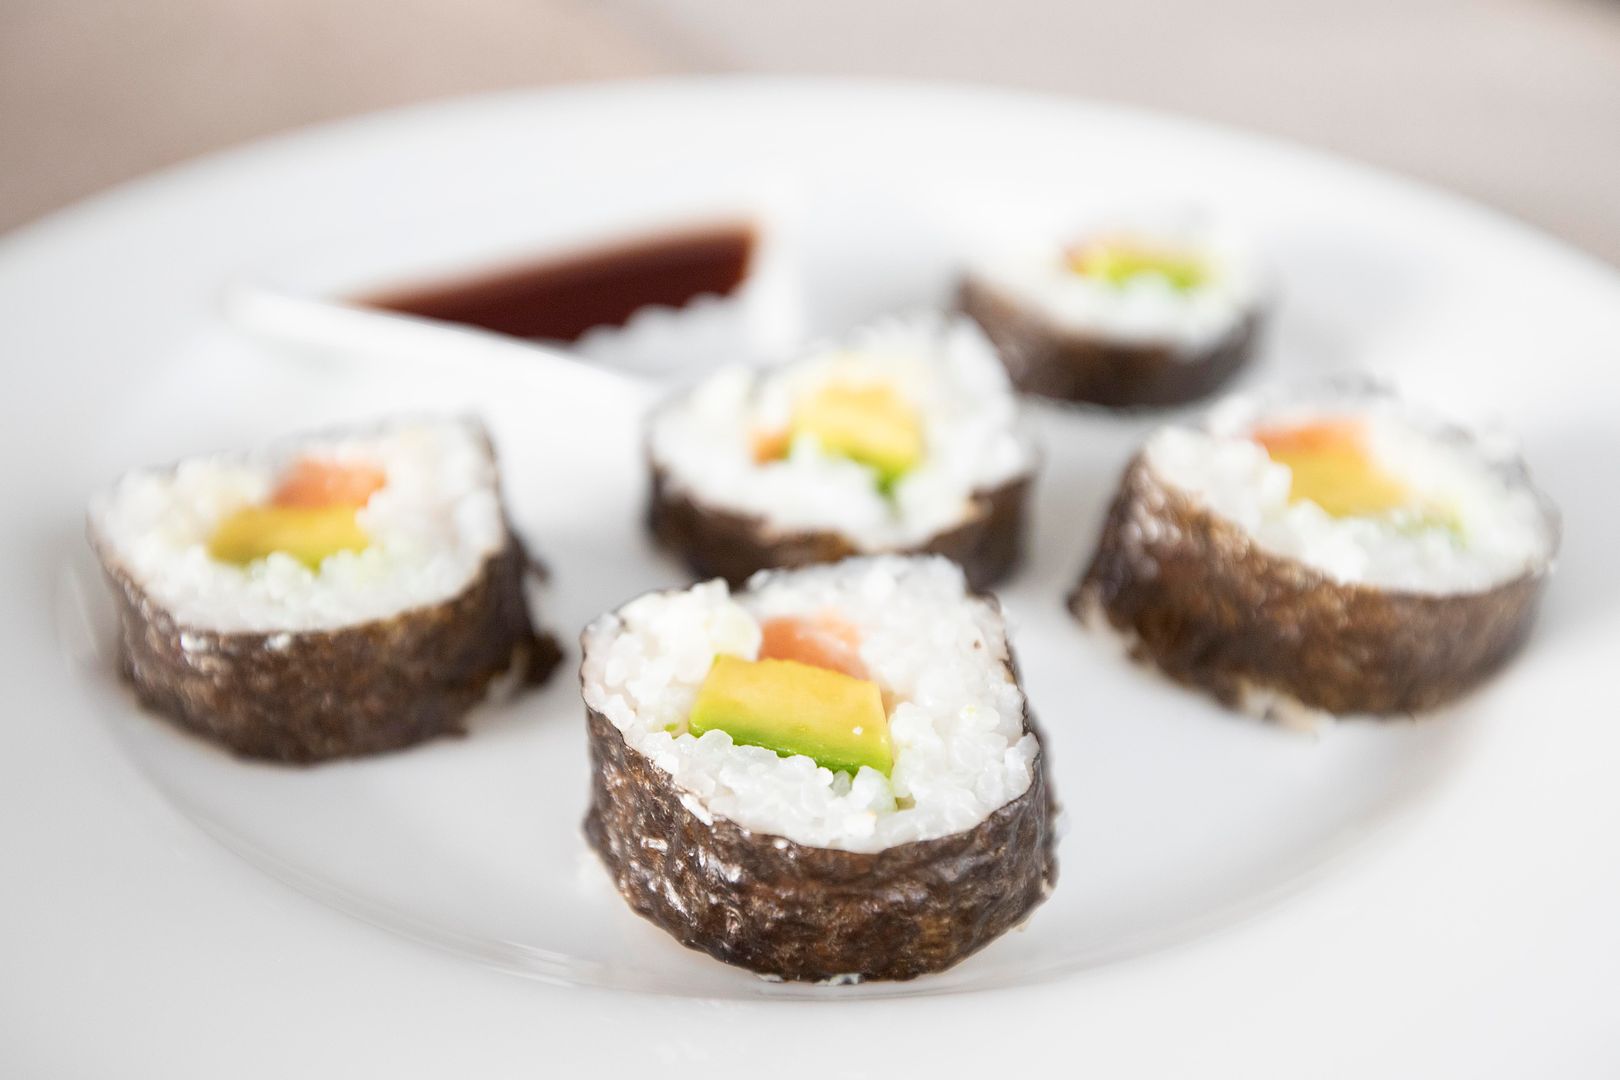
The true Philadelphia roll might be calling for smoked salmon, cucumber, and cream cheese, but there can be some variations. Instead of smoked salmon, I used fresh sashimi grade salmon instead, also swapped out cucumber with ripe avocado. But I'm not worrying too much about the ingredients, it's the rolling action that can get quite tricky. Sometimes the fillings are falling out, or the sushi shape is not holding tightly. Well, it takes some practice, just make sure to have someone (or yourself) on site to help vanishing the not-so-perfect food. Nom nom nom.
Philadelphia roll -
Ingredients?
- 1/2 cup sushi rice (or short grain rice)
- 2 tablespoons rice vinegar
- 1 tablespoon sugar
- 1/2 tablespoon salt
- Some sushi grade salmon
- Some cream cheese
- 1/2 ripe avocado
- Some nori sheets
- Some light soy sauce (to serve)
How?
Mix the rice vinegar, sugar, and salt in a bowl. Make sure the sugar and salt have been fully dissolved.
Cook the rice like usual, but once ready, fluffy the grains with pre-mixed seasonings. Try to fan and fluff the grains at the same time, keep cool till temperature drops and ok to handle by hand.
Pre-cut the cream cheese and salmon into strips. Remove the pit and scoop out the avocado. Try to cut into similar shape.
Wrap the bamboo mat with plastic wrap, it'll prevent rice from sticking all over and easy cleaning afterward.
Lay one sheet of nori on top. Wet both hands with pre-boiled/drinkable water and spread some rice over nori.
Place the salmon, cream cheese, and avocado on one side.
Grab both the mat and the nori sheet, roll over the fillings, like surrounding the fillings, and squeeze to firm up the round shape of the sushi roll. Release and keep rolling till the end and squeeze again to firm up the shape.
Transfer the roll to a cutting board and slice to serving pieces using a very sharp knife. Otherwise the fillings can get squeezed out without a clean cut.
Serve with light soy sauce.
Sometimes I also make the rolls but only with cream cheese, regular rice, and nori sheet. Don't even bother to make the grains into full on sushi rice. It's like my simple afternoon treat before dinner.
By the way, making sushi rolls can be quite a hassle in the beginning. Check out some videos online and see how people roll up sushi if there's any doubt. Otherwise, trial and error always work, use less rice and fillings to begin with help too. Also make sure to have a little helper to make all the not too good looking ones disappear!
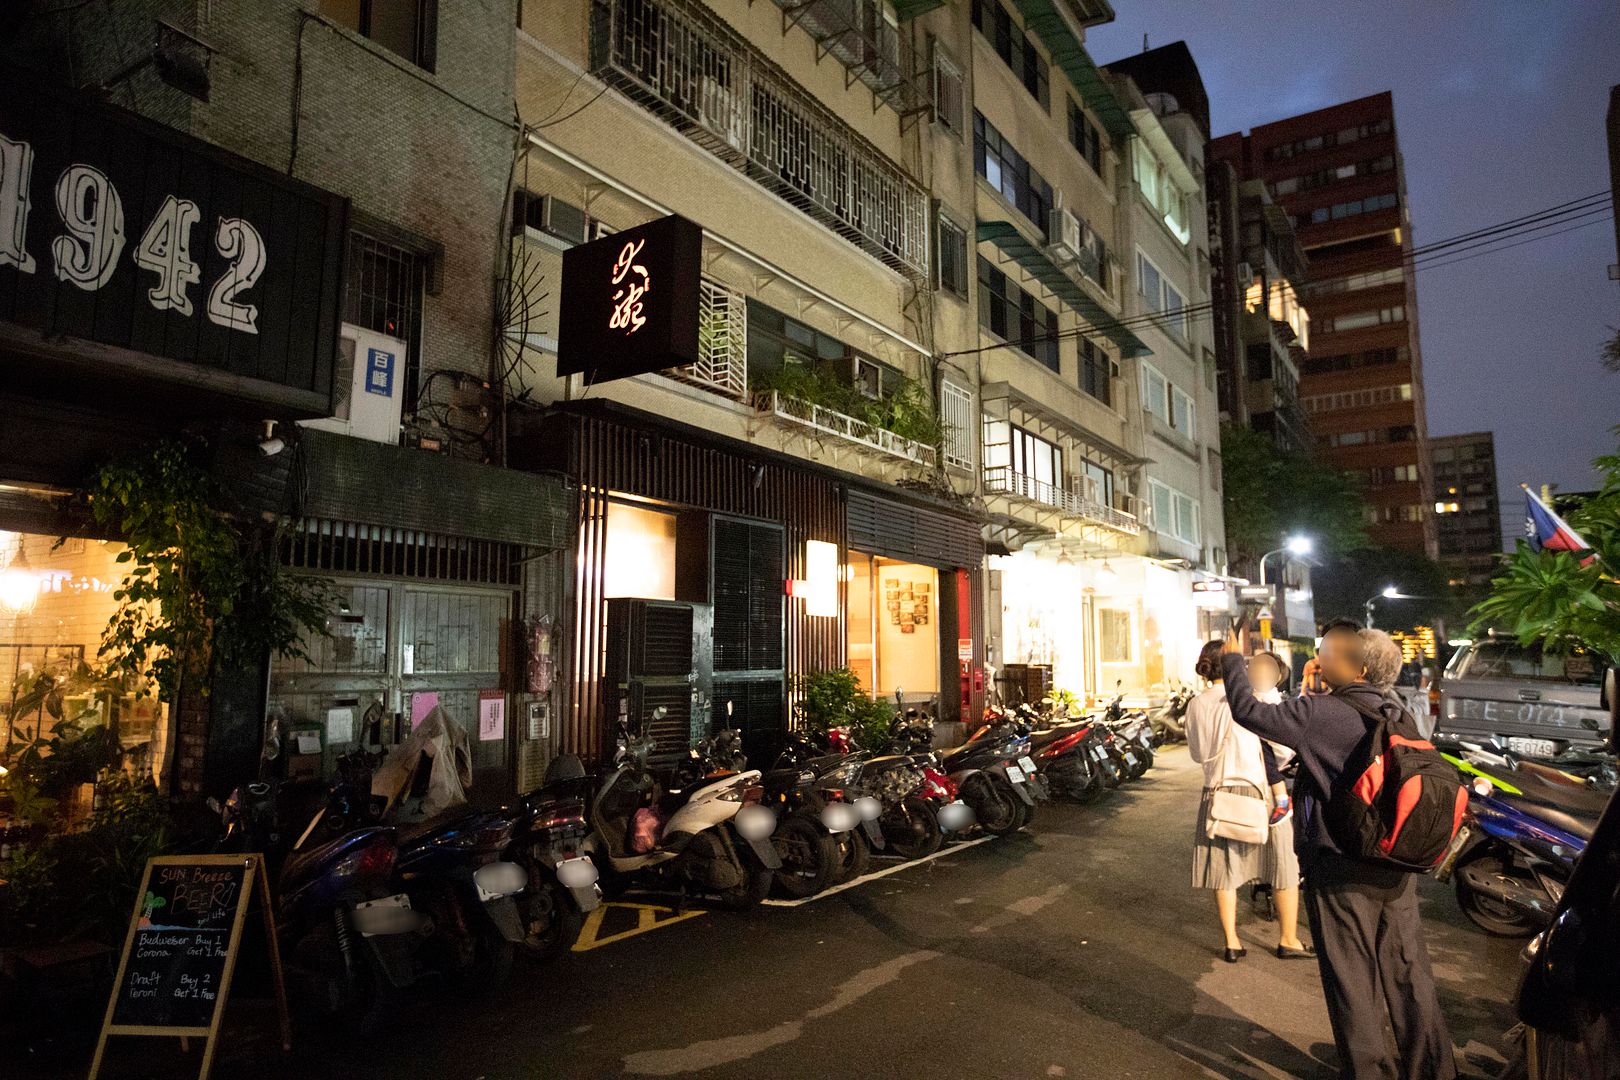
When talking about Michelin-starred restaurant, it's easy to imagine a place with great ambience, clean, tidy, or more so elegant. Somewhere you kind of have to dress up for, or perhaps a fancy place to bring your lovely date.
Not quite the case for Da-Wan Yakiniku Dining Restaurant Taipei, which was crowned one Michelin star earlier this year. It was crowded, like shoulder touching shoulder kind of tightness. It was also smoky, but inhaling wagyu grilling fume once a while, that I can endure.
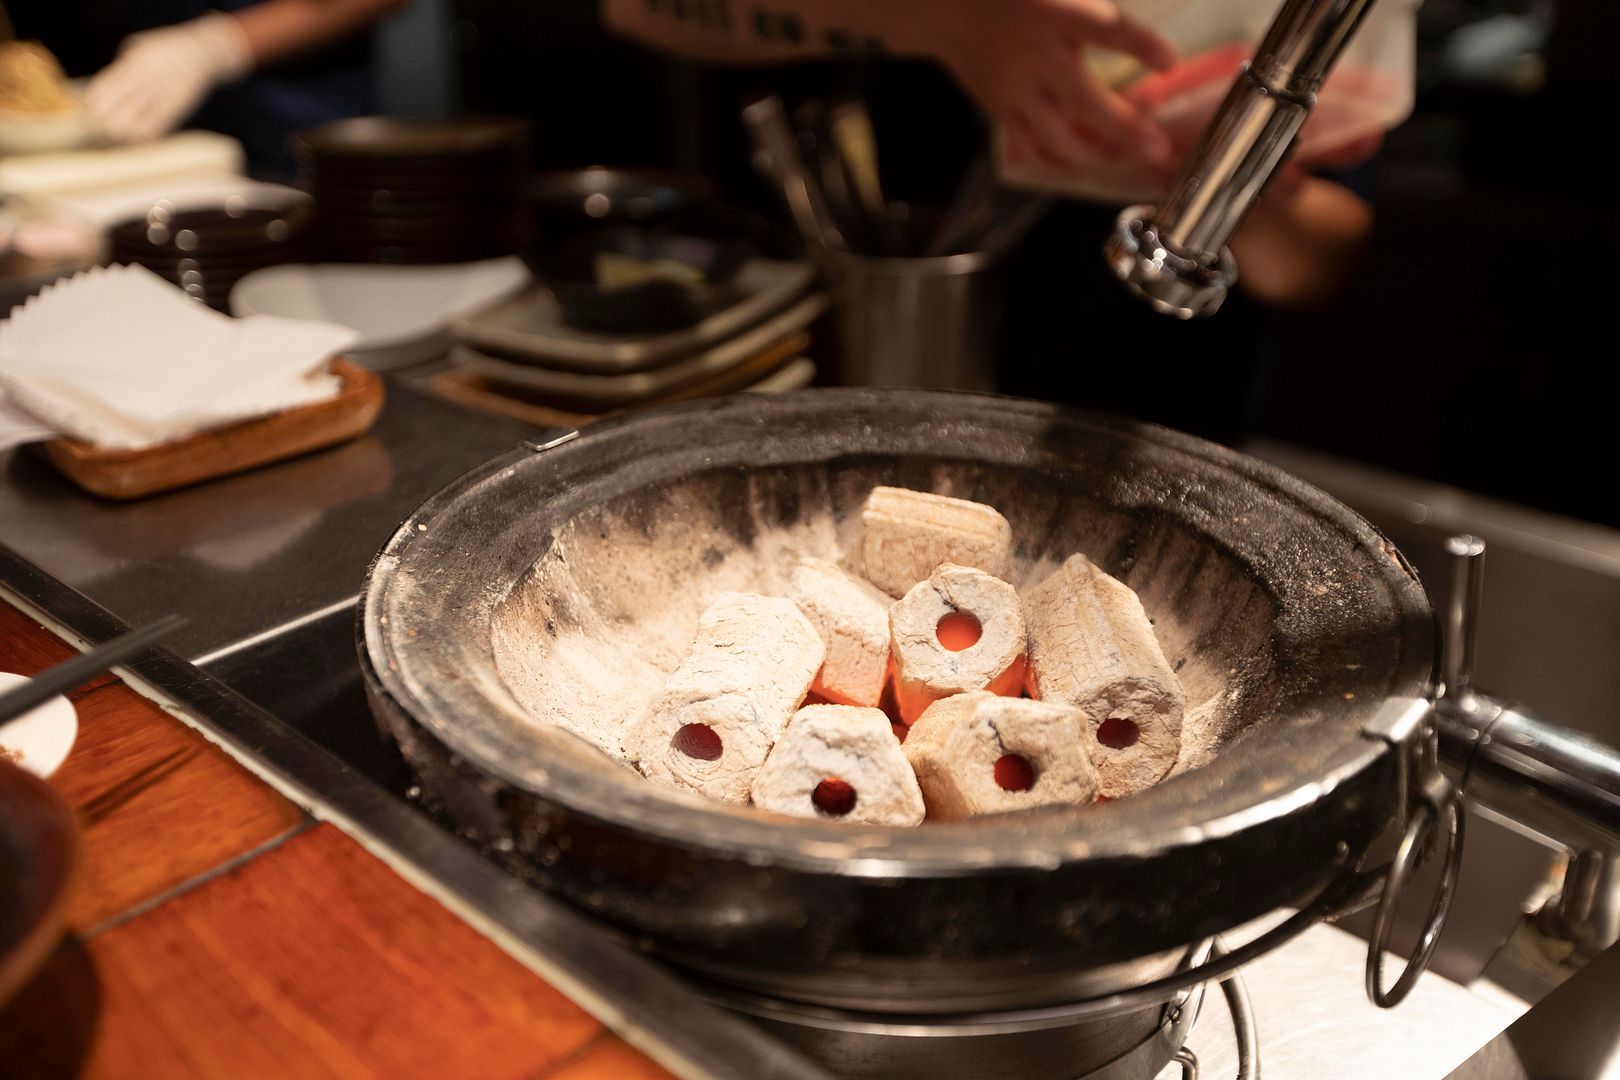
So I locked my bag in the cabinet, the only place free from grease and smell. Then dived right into yakiniku heaven.
Another surprise is that Da-Wan put a dining time limit for regular dinner hours. Starting at 6 p.m., 1.5 hours for two rounds, these time slots can get very popular, especially during weekends, so reservation in advance is highly recommended.
After rush hour service, it gets more chill and easier to enjoy a few drinks at ease. Give-and-take, do you want to eat such heavy marbled beef during late hours? I get it, I know some of you will say anytime. "Anytime" is the perfect timing for eating wagyu beef.
Anyways, I was worried about that 1.5 hours limit. Remembered once I was having a spicy hot pot dinner with the same time restraint. It was such rush and not very enjoyable. Fortunately, such concern did not surface at Da-Wan.
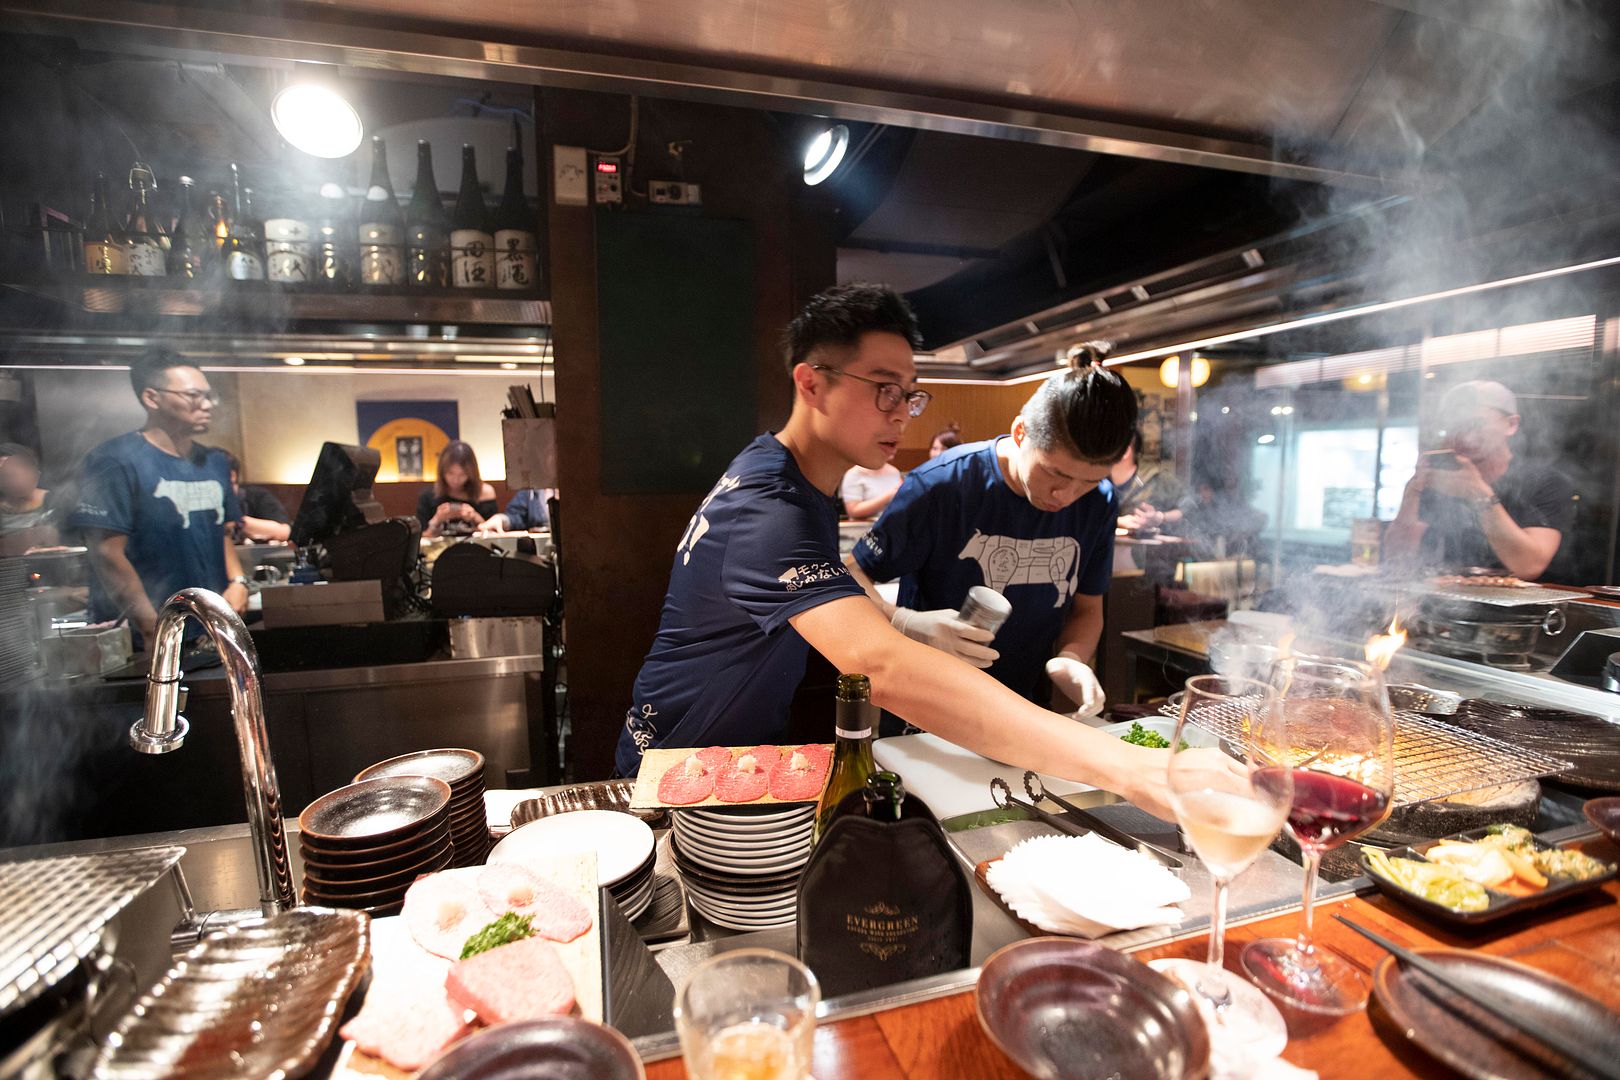
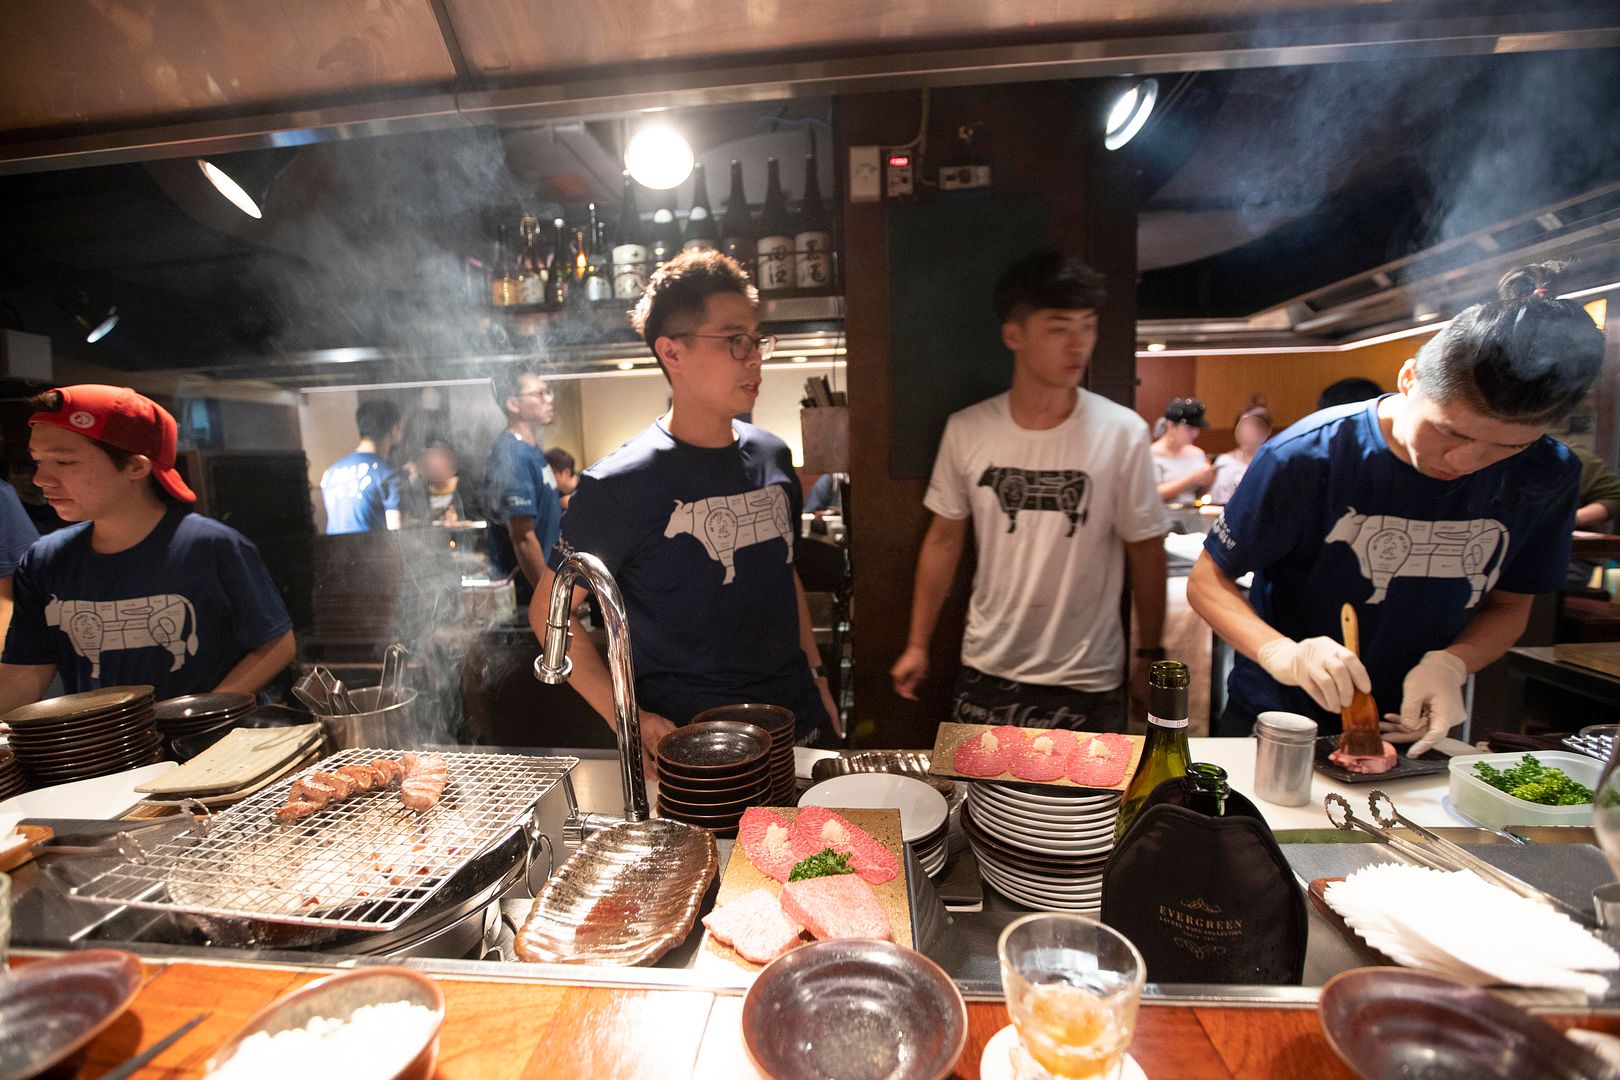
I guess Da-Wan trained their crew well. Their SOP was impeccable. Some staffs in charge of plating or prepping ingredients, some focus on grilling and customer service, like chatting and socializing, and one other guy helped in slicing cooked meat, putting everything in order. Very efficient after all.
Wanting to try more food, I even put in a few extra orders towards the end. They still managed to finish all my meal, from raw meat to perfectly cooked dishes. By the time I walked out Da-Wan, it wasn't even 1.5 hours yet. Didn't feel rushed at all, a lot has to do with their flawless service.
The best way to start a wagyu filled night, of course a few drinks. Da-Wan is conveniently located near MRT station, only few minutes walk. So either public transportation or take a cab, just don't drive there, drink responsibly.
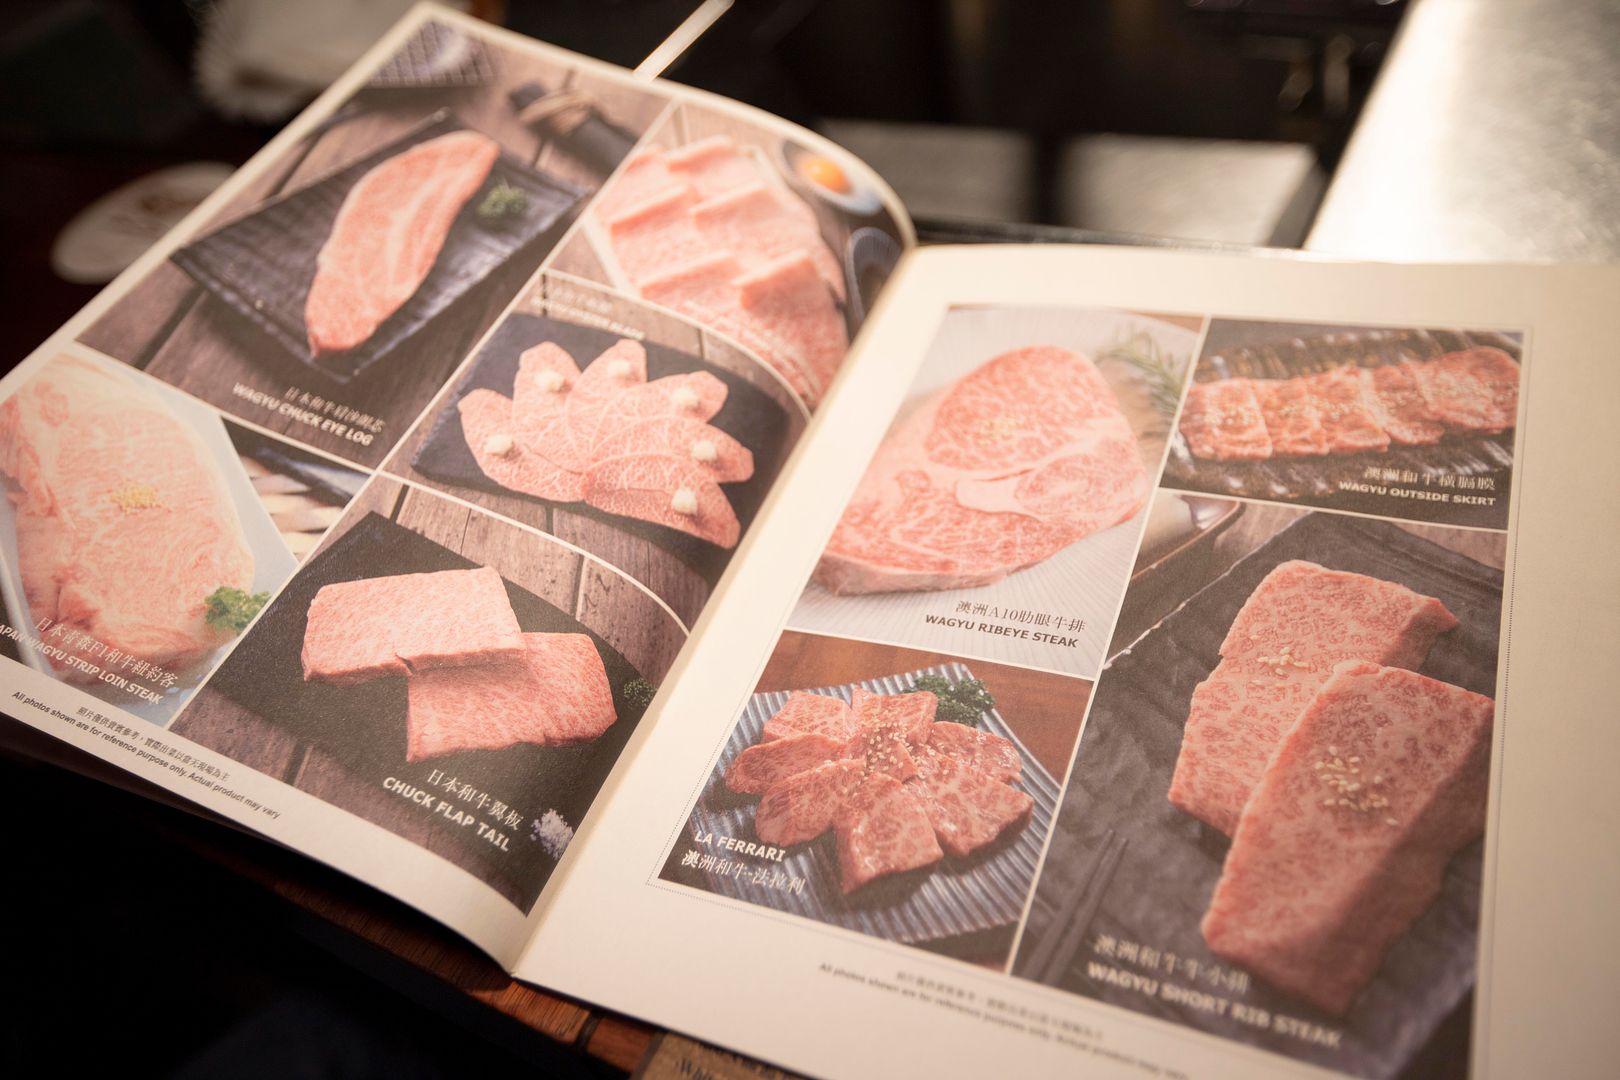
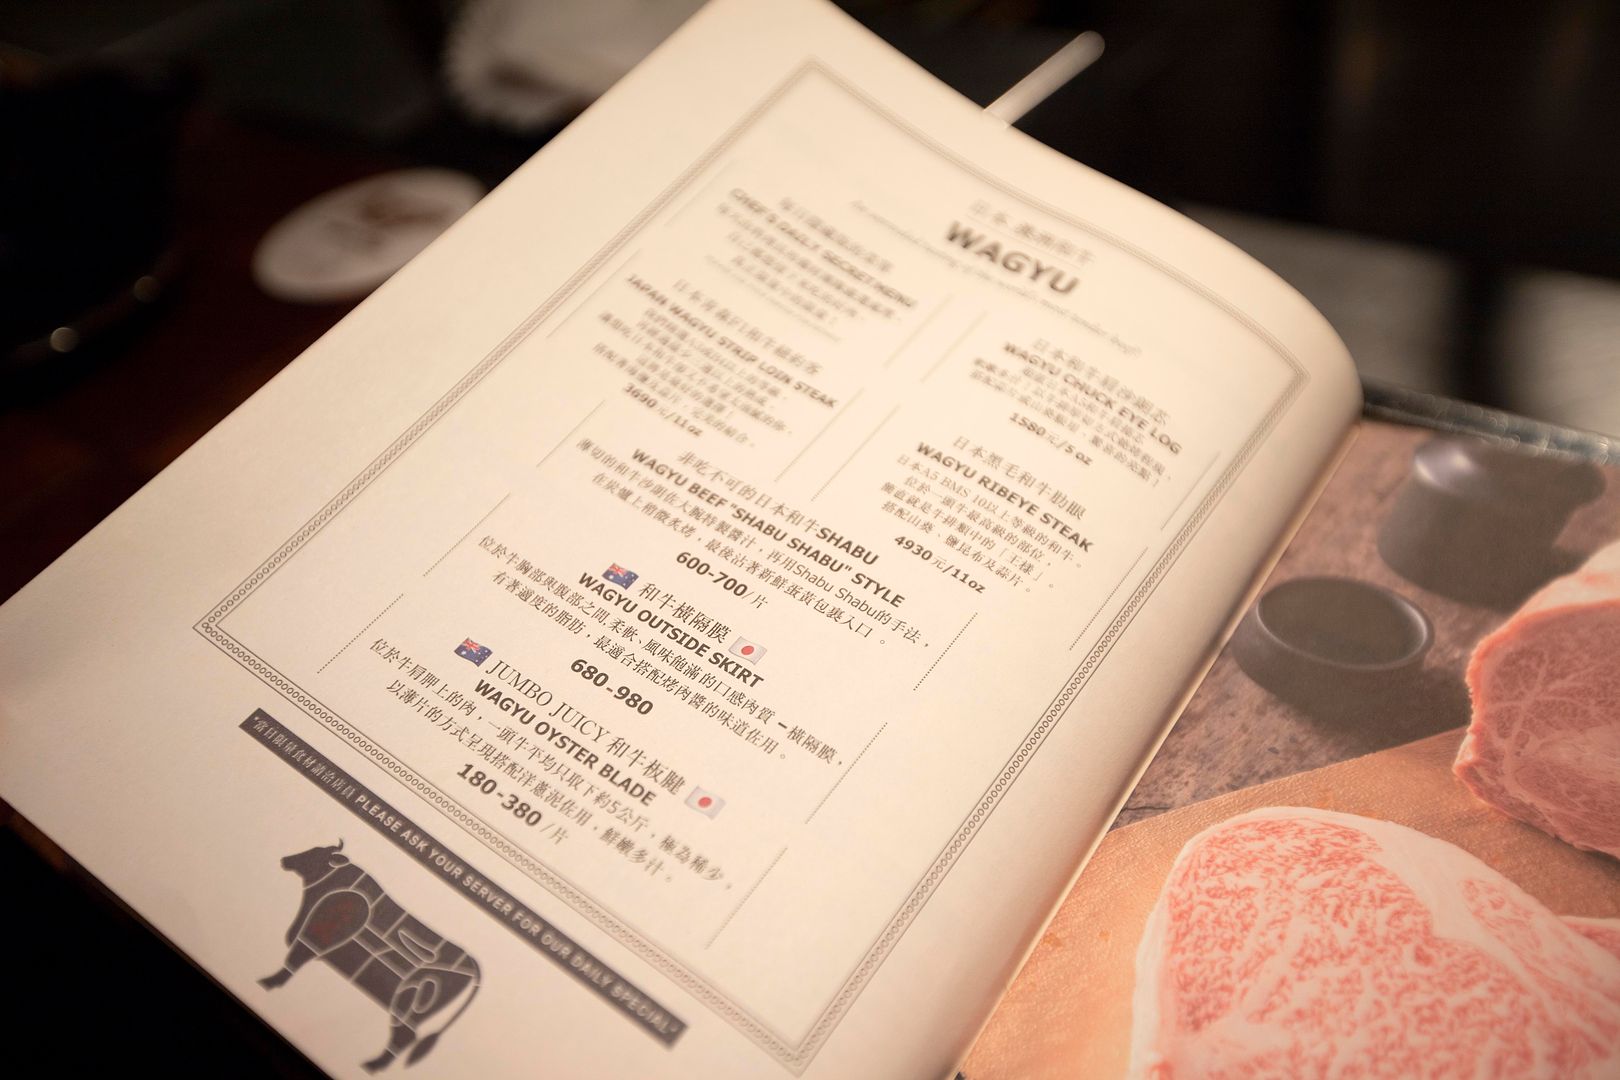
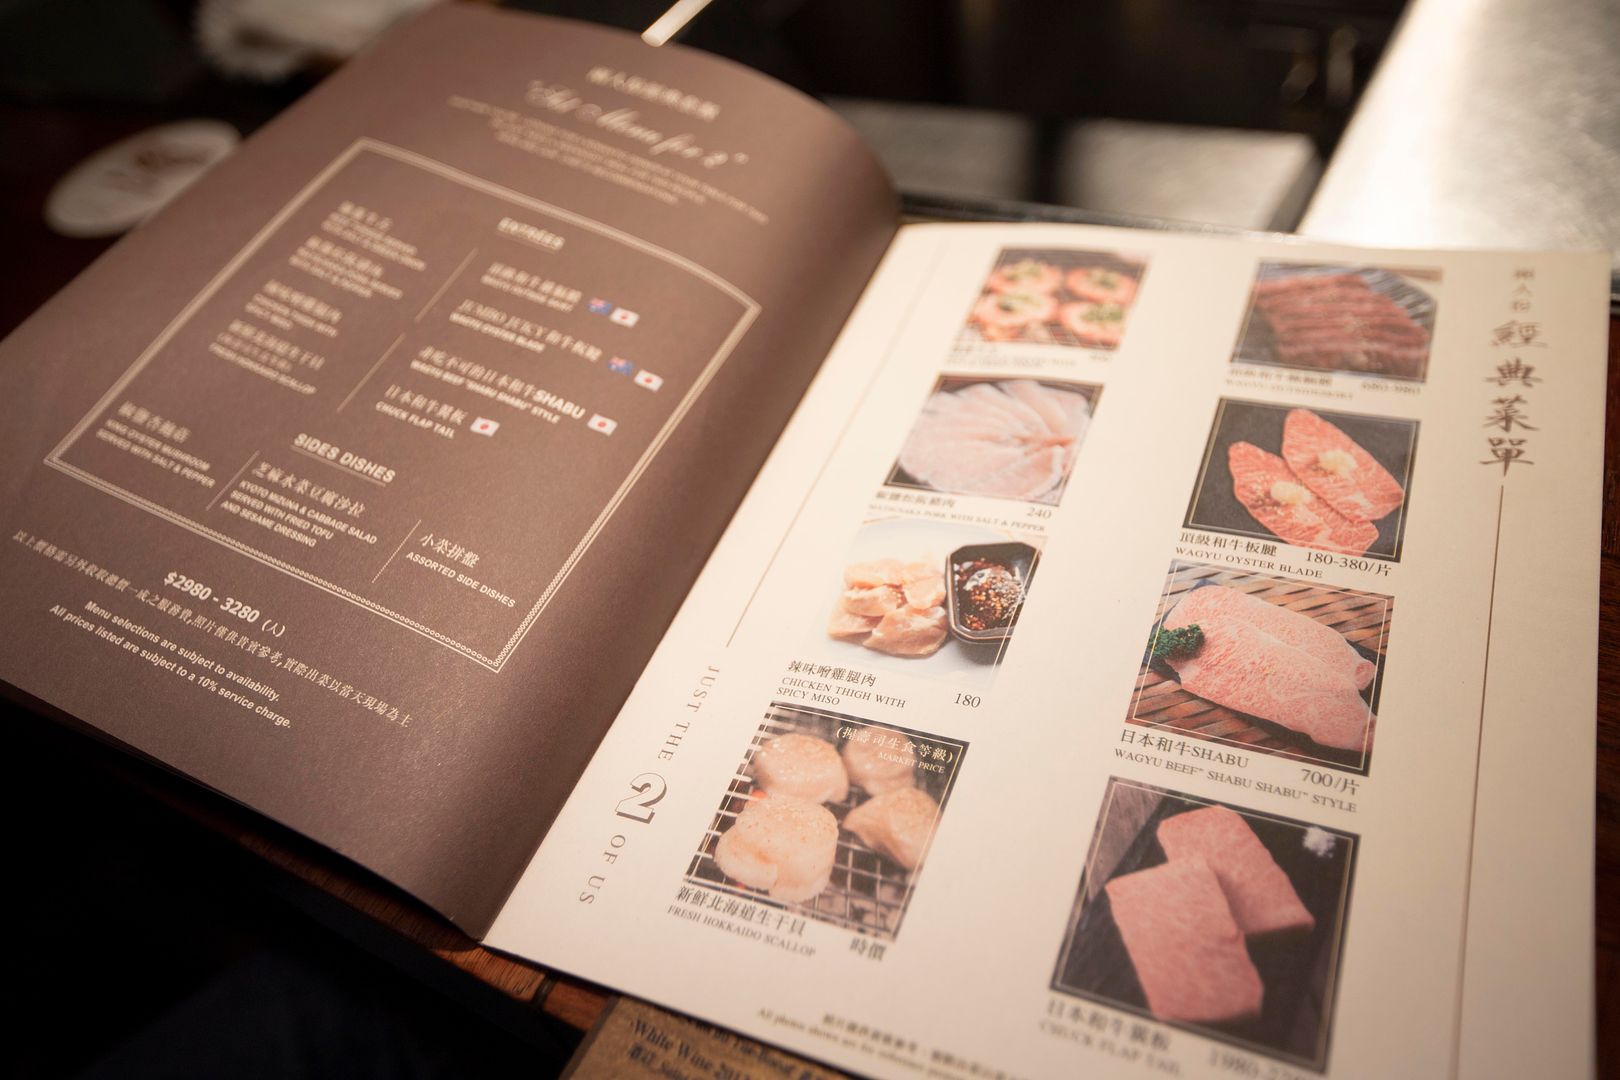
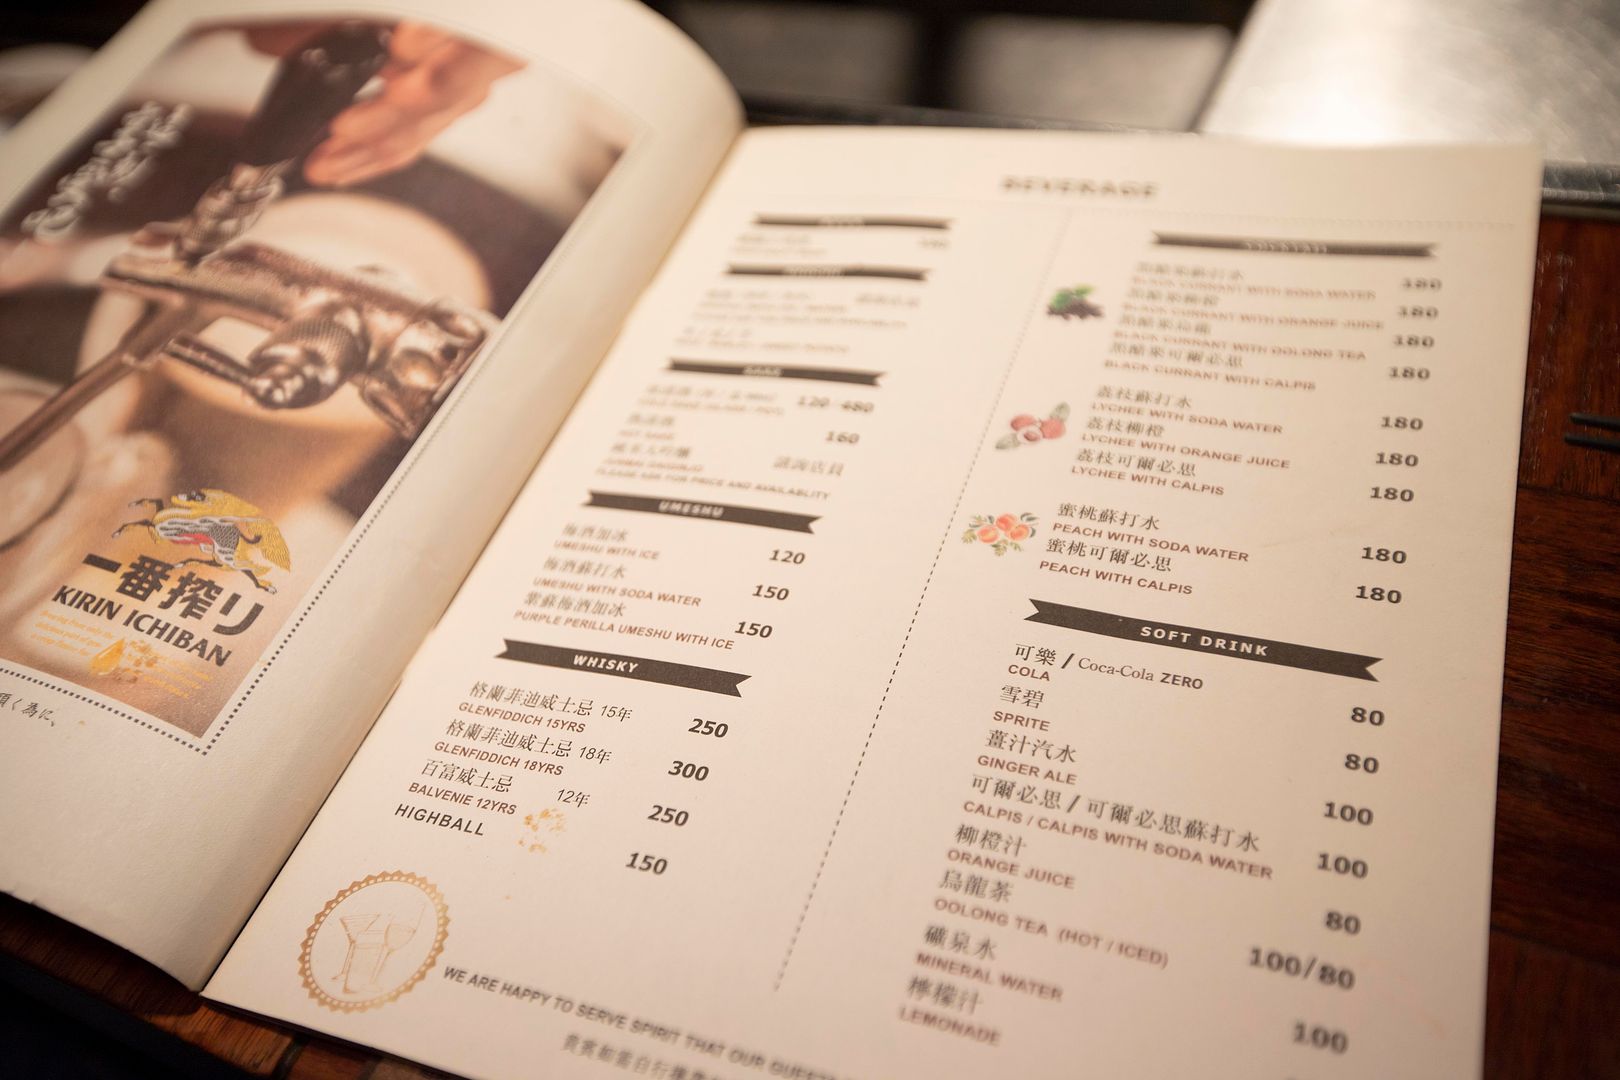
Nearly all items come with an image that customers can refer to on the menu, otherwise, the staff is more than happy to show you what are the differences of these wagyu parts. It can get confusing sometimes.
Considering a high-end yakiniku joint, one must try at least few wagyu dishes here, making it worth the trip, worth the hassles of getting a weekend dinner seat.
Set menu is also available, you get to try some fancy parts at a fairy reasonable price. Good for first timers. Get a set course then order one or two a la carte items as extra.
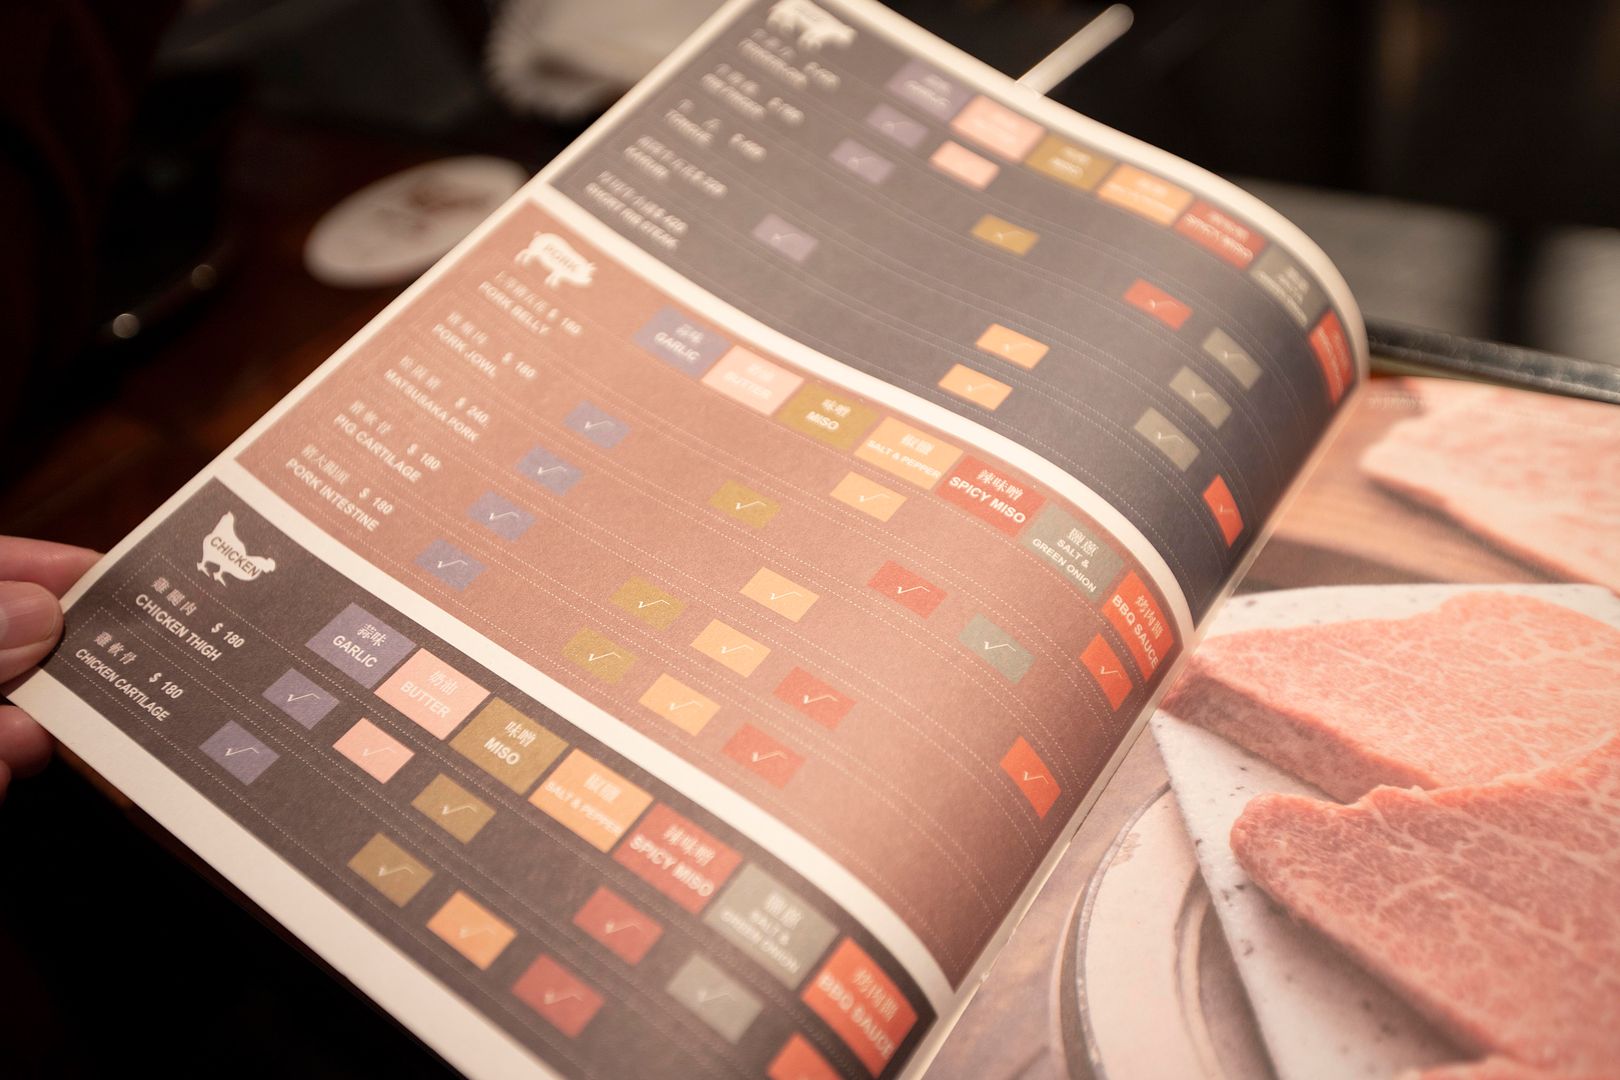
Parts and flavors chart -
Other dishes -
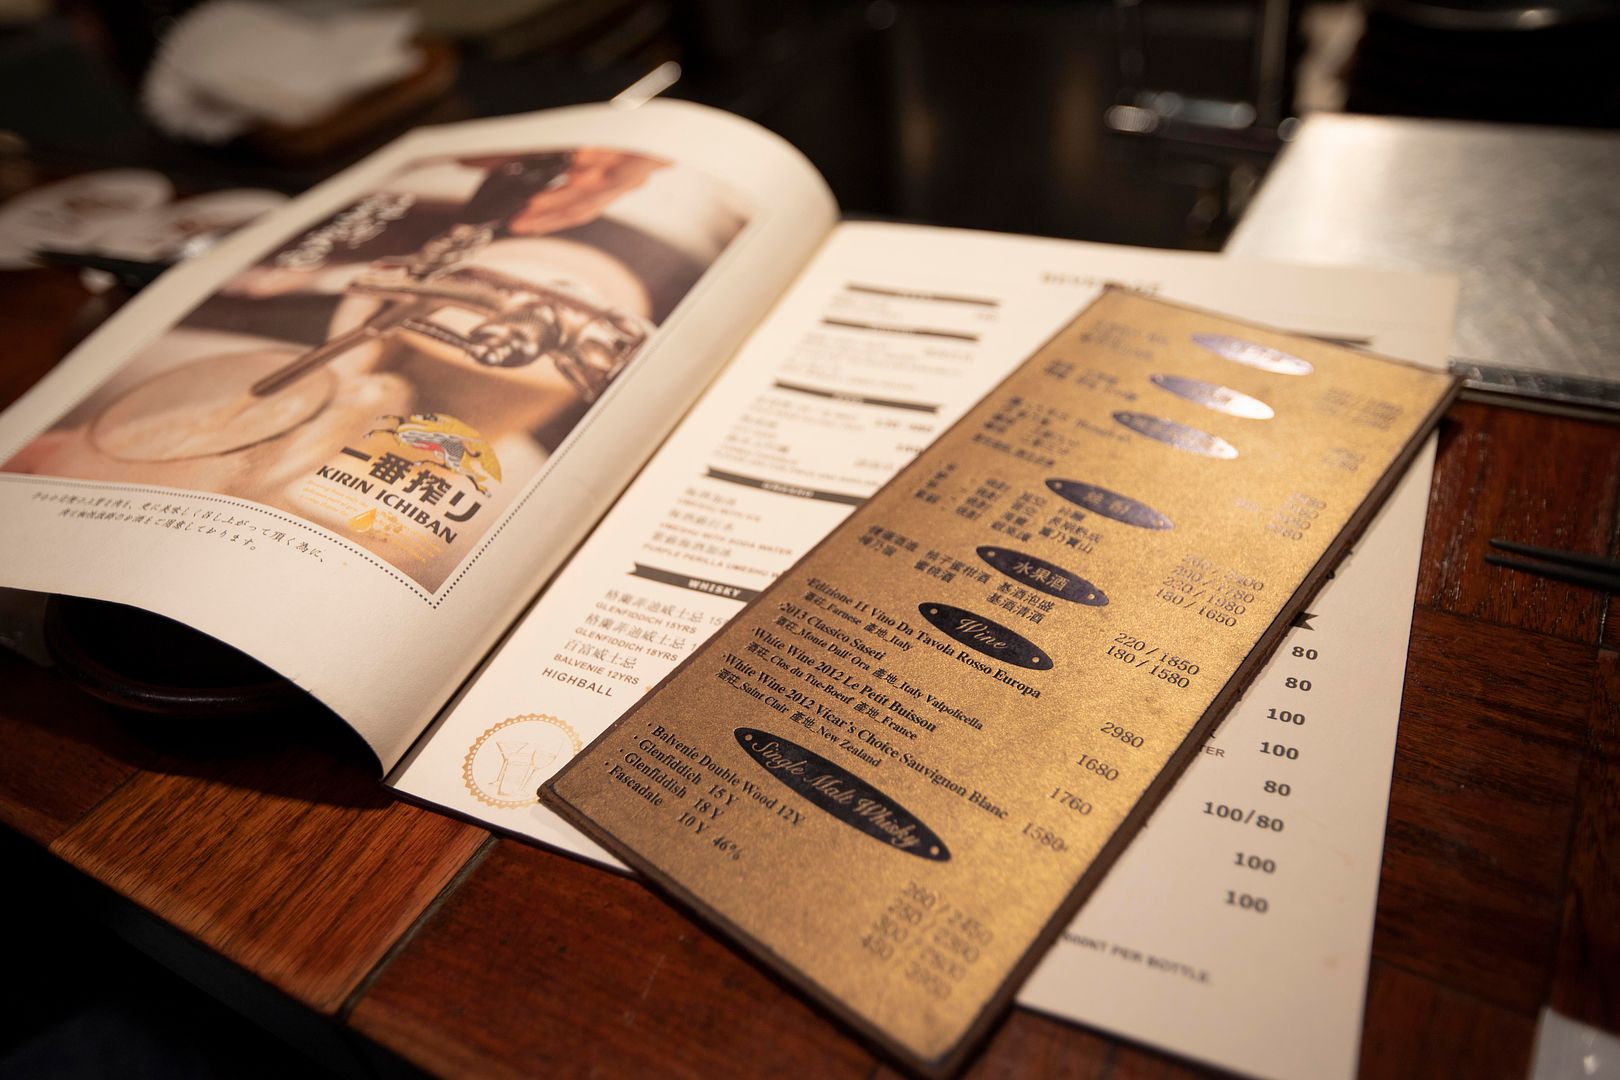
Drinks -
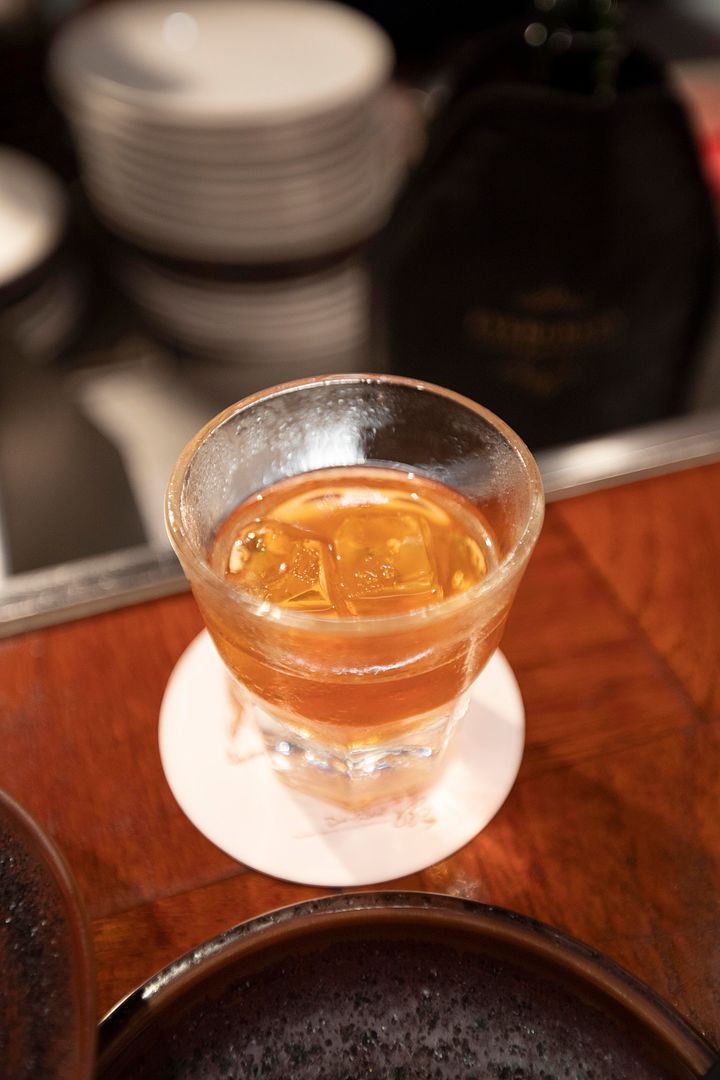
Plum wine on the rocks -
Always love that dense sweetness and sourish taste, a great start to a rather fat-heavy meal.
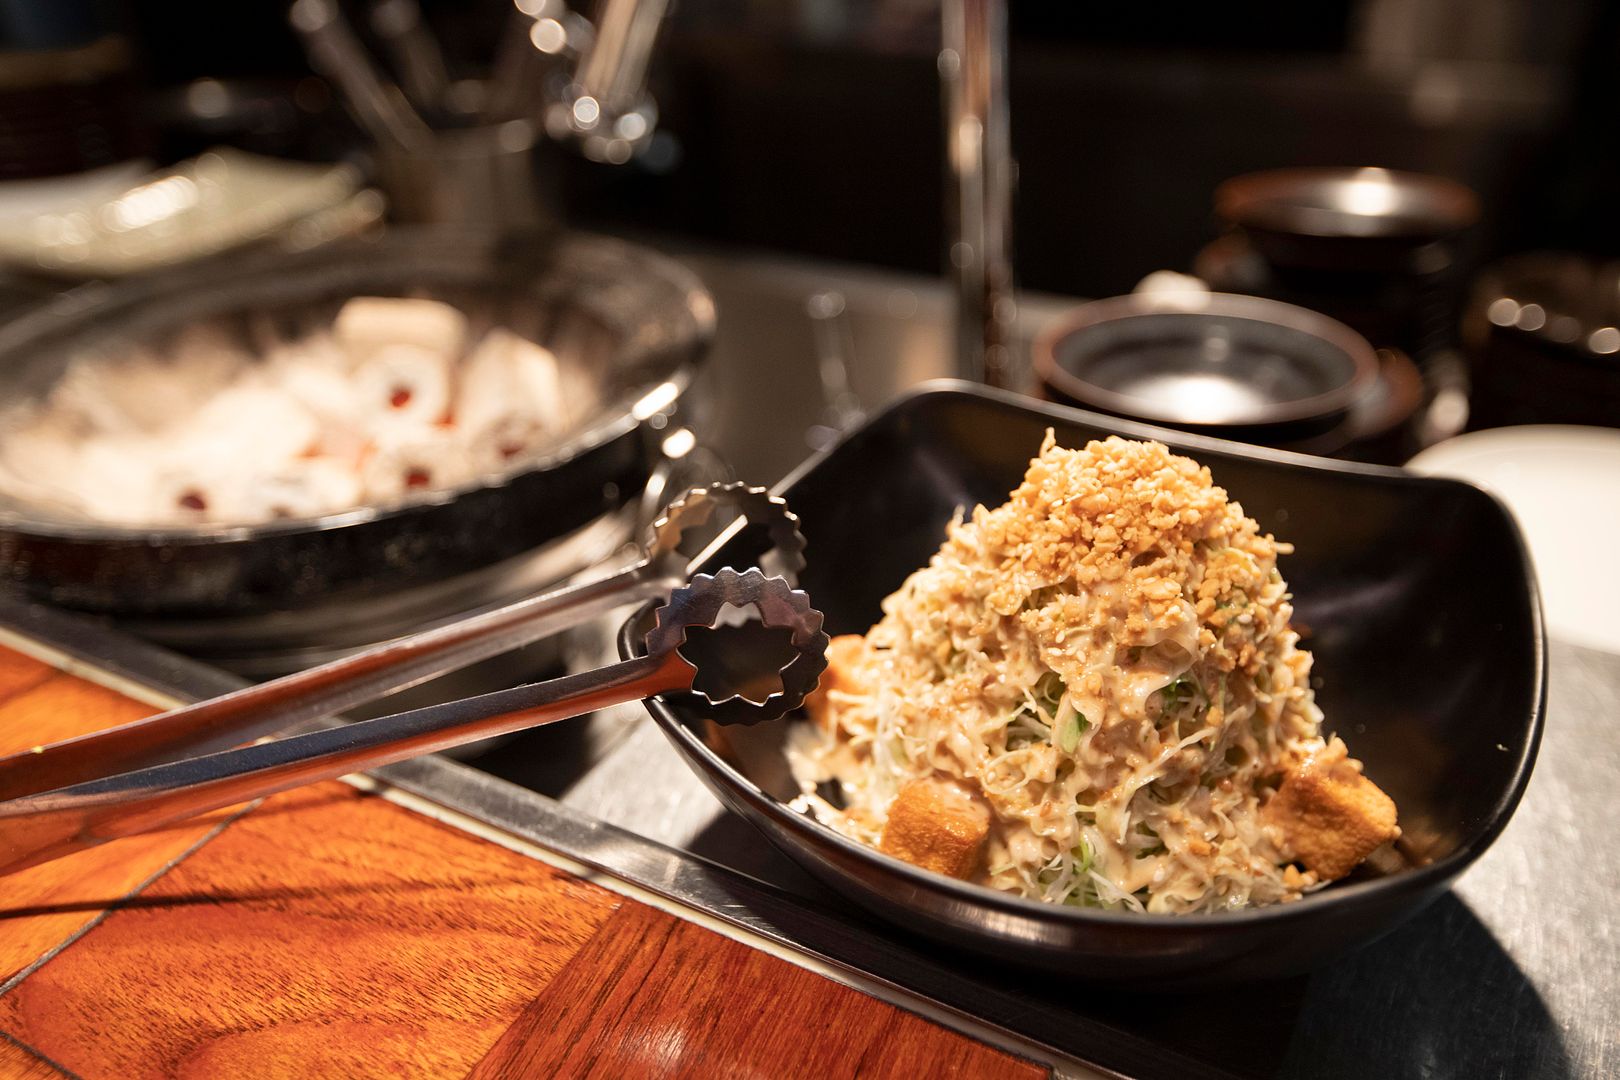
"Kyodo mizuna and cabbage salad, served with fried tofu and sesame dressing" -
Have to be honest here, the salad was here just to balance off the heavy meaty meal coming up. But surprisingly it was quite delicious. The amount of sauce used here almost overtaken the actual veggies, but the two elements bond nicely, adding each other's strength. And there're crunchy tofu cubes creating one extra layer of texture. Not light but very flavorful salad indeed.
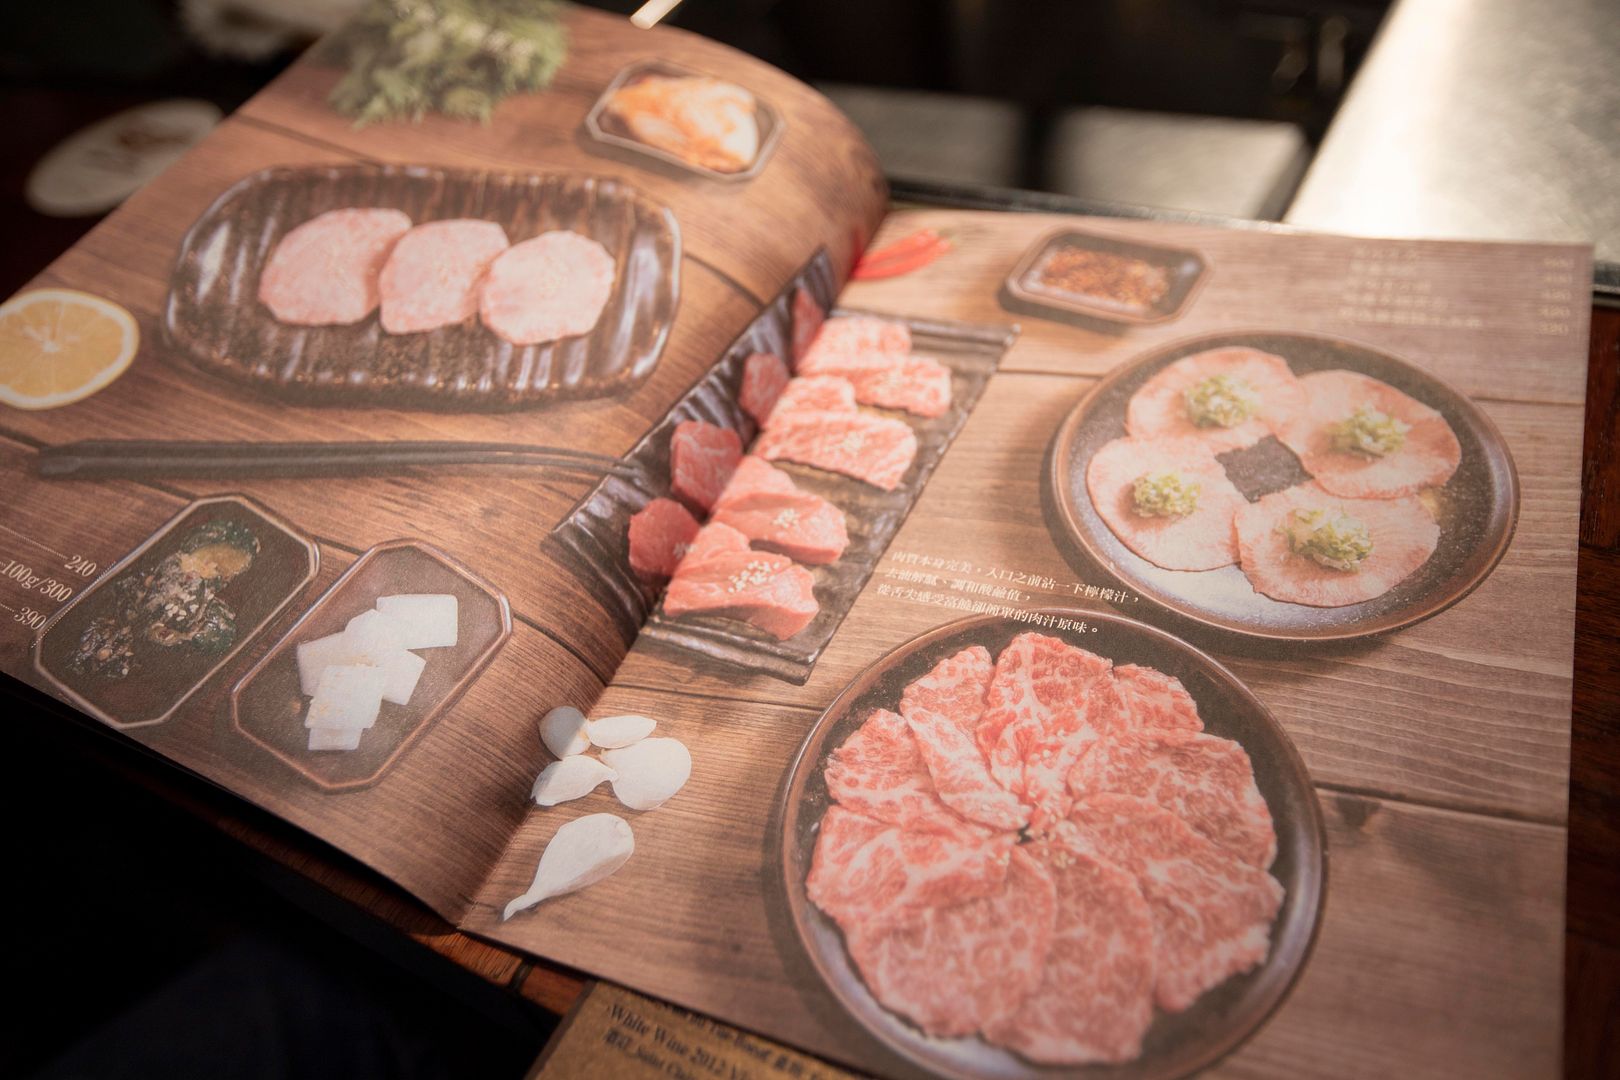
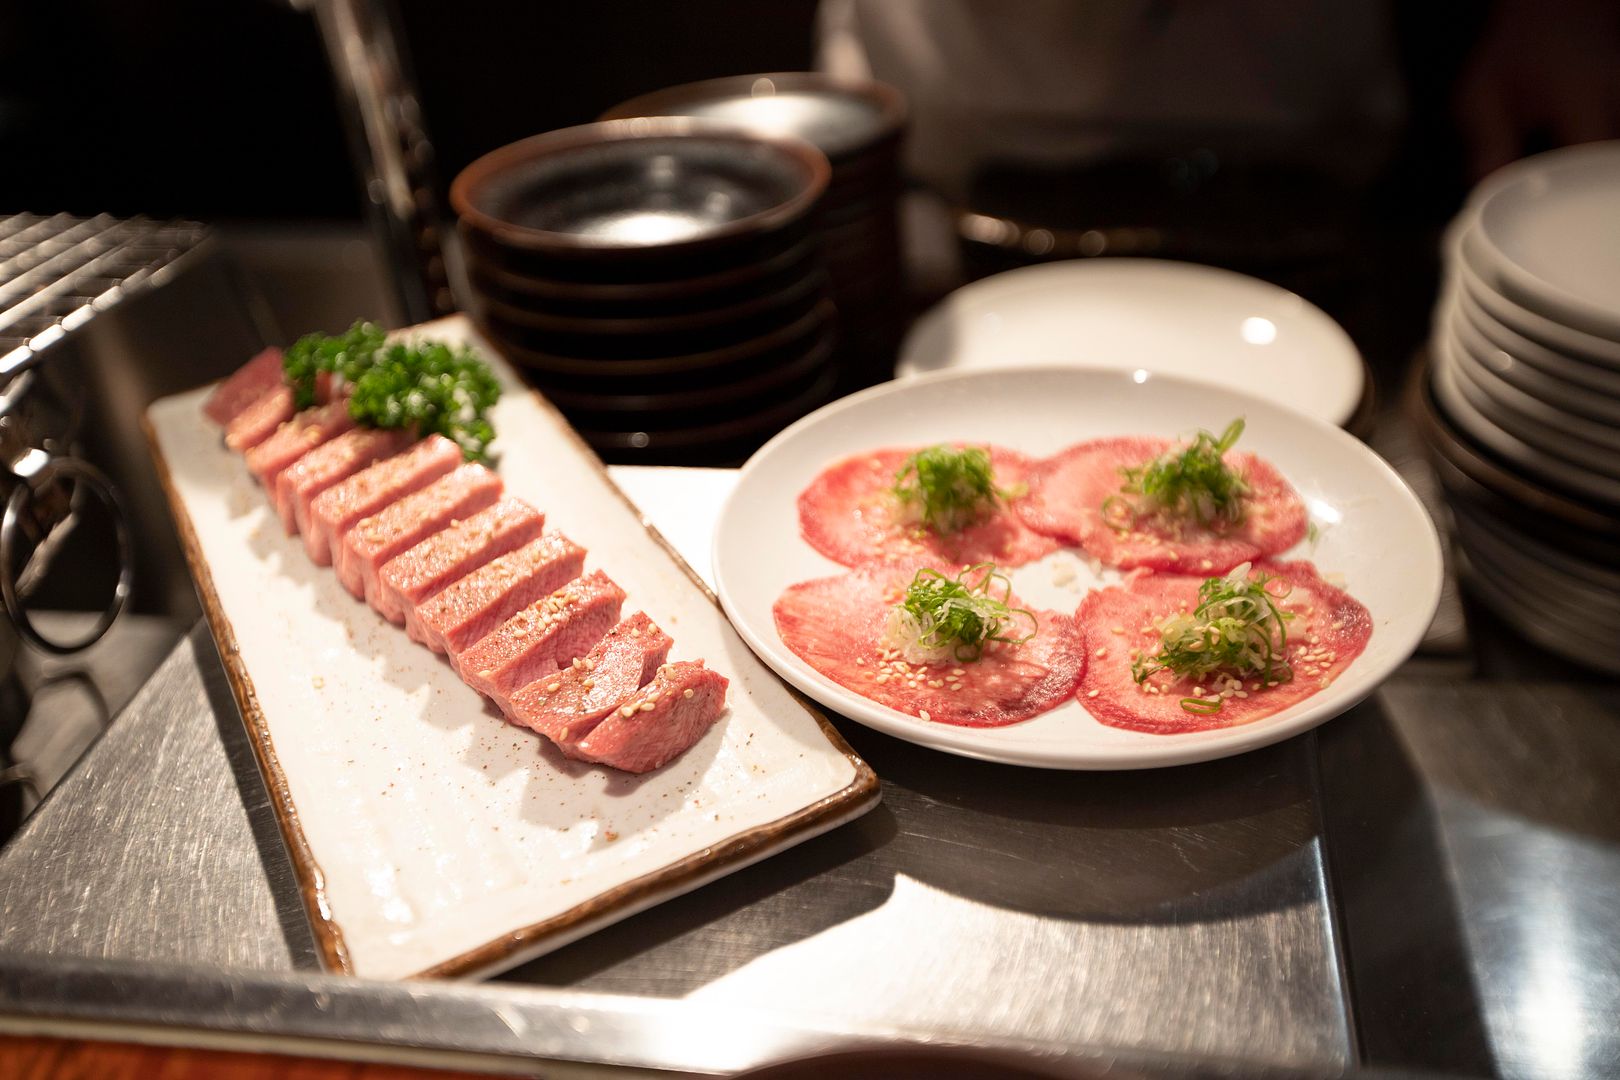
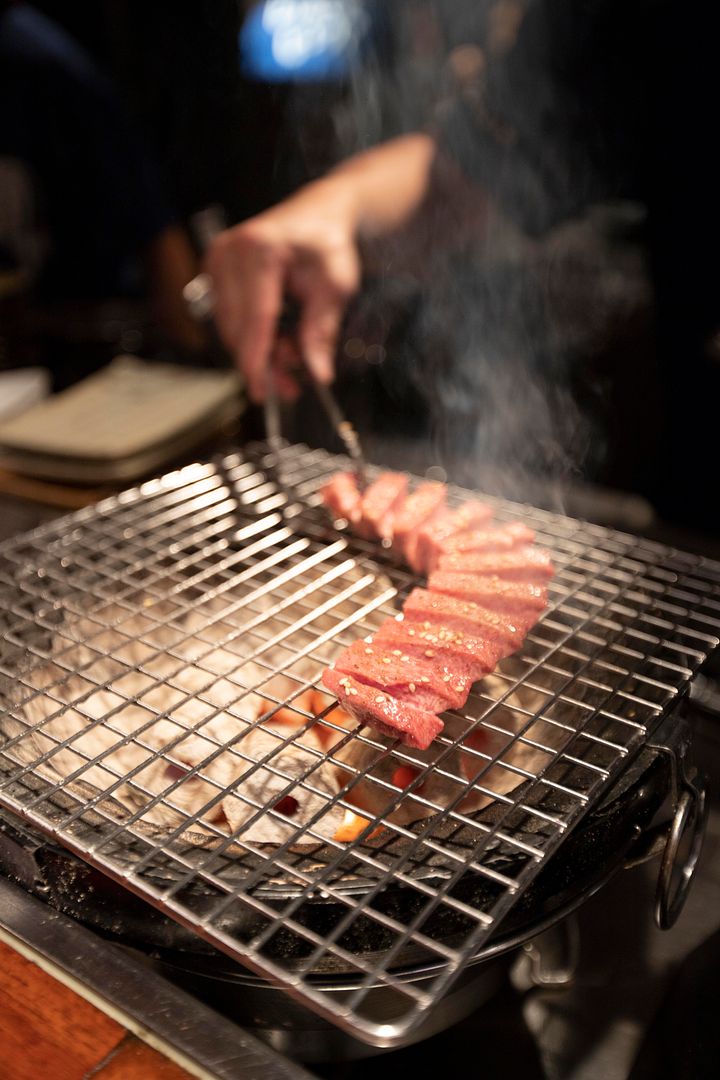
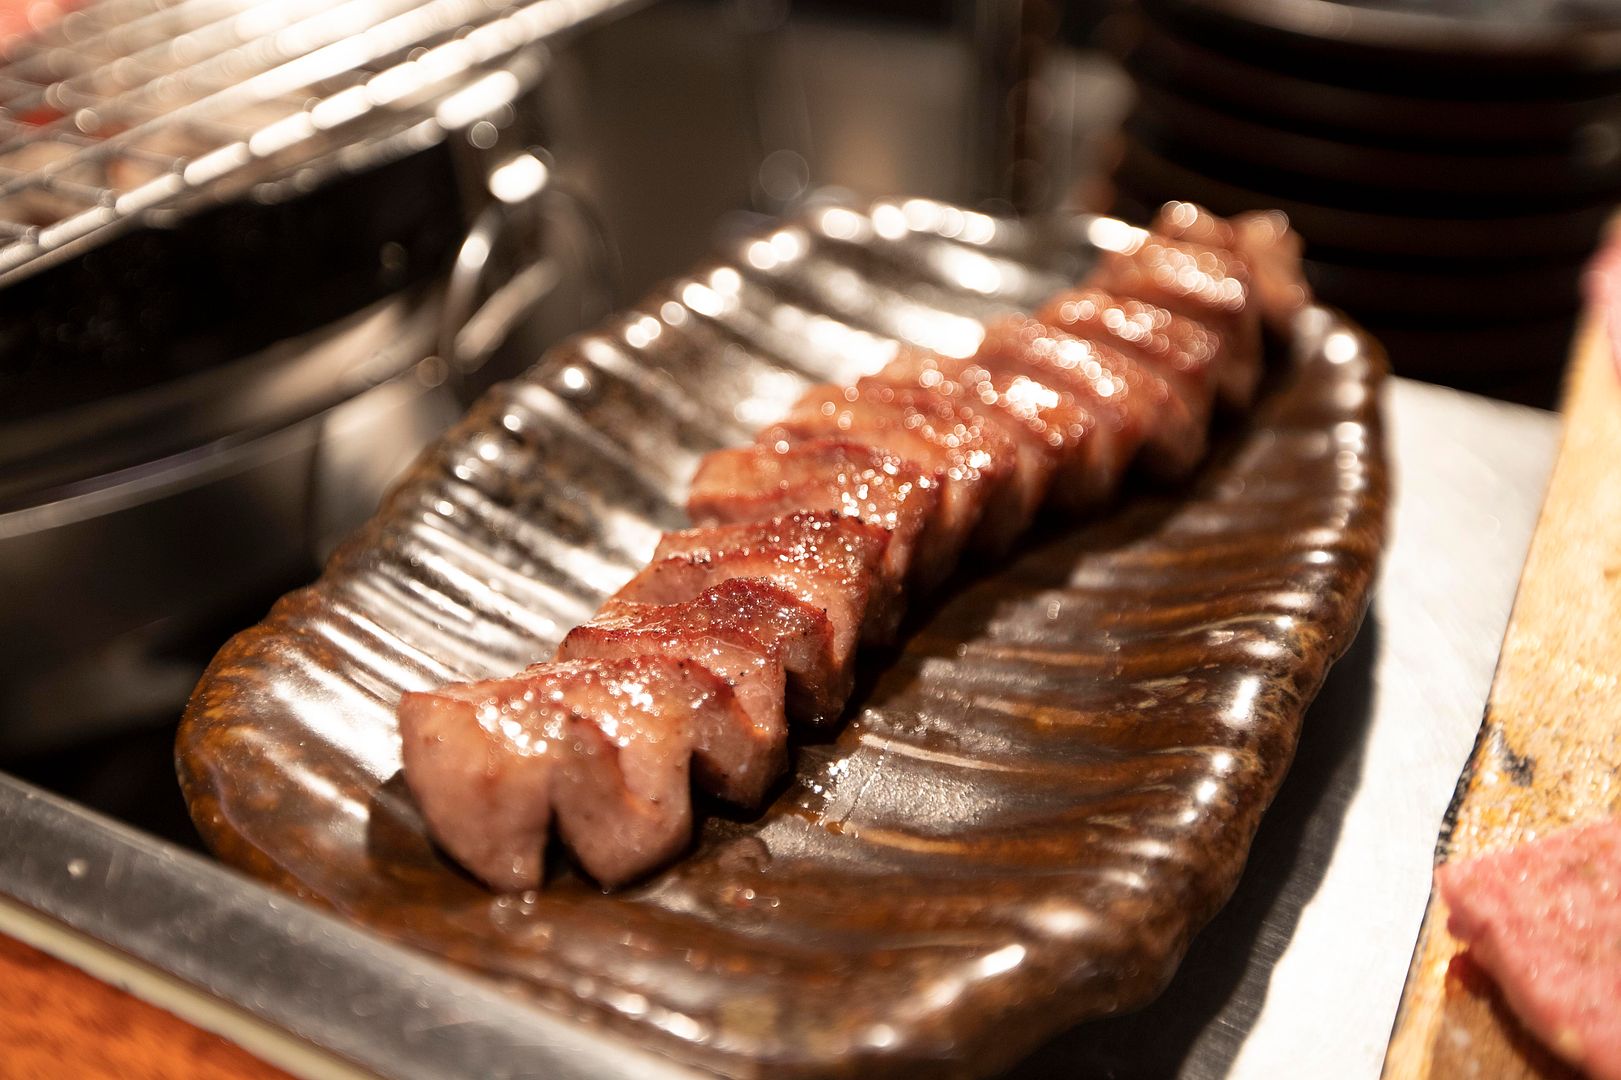
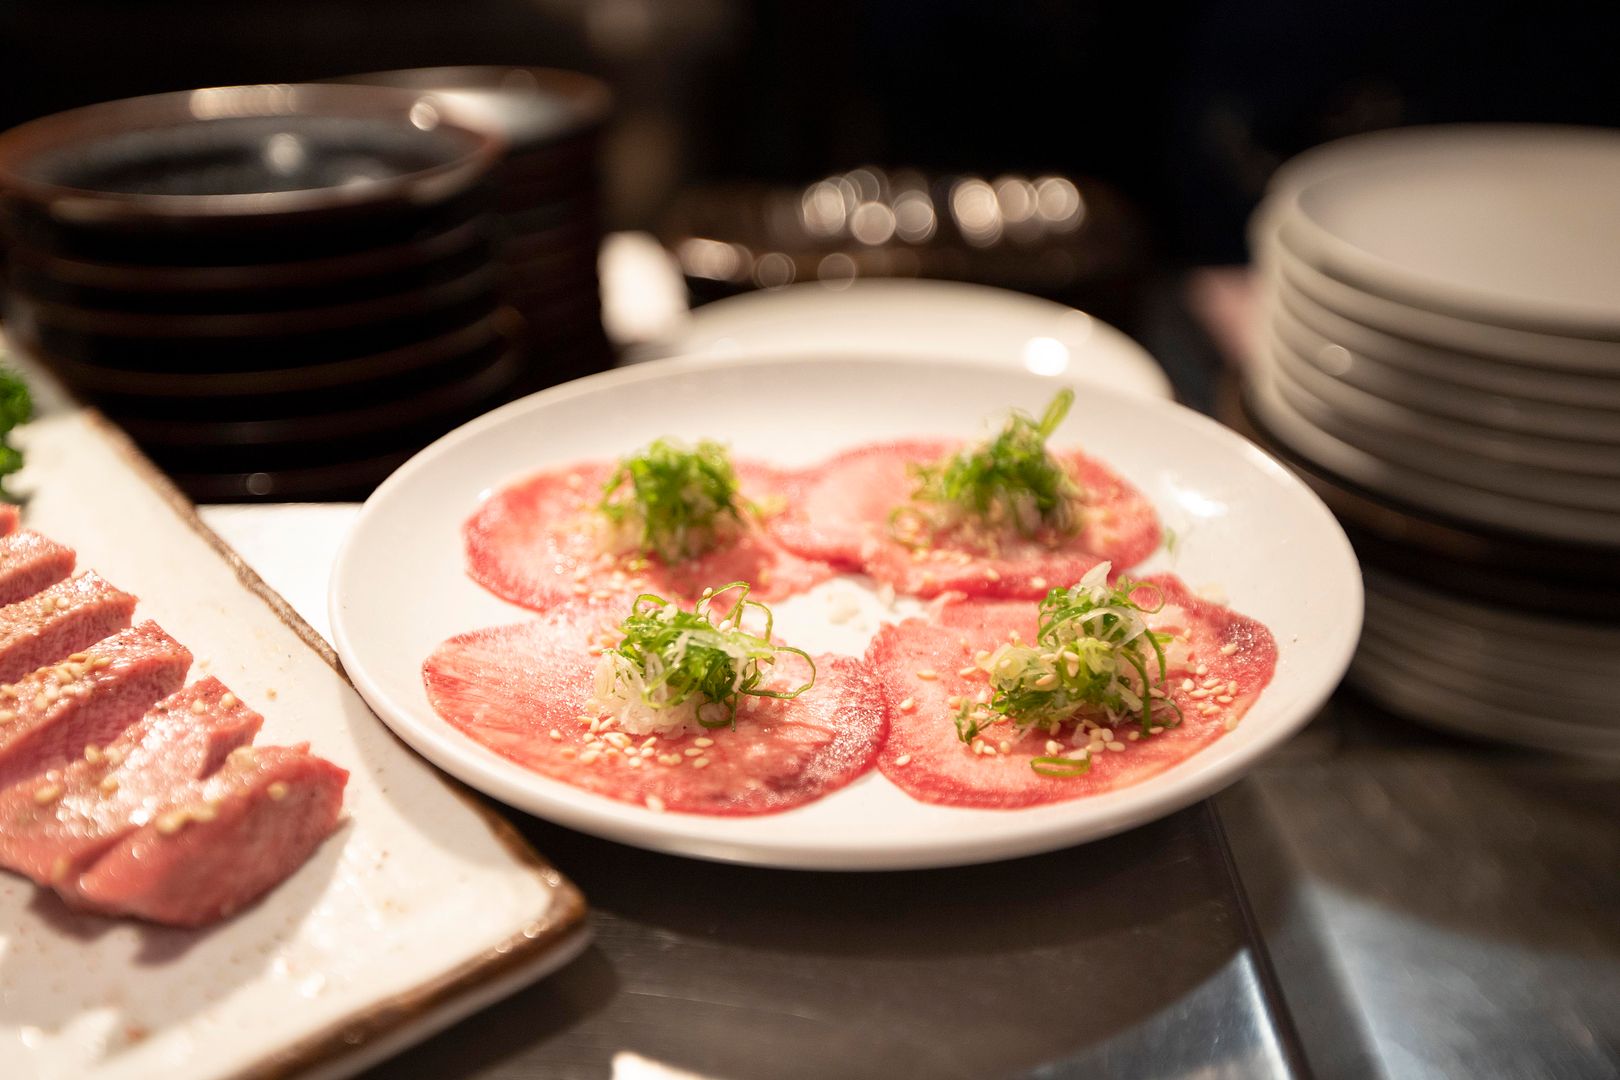
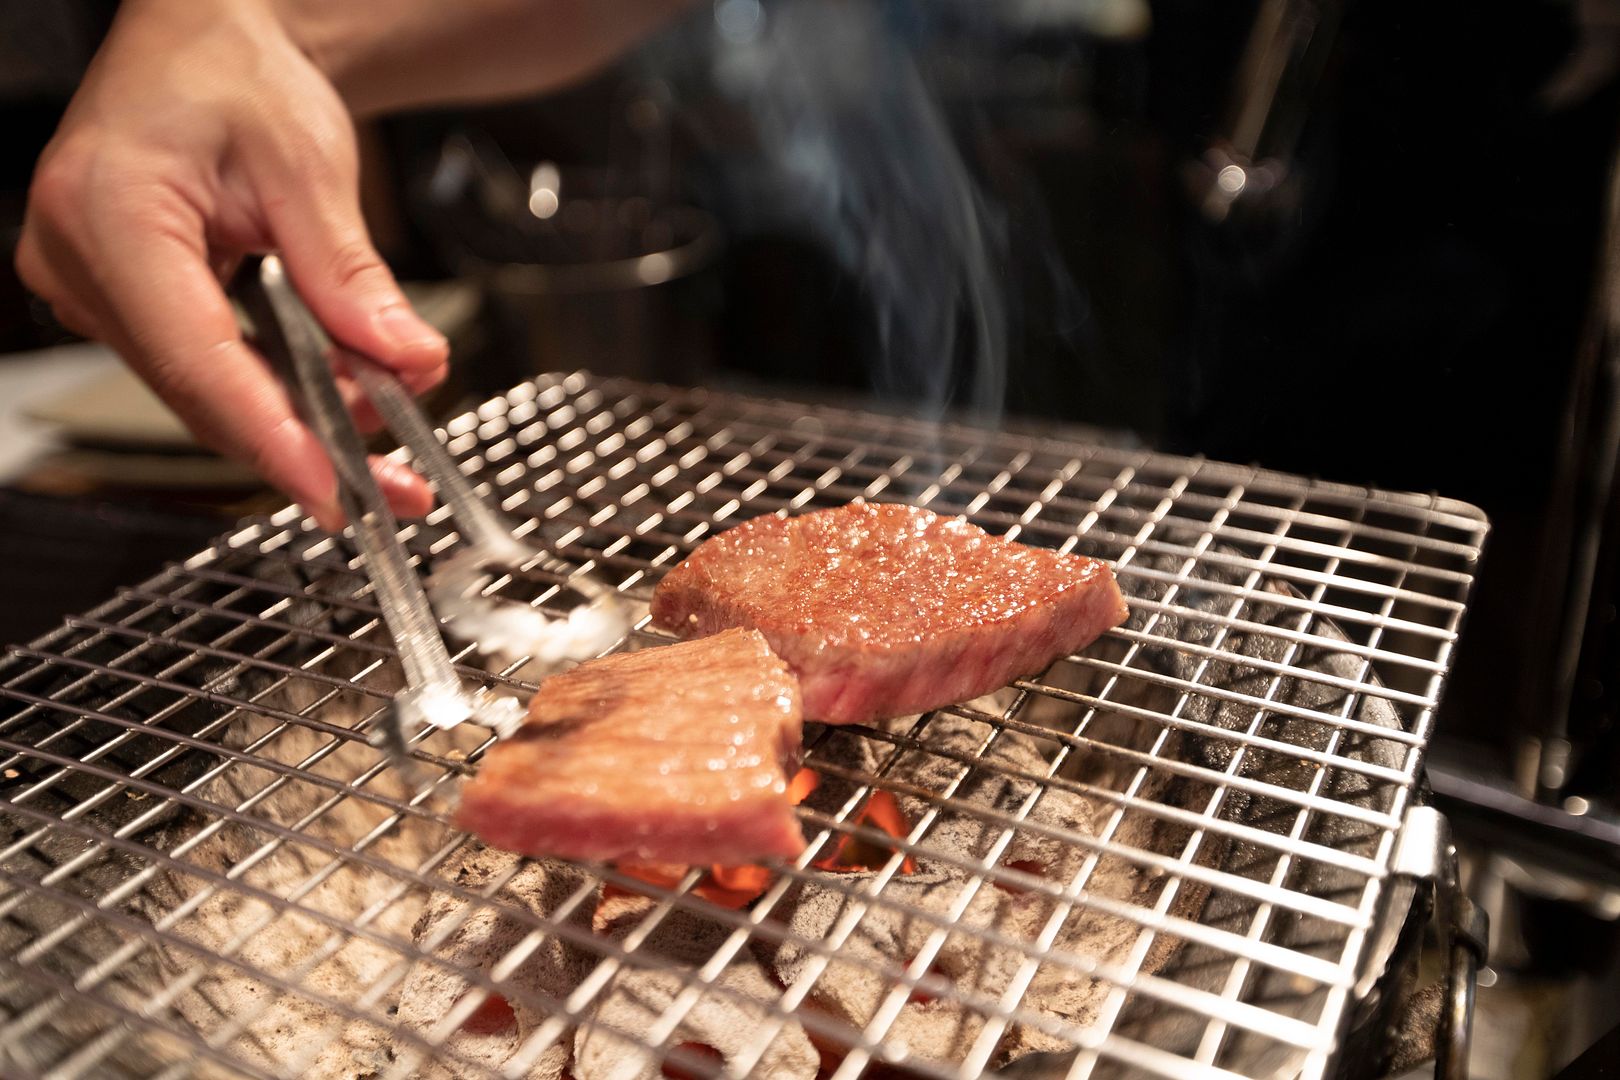
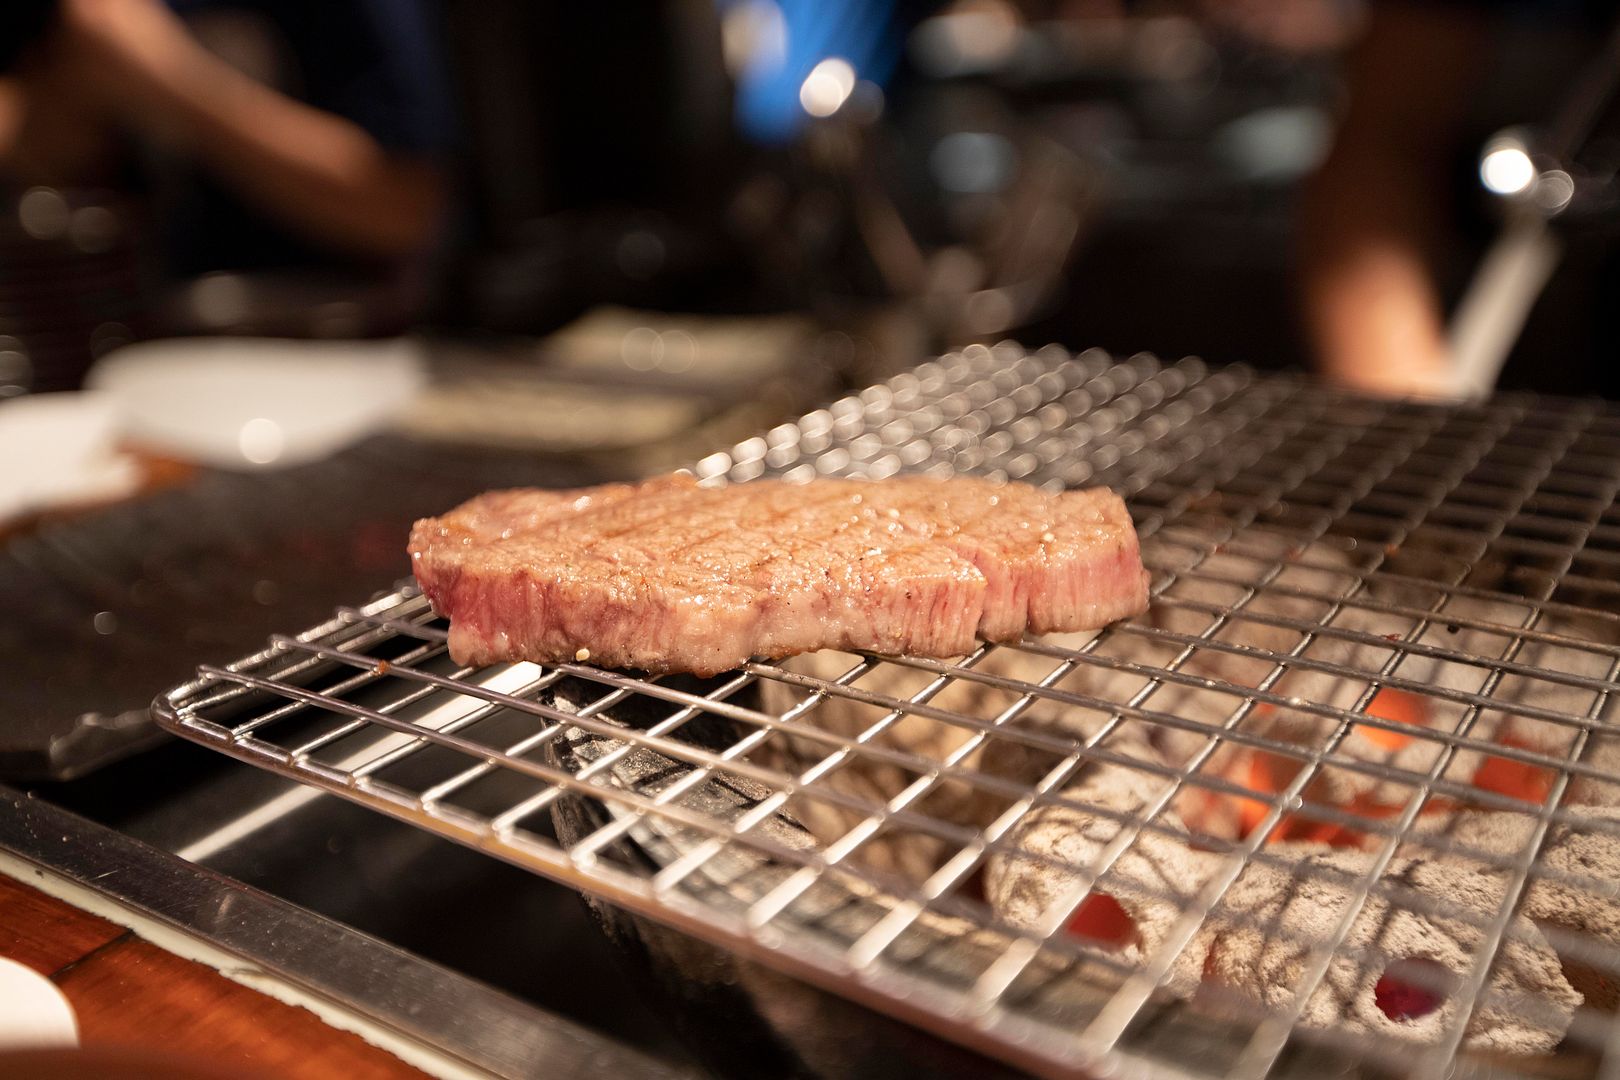
Beef tongue duo -
Being a fan of beef tongue, I have to order both beef tongue dishes on the menu. The strip-looking one is the end part of the tongue. Usually you'll find restaurants simply slice it into thick pieces. But at Da-Wan, they separate a whole section of the tongue "vertically," also not cutting the pieces all the way down. That's why these pieces are still connected and grilled as a whole.
Not just grilling and serving, after the first grill, the thick-cut beef tongue was put aside to rest for few minutes, then back to the grill again to get to that perfectly thin crust on the surface.
No extra seasoning, but if you'd like, a gentle dip in freshly squeezed lemon juice to brighten up the flavors.
Every bite was paradise to me.
If you had thick-cut beef tongue before, you might be able to relate to that distinct bouncy but not chewy texture. This one with one extra bonus, thanks to wagyu quality, the fat throughout even though not as obvious as other parts, but for sure it further tenderized the meat. So the more you chew, it seemed like a very thin layer of fatty juice started to come out, bouncy and somewhat juicy at the same time. Highly recommended, do not miss this one if ever paying a visit at Da-Wan.
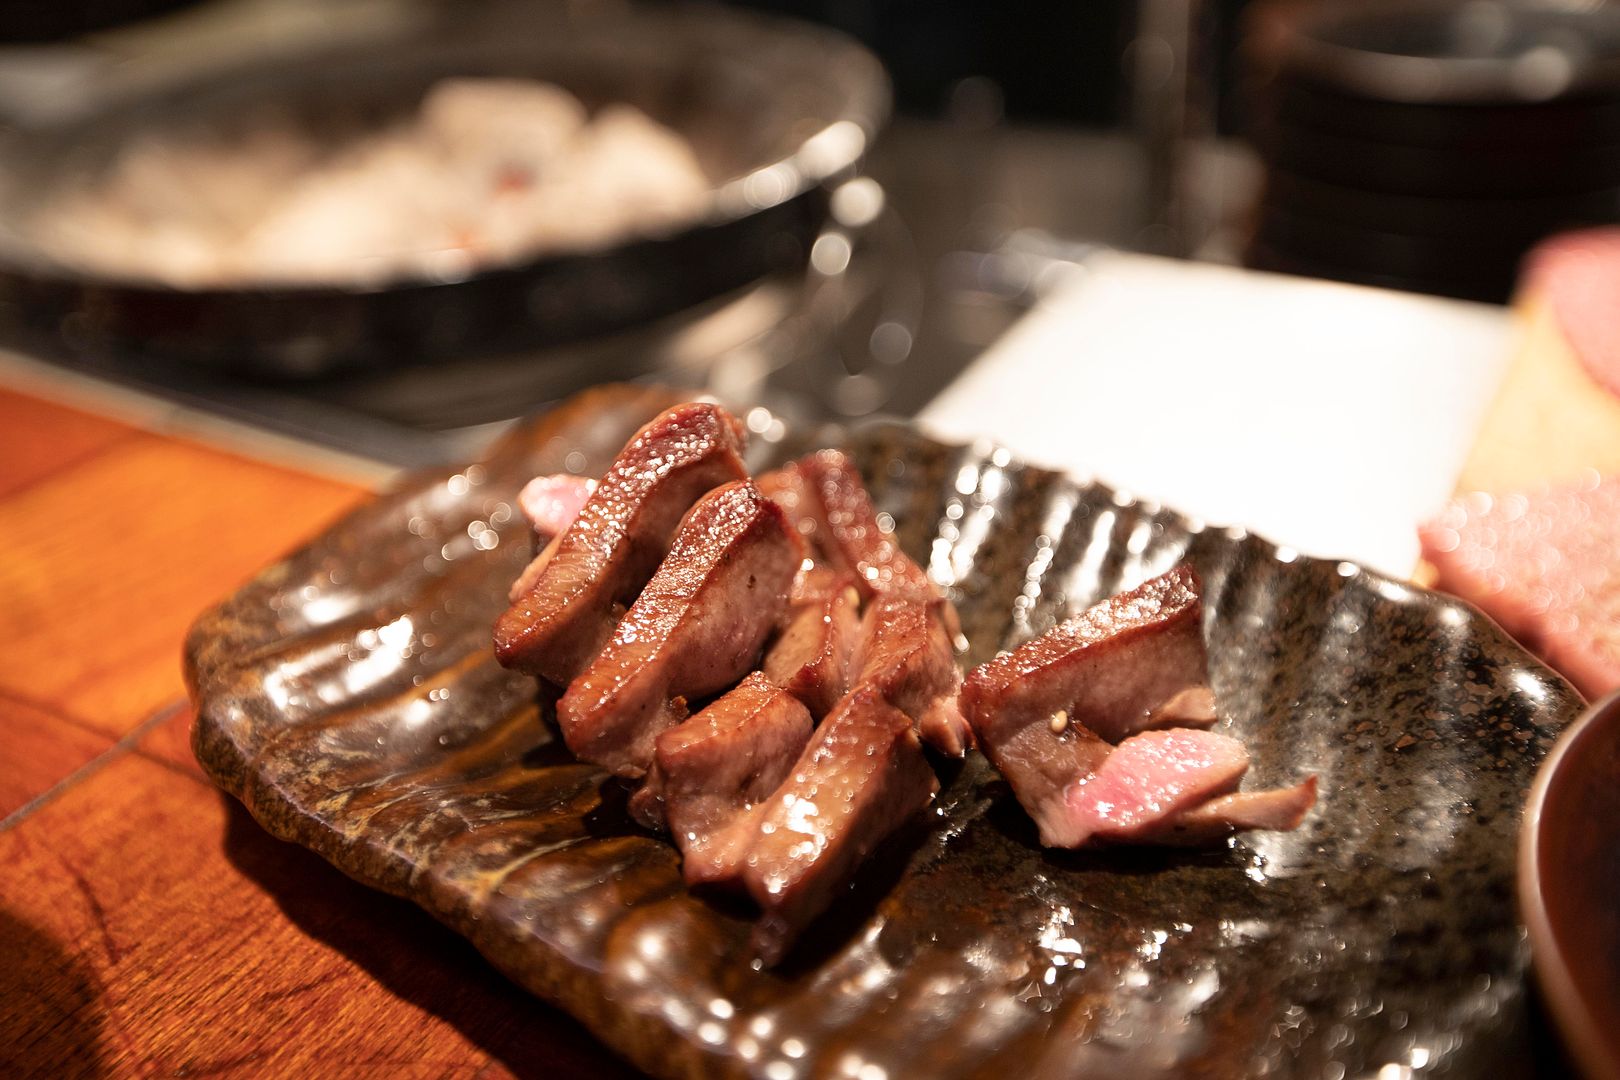
The other part is close to the front/tip section of the tongue, usually much chewier. As a result, most places prefer to thinly slice this section. Here, served with salt and green onion -
No need to double grill.
Instead of that bouncy tongue earlier, this one is leaning towards the chewy side, but still easy to eat.
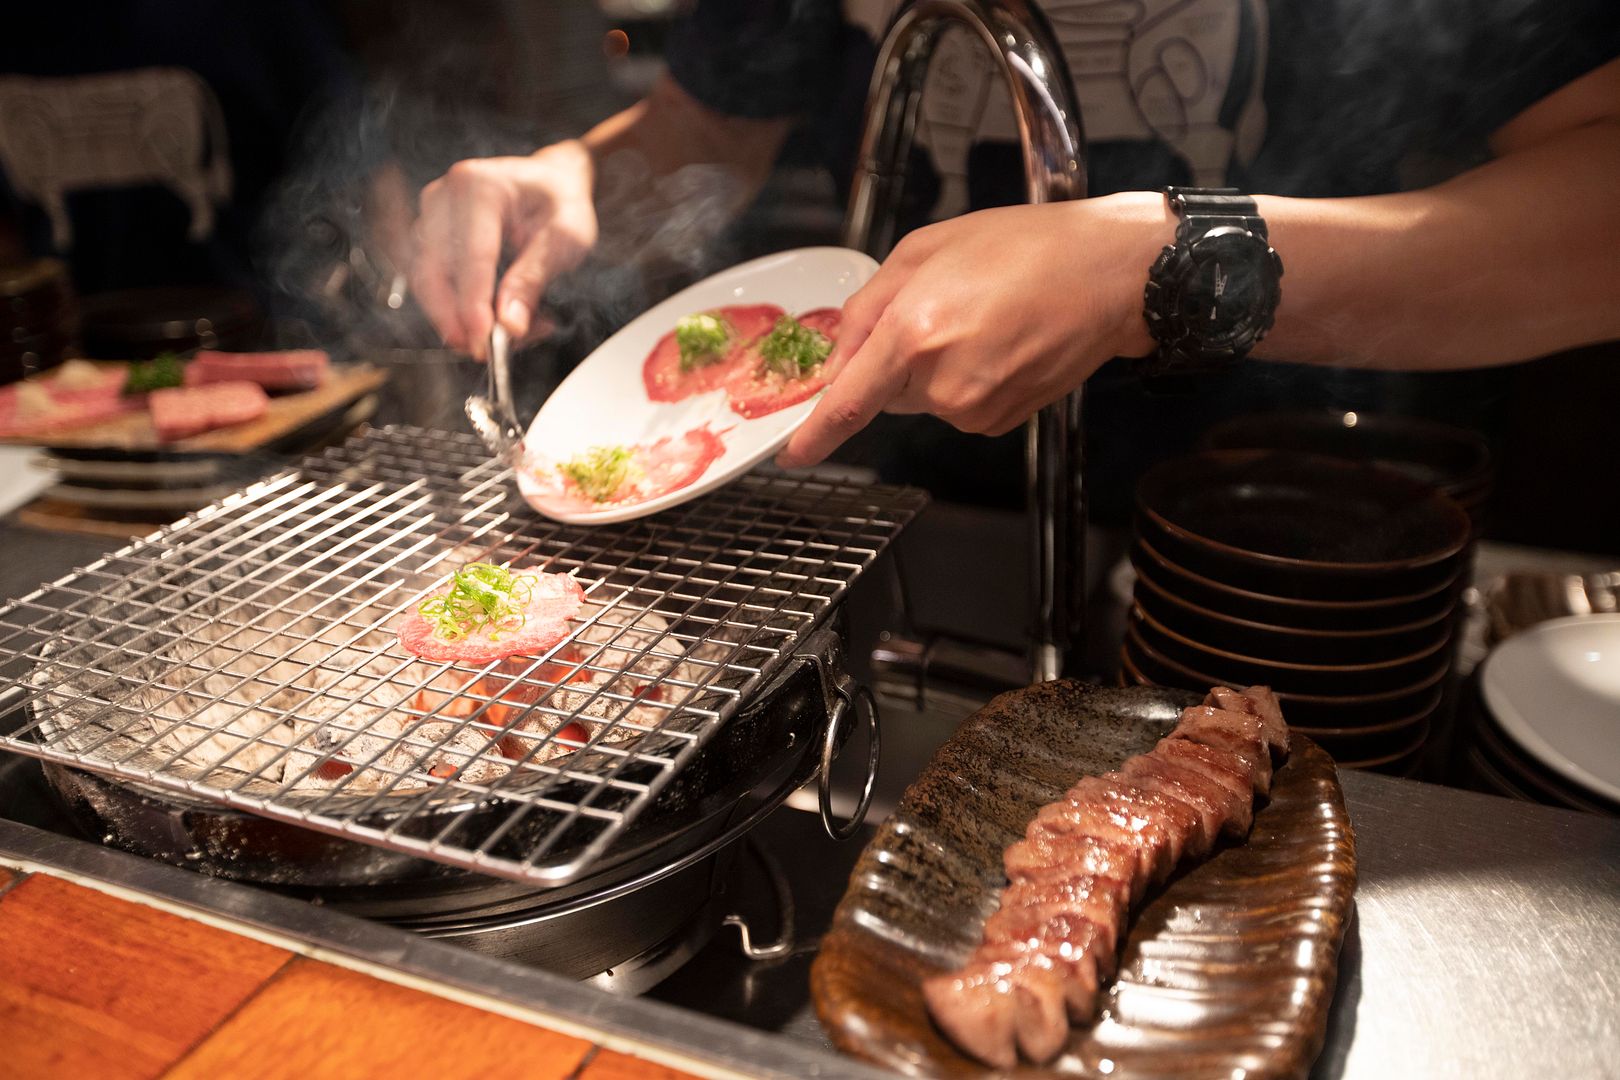
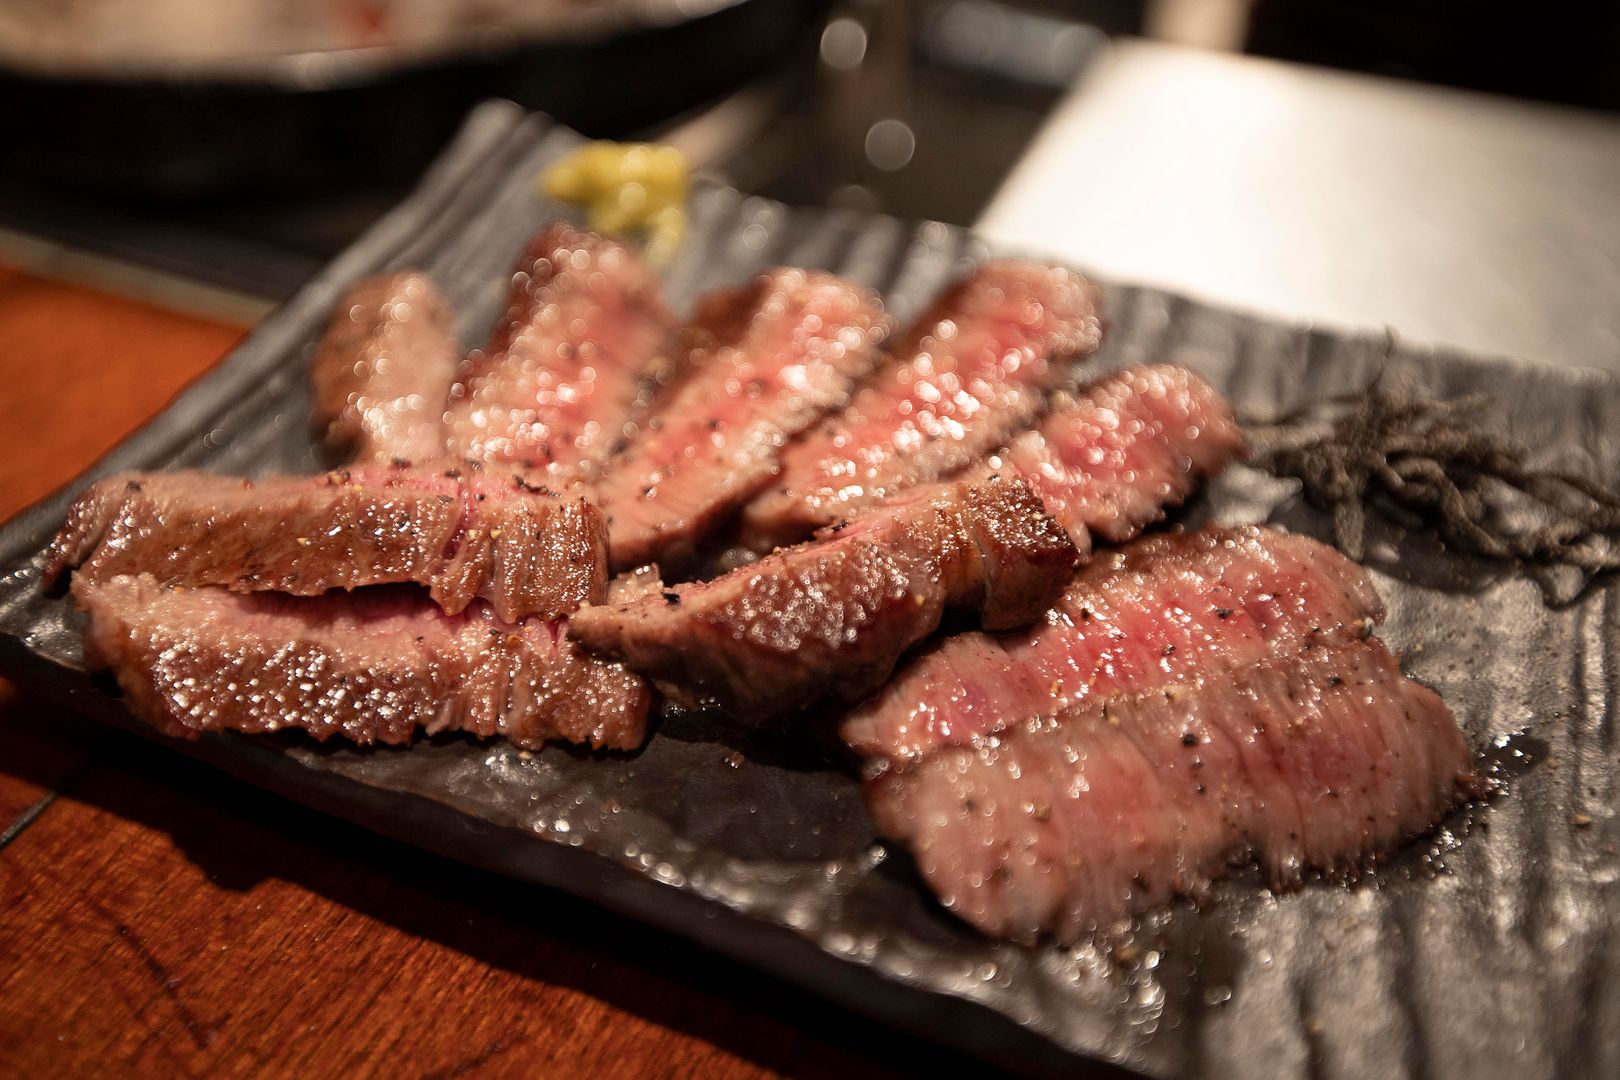
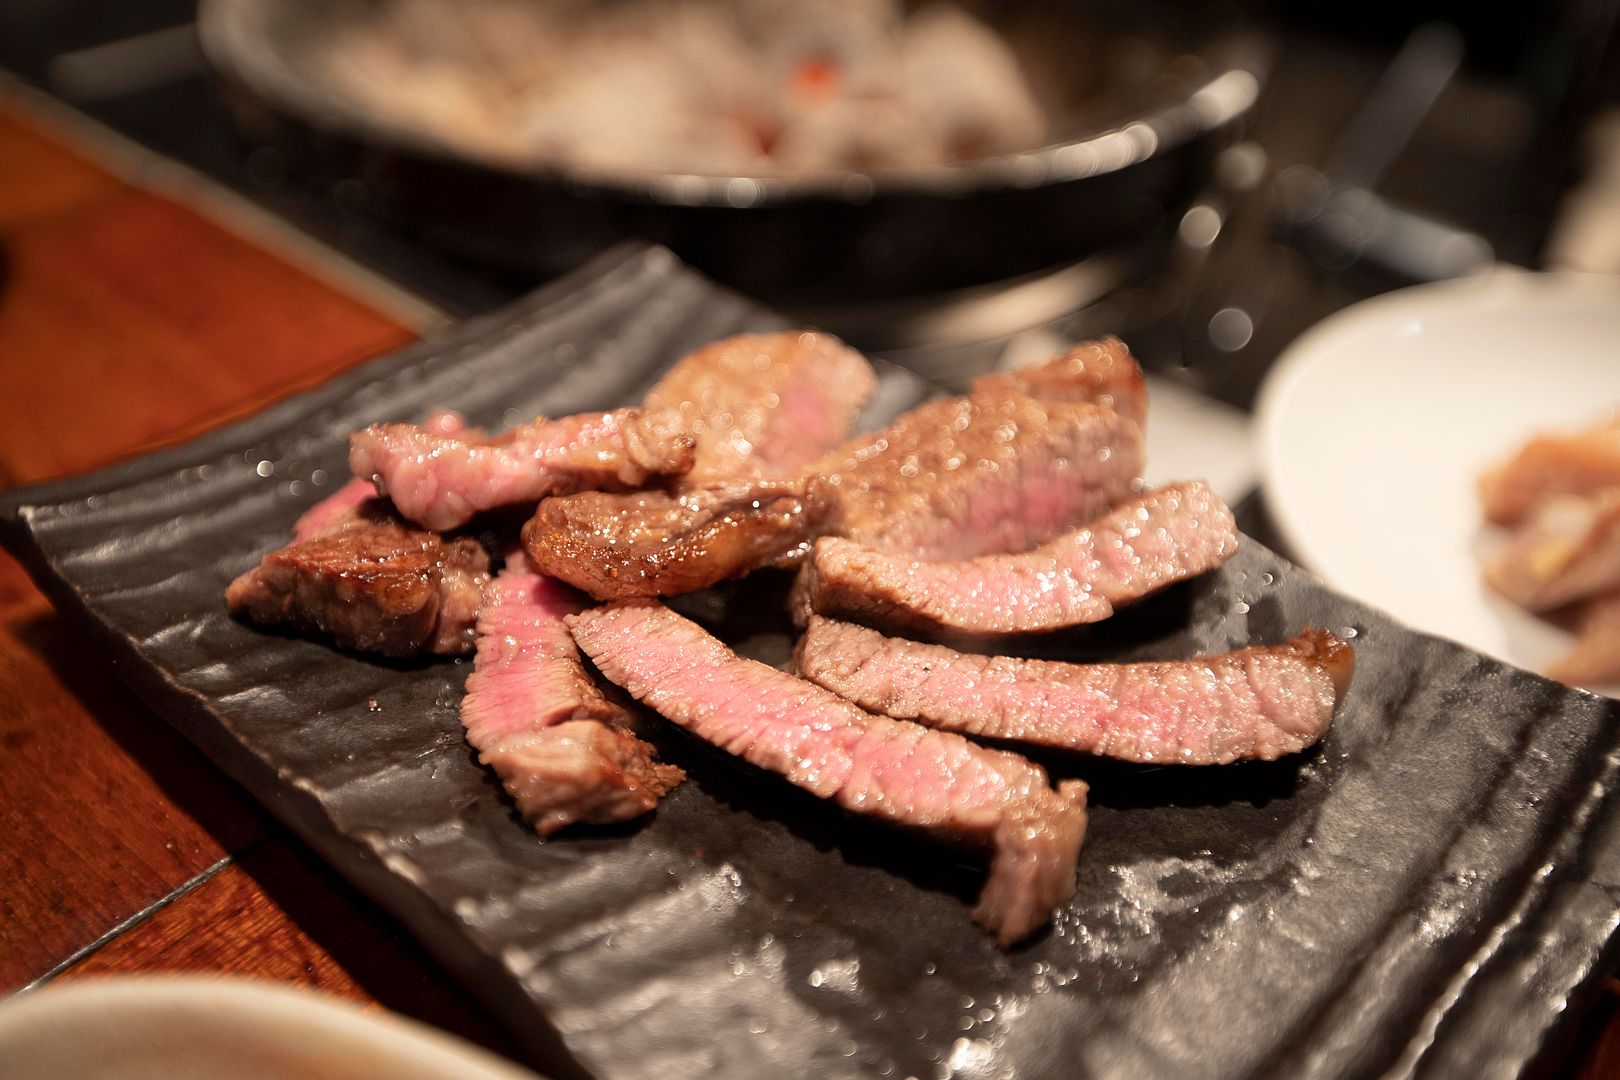
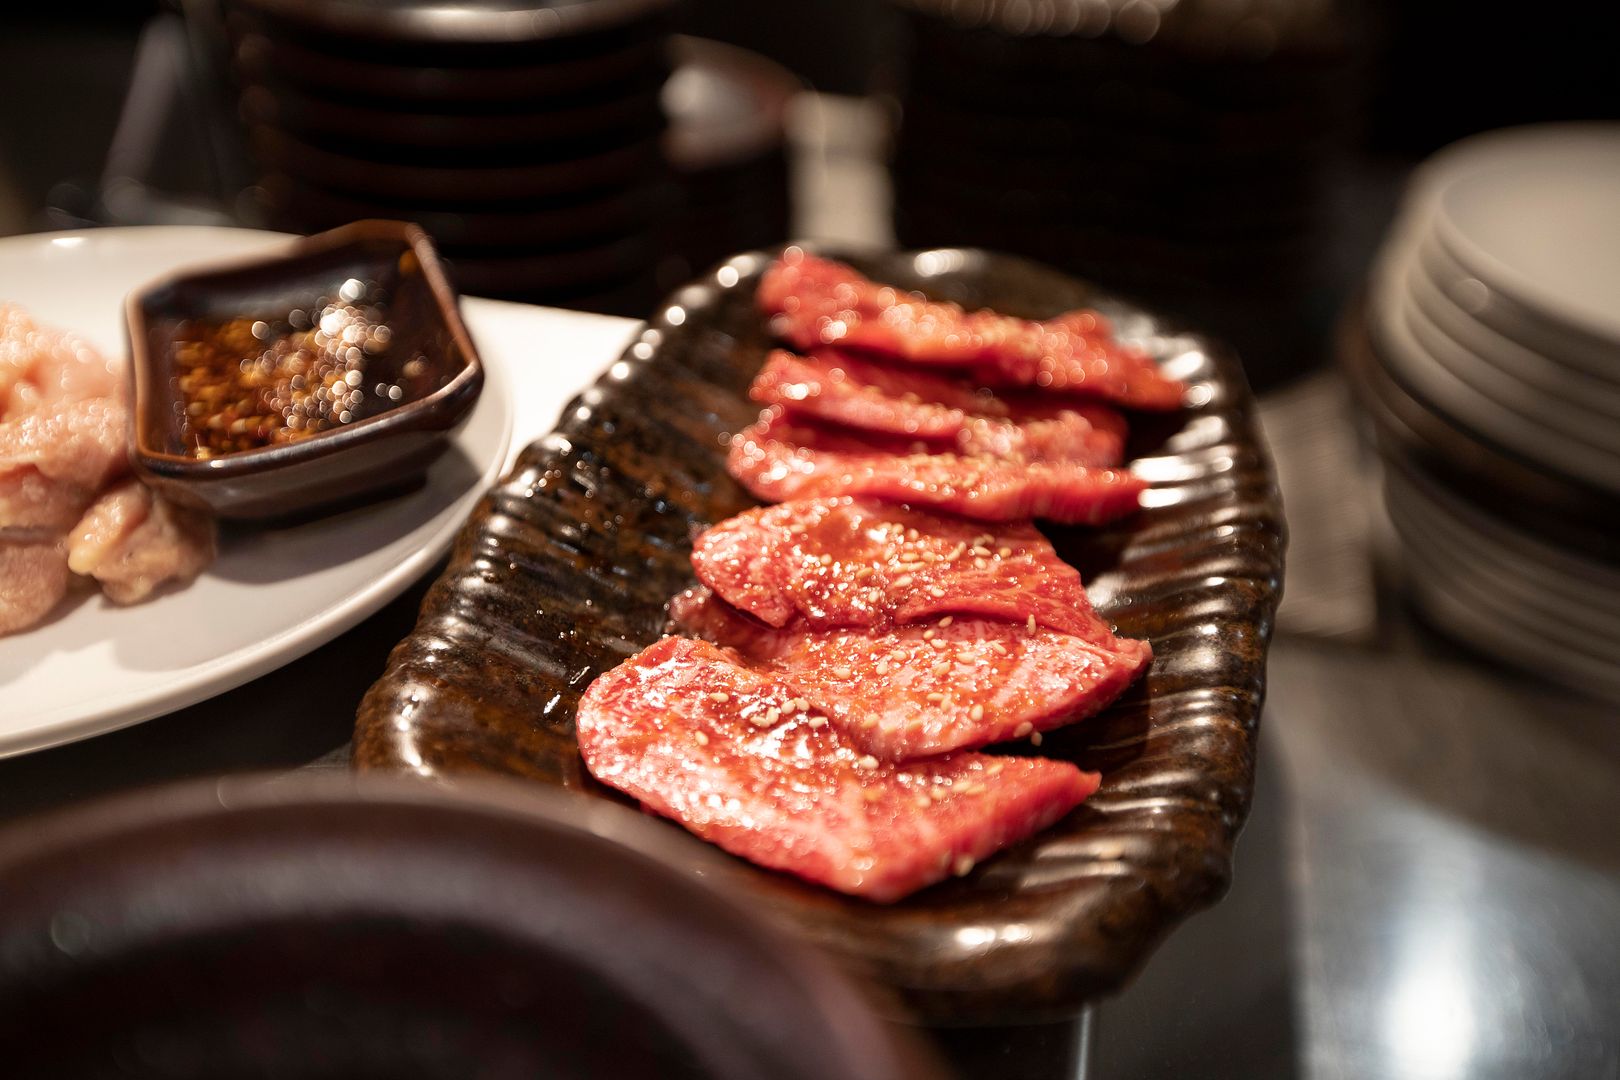
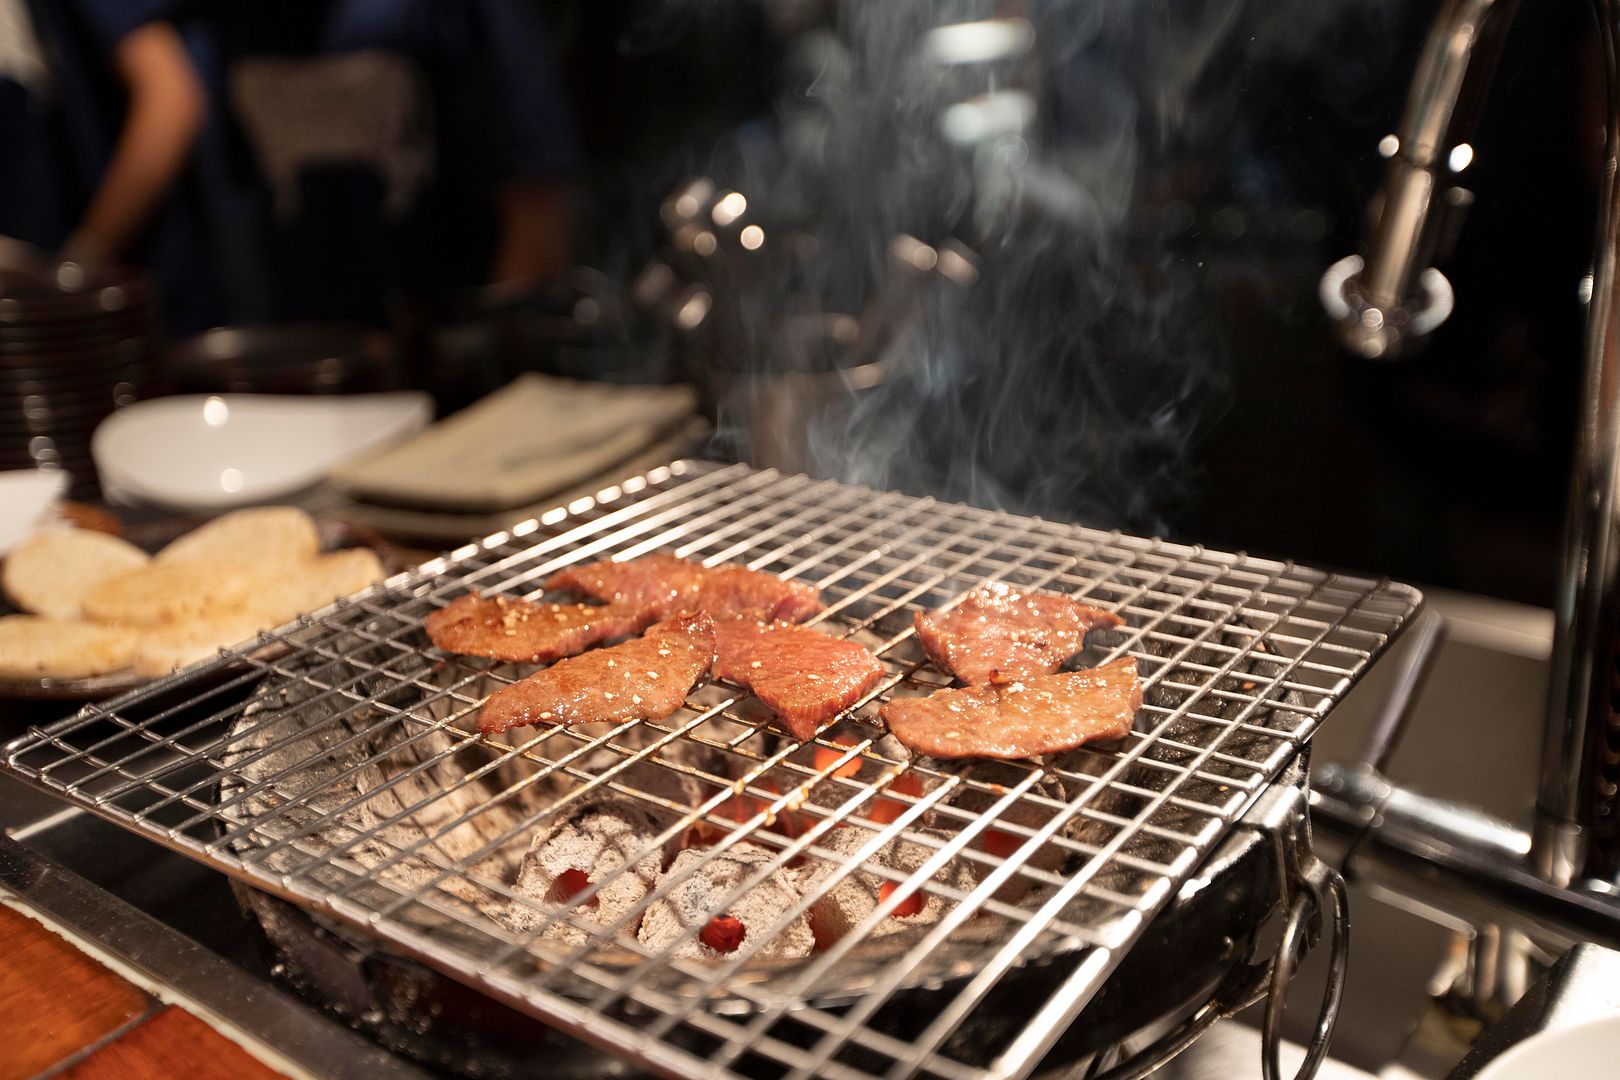
Chuck flap tail and wagyu oyster blade in the back -
This is when picture speaks louder than words.
Meanwhile we had some king oyster mushrooms in between. While most places cook the veggies alongside the meat, Da-Wan actually change to a new grill for every different item. Think about it, going through such hassles and time-consuming process, I was still able to finish all the dishes within time limit.
Also grilled twice, this time the chuck flap tail was served with yellow mustard and shio kombu, pick one to eat with. I prefer the shio kombu. Savory and packed with umami, which further enhanced the sweetness and drew out even more juice from the meat. On the other hand, the yellow mustard provided a pungent kick to the heat, in a way toned down that fatty sensation.
And the wagyu oyster blade just melted in my mouth, literally.
Kimchi, something sourish and spicy for a taste swap -
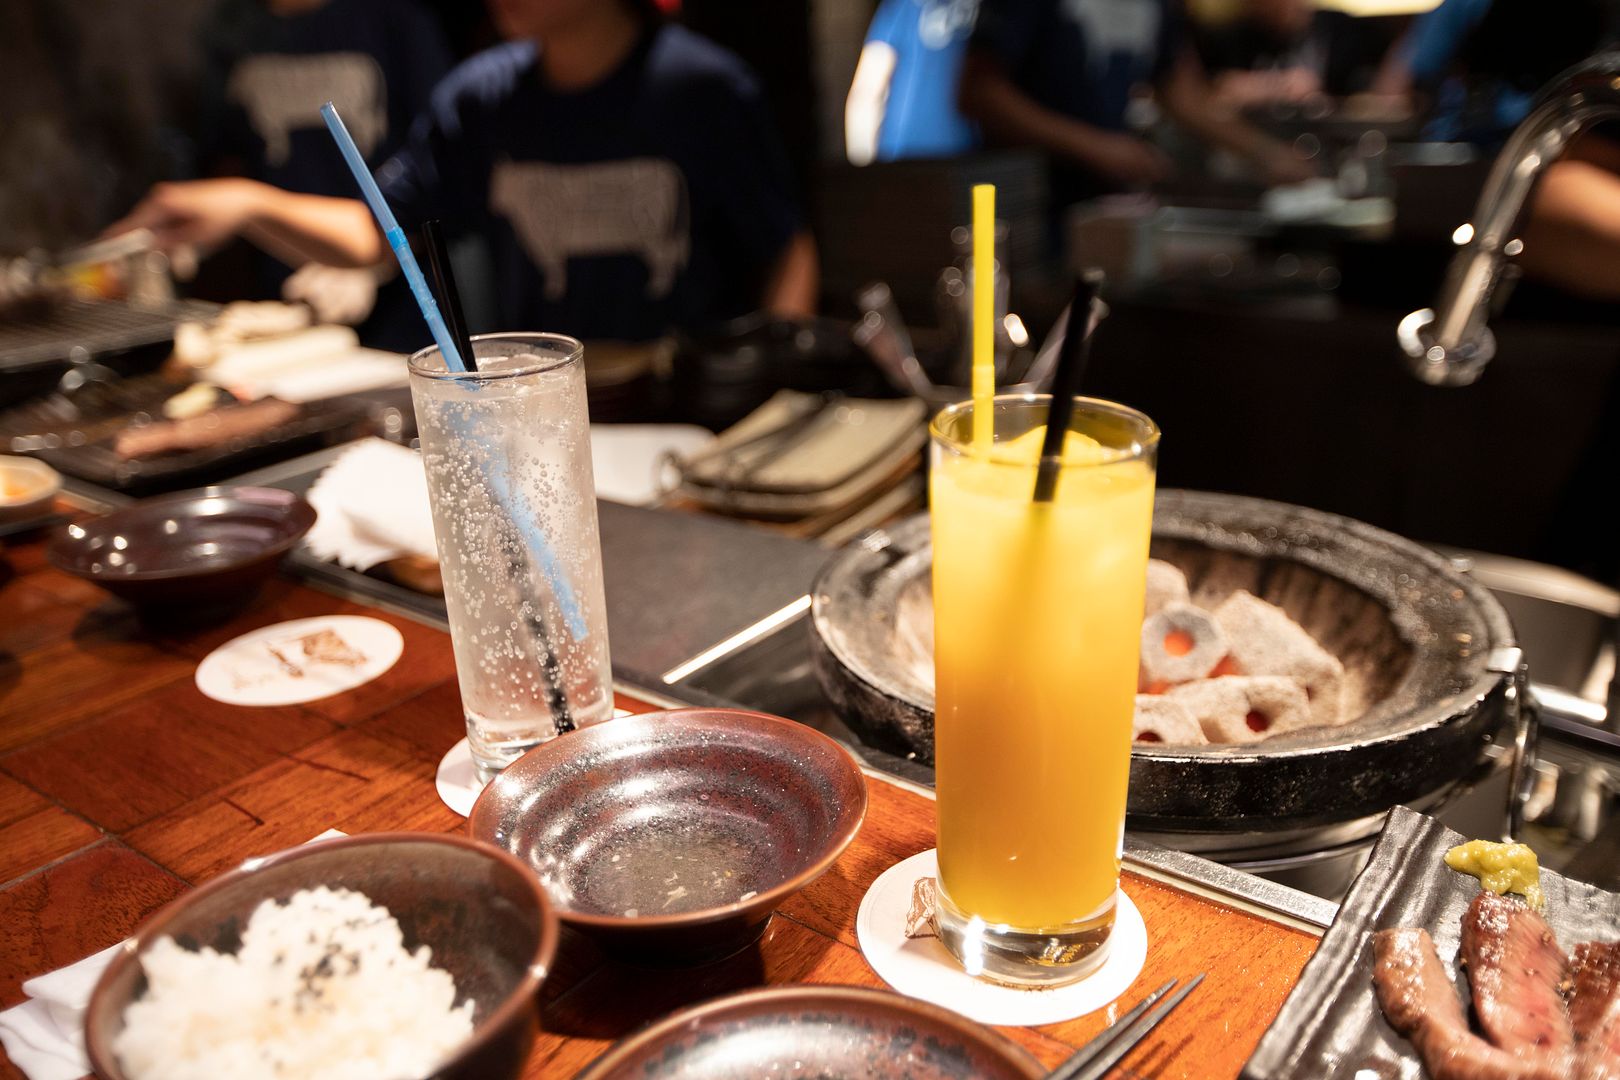
Also two more easy drinks, lychee with orange juice and lychee with soda water -
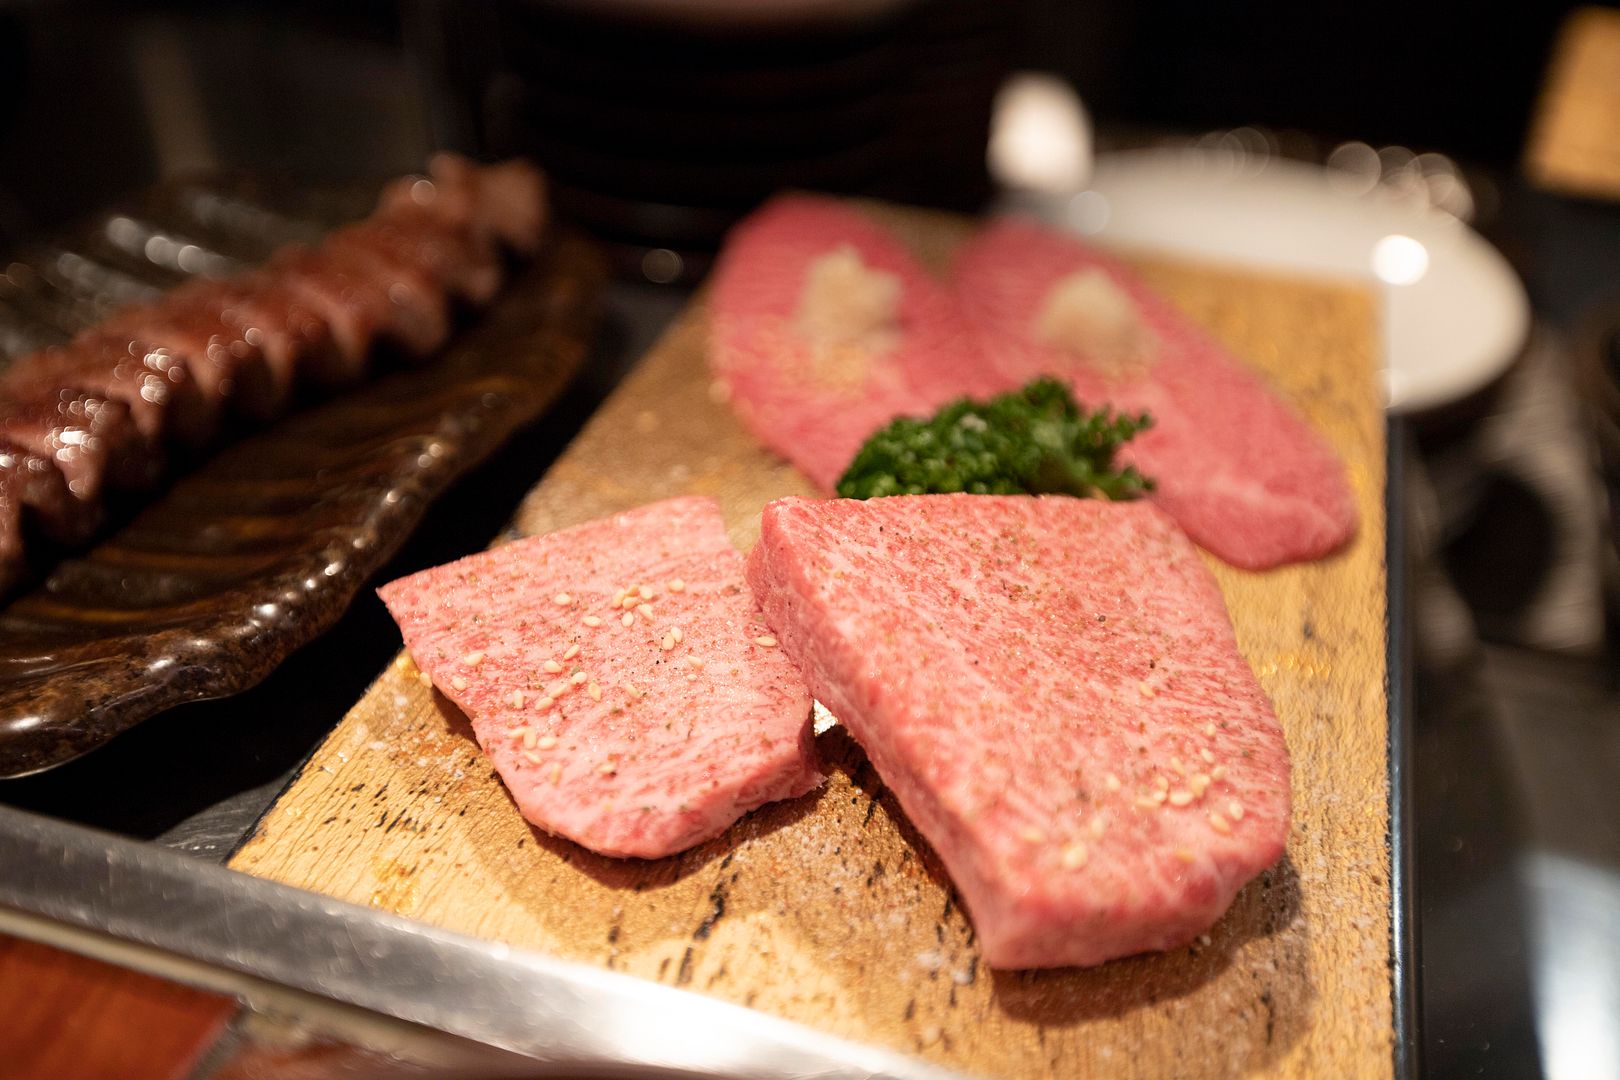
Chateaubriand, the center part of fillet -
One thing about wagyu fat, it's not clingy at all like pork fat. If not binge eating, but rather savoring a small bite, you can better understand that wagyu fat can be so delicate, like thickened jus lightly flavored with beefy aroma. Which was also the case for this fine piece of chateaubriand.
However, not sure why Da-Wan drizzled some truffle oil over. Most people might fall for such aroma, but I'd rather savor the oil from the beef itself. With such high-quality meat, simplicity is the best.
This one should be bottom sirloin or some part around there -
I was going to order the diaphragm, but it wasn't available so the staff recommended this part instead.
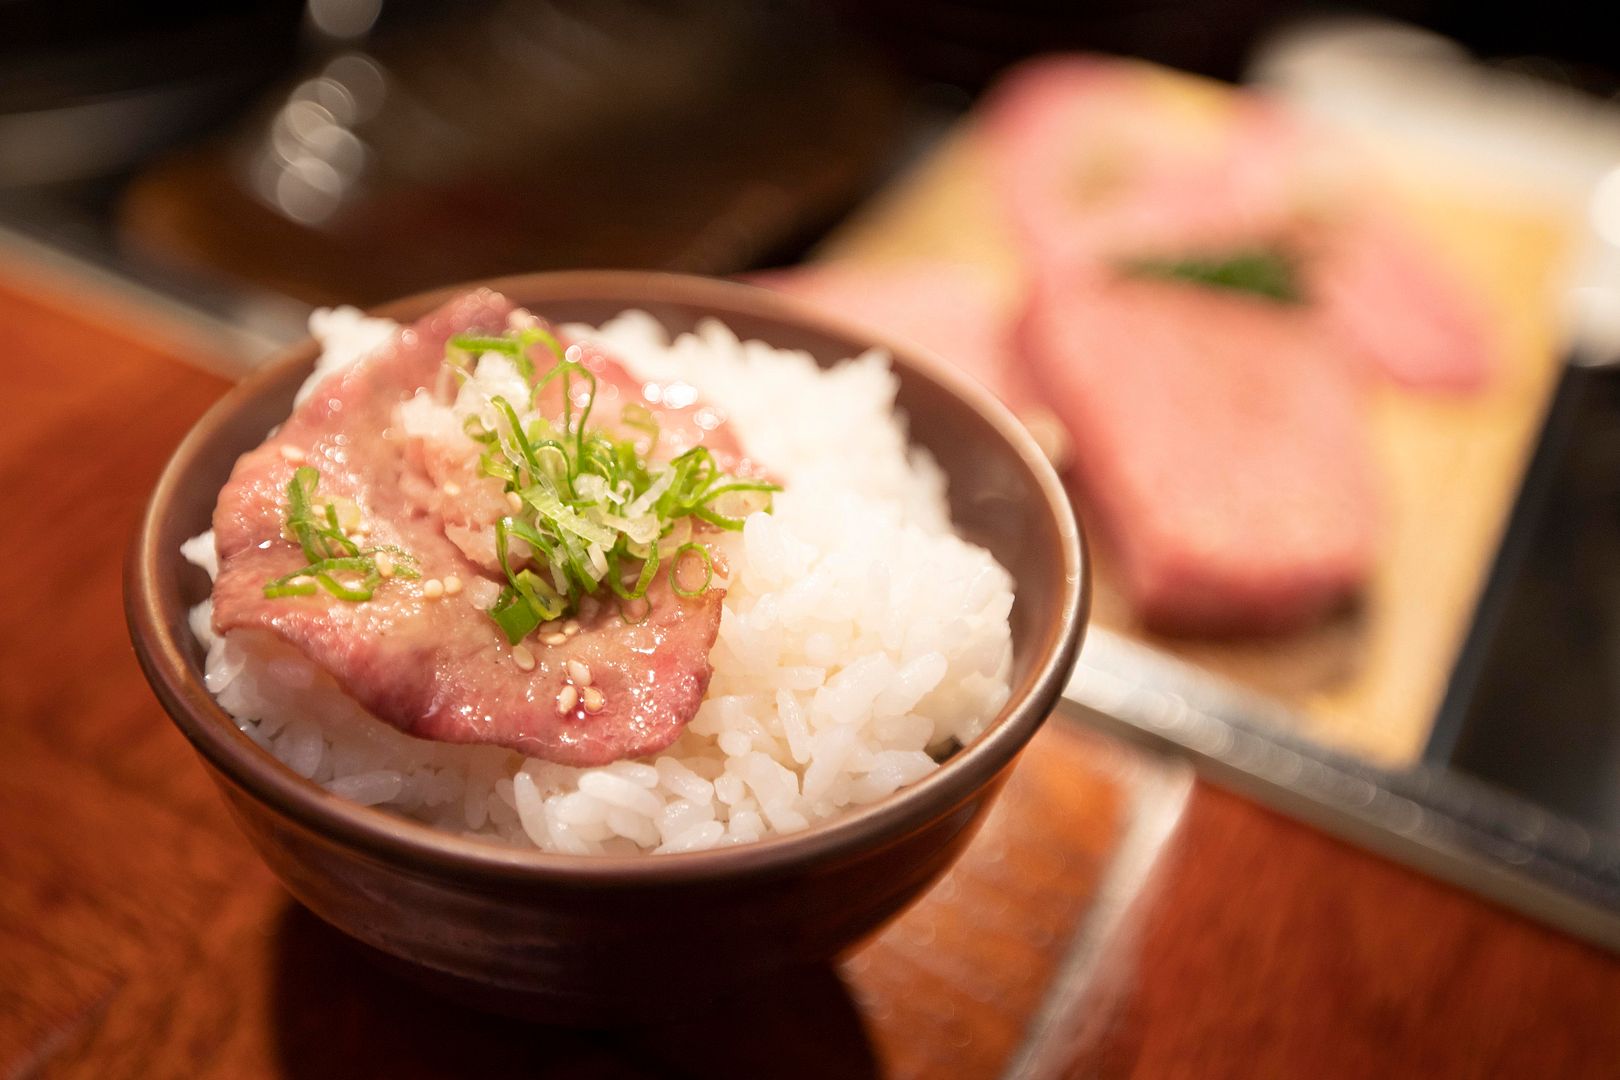
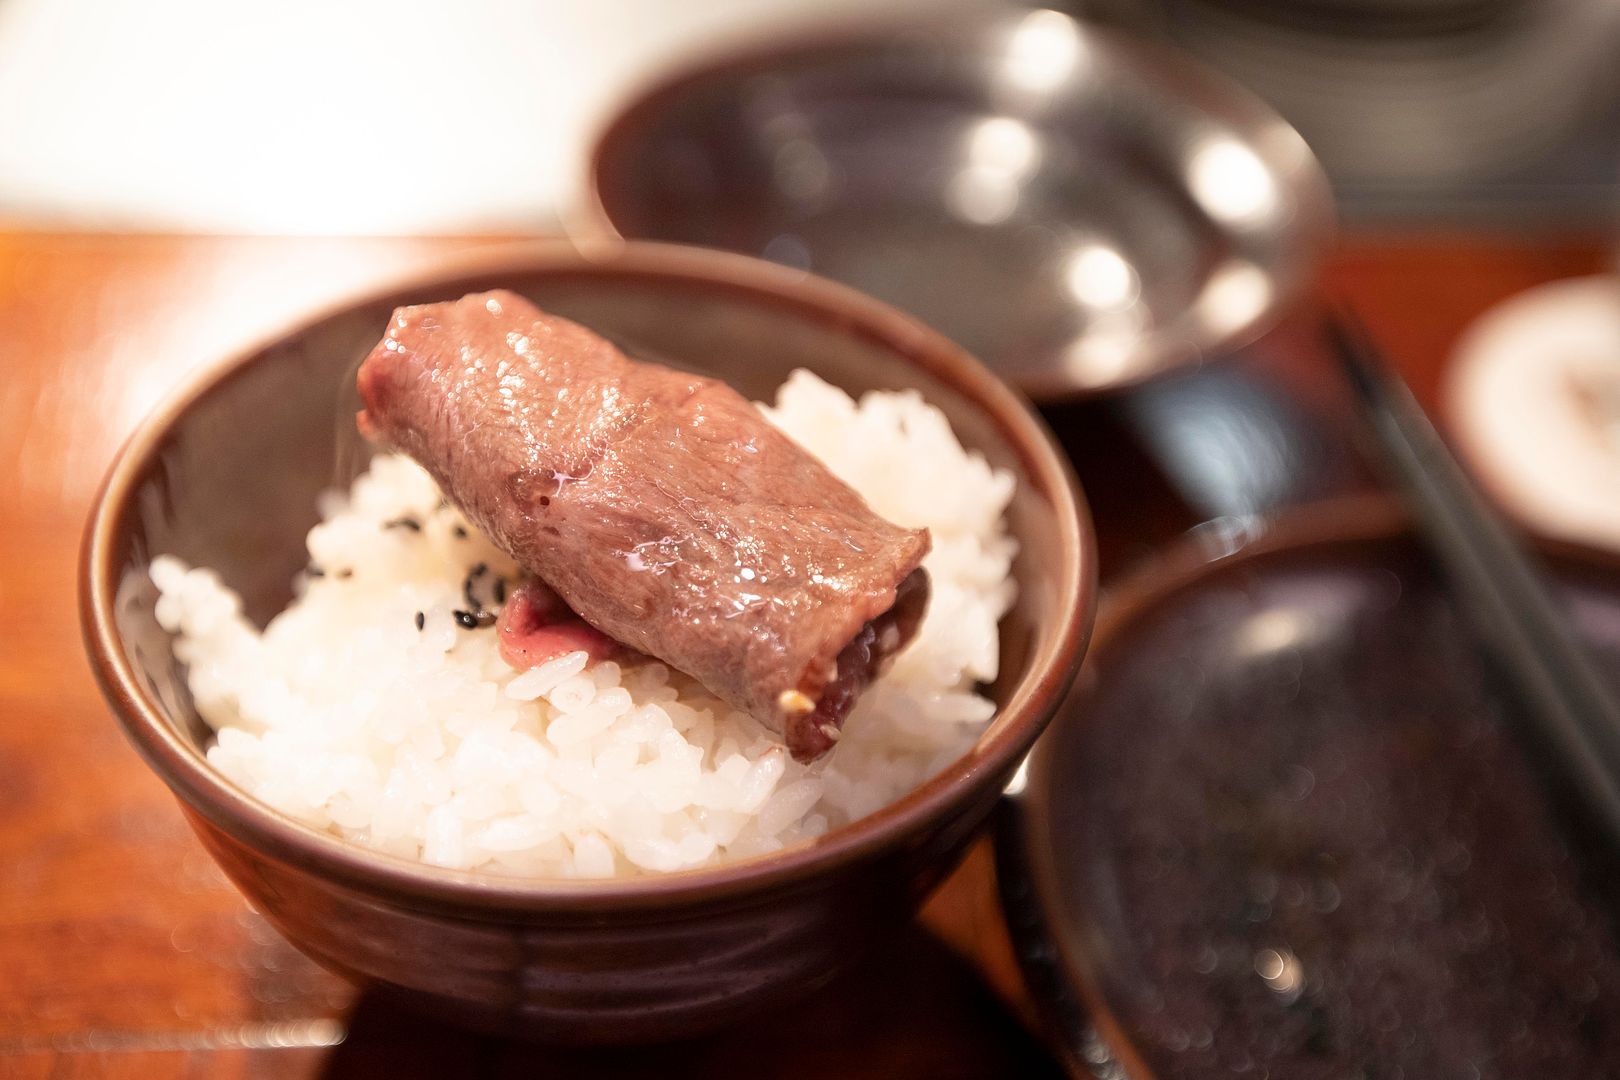
Marinated first, which was fine, after trying out some wagyu pieces, it's time to venture to the heavy seasoning zone. Helped emptying my rice bowl too.
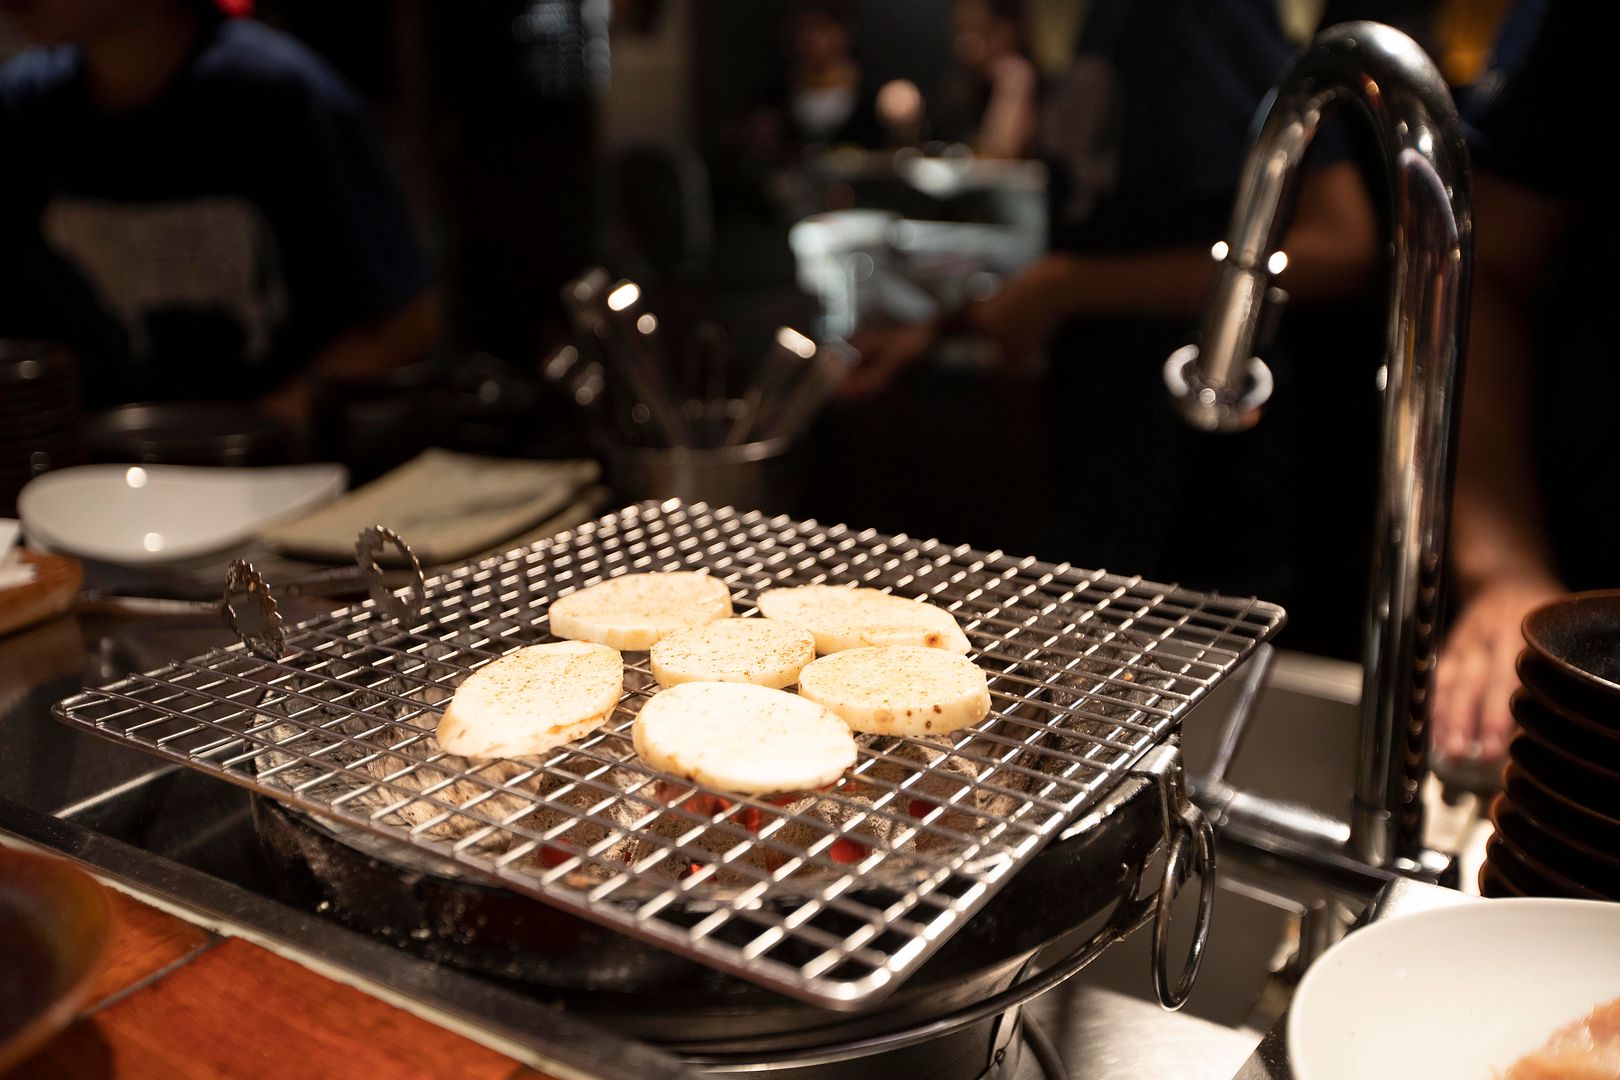
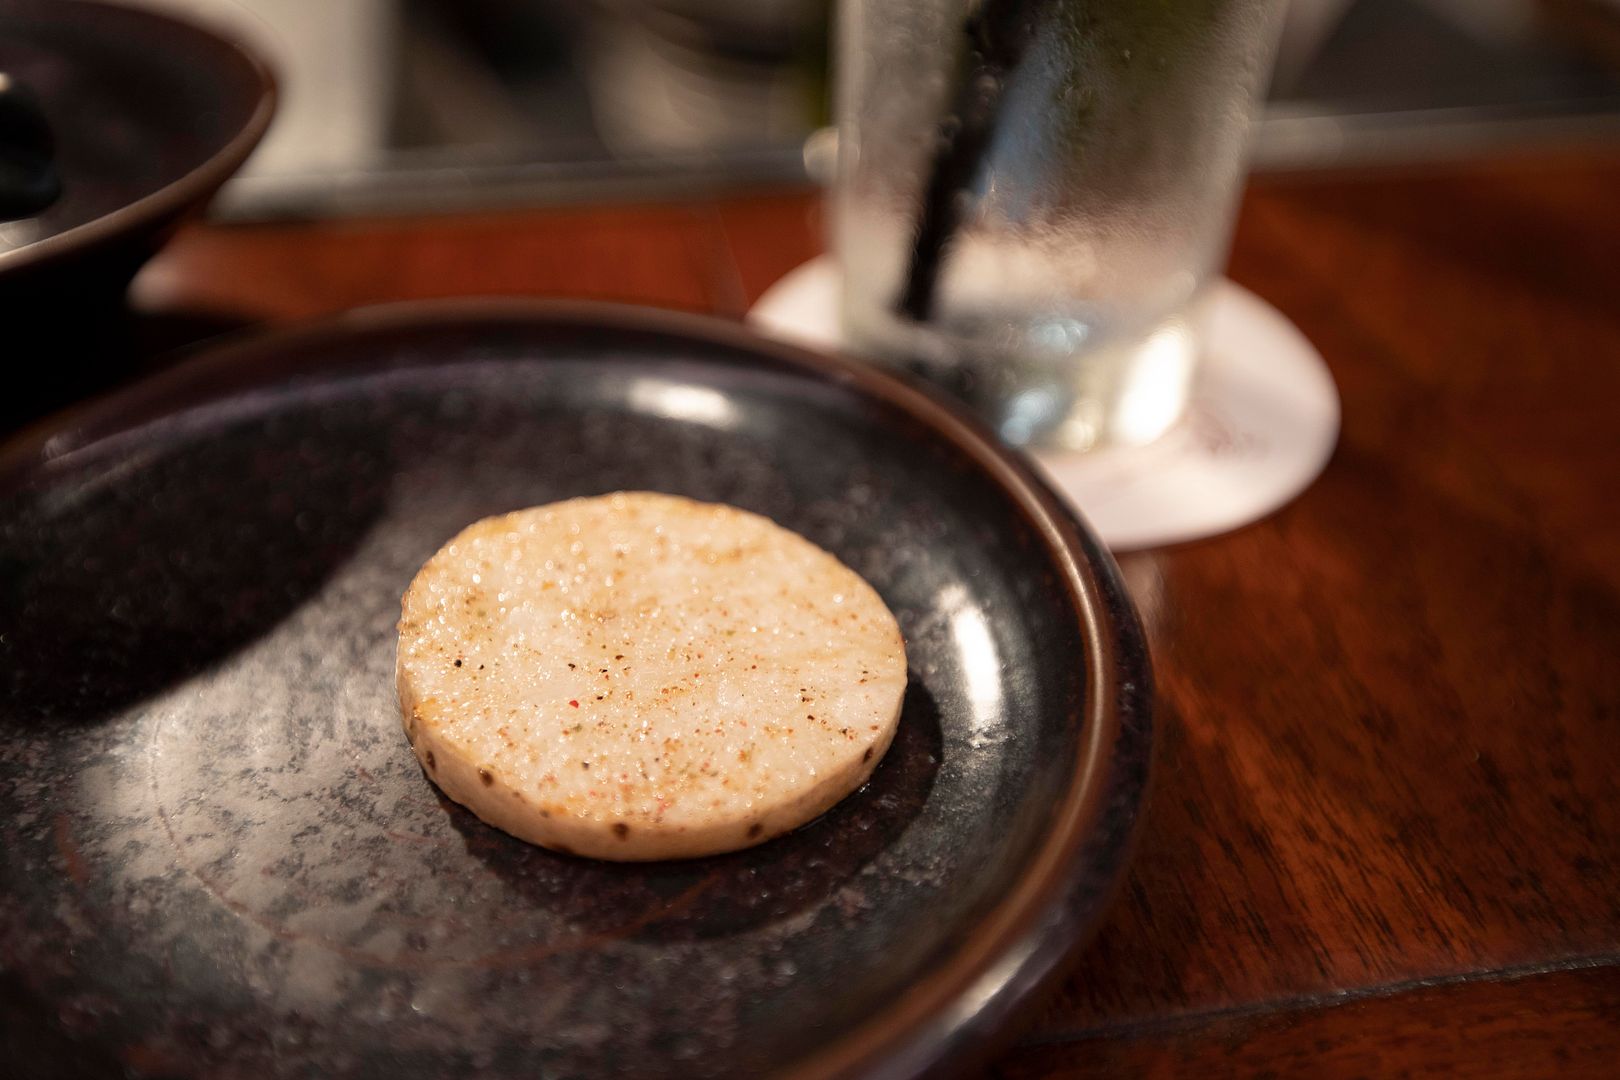
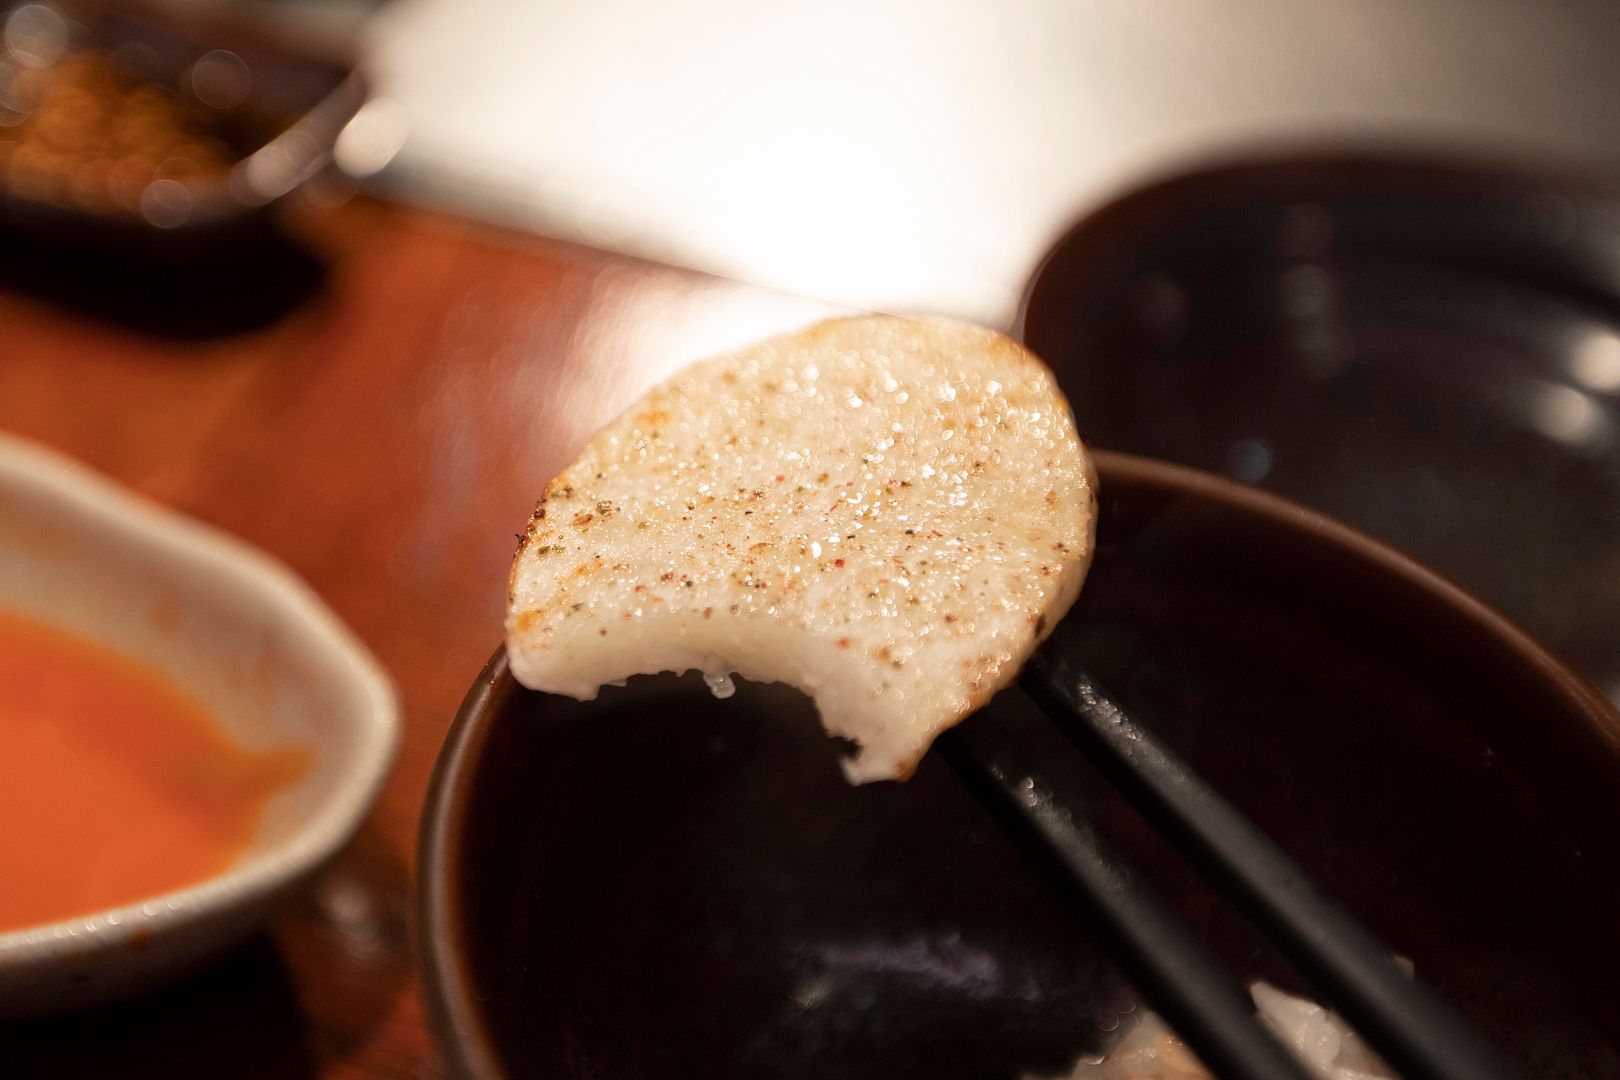
Japanese yamaimo -
Believe it or not, it was my second favorite item of the night (thick-cut beef tongue being my first pick). So simple but why so delicious? It's like a savory beer snack but much healthier version.
Brushed with sesame oil then dusted with salt and bell pepper powder (I suspected paprika but the staff was telling me bell pepper in Chinese, slightly different but couldn't verify at the time).
Not sticky at all, but more of a gentle crunch, kind of like biting into thickly sliced pear. Do not miss this one, you'll be amazed.
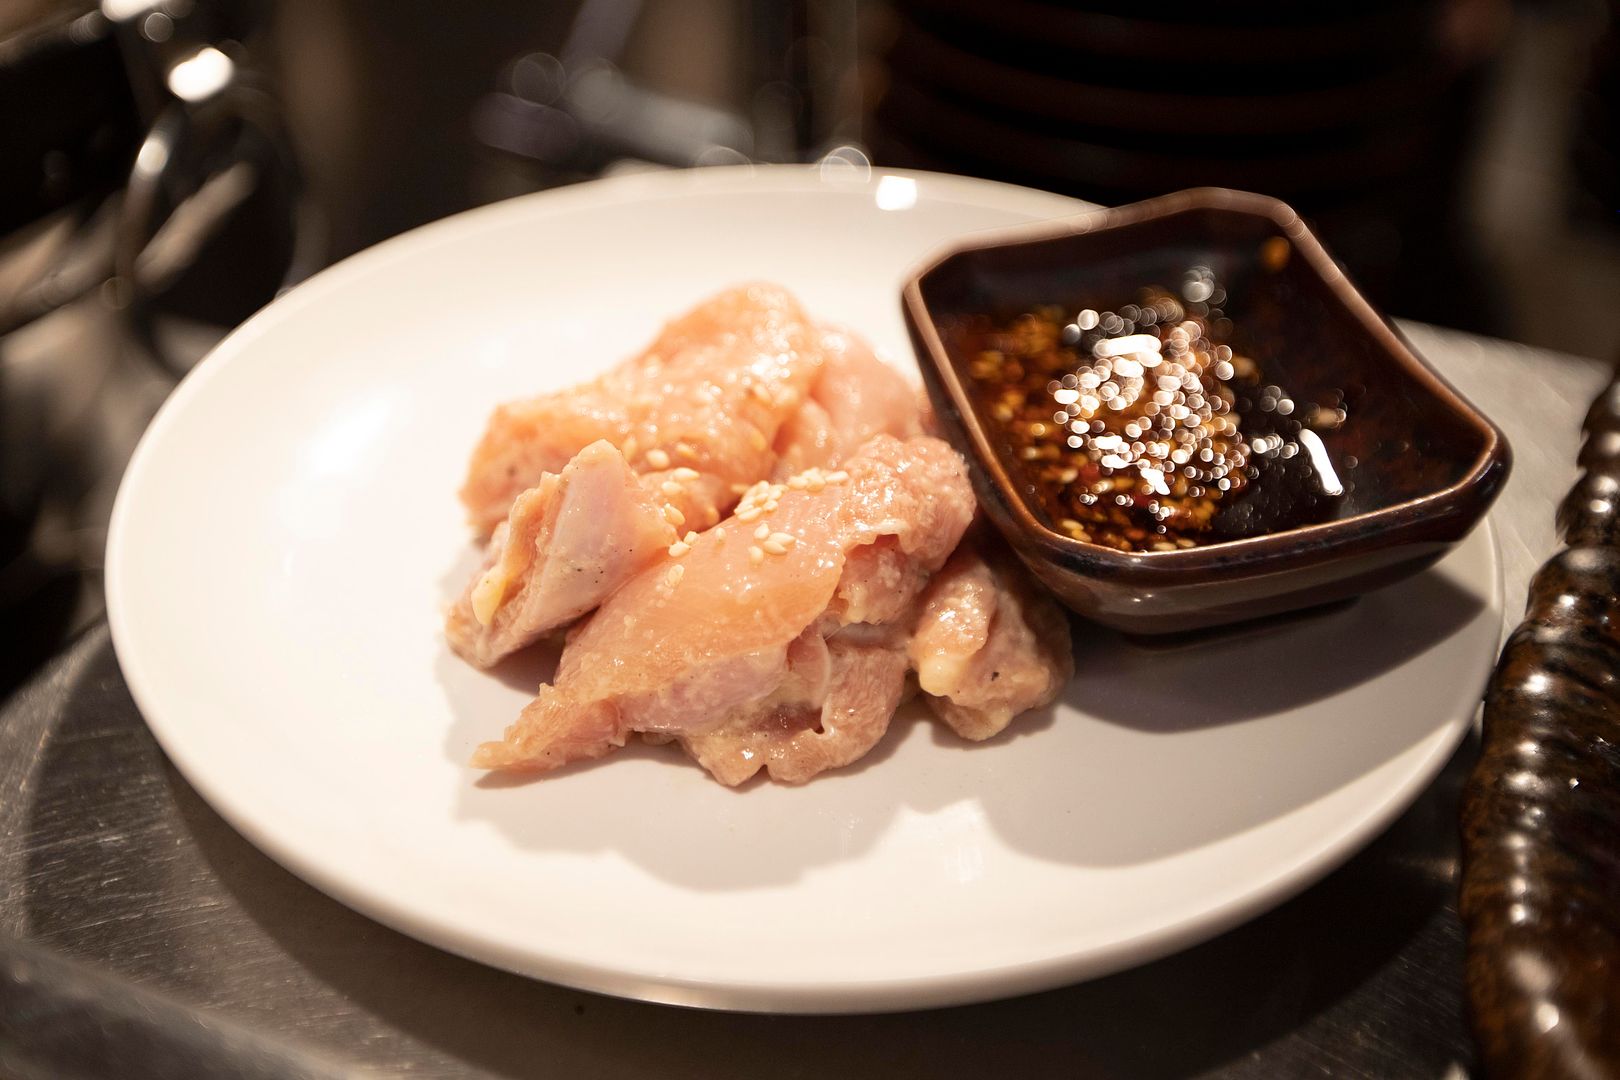
Chicken thigh with spicy miso -
Extra order so I can finish the last bits of my rice. Put the chicken aside, the spicy miso was such a rice killer. They blended some chili flakes which added a tiny touch of spiciness but greatly boosted up the aroma, also brought up the sweetness from the miso.
Up till that point, I was already pretty full from all the meat, otherwise I would like to figure something else to go along with leftover spicy miso sauce.
As I rubbed my happy tummy, another round of customers already waiting outside. "Make sure you won't miss Da-Wan's thick-cut beef tongue and Japanese yamaimo," my mind yelled out.
Da-Wan Yakiniku Dining Restaurant (大腕燒肉專門店) currently holds one Michelin star status.
Da-Wan Yakiniku Dining Restaurant
1F., No.22., Alley 177., Section 1, Dun Hua South Road, Da An District.
Taipei, Taiwan
011 886 2 2711 0179
Facebook: Da-Wan Yakiniku Dining Restaurant
*Reservation highly recommended, can be made 30 days prior by phone or by Facebook message after 2 p.m. pacific time.
Opening hours:
Monday through Thursday, Sunday 6:00 p.m. ~ 12:00 midnight
Friday, Saturday 6:00 p.m. ~ 2:00 a.m.
Other Michelin-starred restaurants in Taipei:


