Showing posts with label Cindy's Homemade Food-Rice and Risotto Dishes. Show all posts

Jul 25, 2025

Salmon and Dashi Takikomi Gohan Using Brown Rice 炊き込みご飯

No fuss rice cooker recipe, especially hassle-free for people who doesn't want to deal with greasy kitchen in the end.


This time I'm using brown rice and homemade Japanese stock. However, if you would like to skip the stock making process, simply add some Japanese dashi powder instead, can't be easier than that.


Salmon and dashi takikomi gohan using brown rice -


Salmon and dashi takikomi gohan using brown rice


Ingredients (about 6 portions)?

  • 4 rice measuring cups brown rice
  • 2 or about 440 grams salmon fillets
  • 700ml Japanese dashi (or use some dashi powder instead)
  • 1 medium fried bean curd skin 油豆腐皮
  • 1/4 cup hijiki
  • 1 small bundle or about 250 grams Japanese mustard spinach コマツナ
  • 1 medium carrot
  • 1 pack or about 100 grams brown beech mushroom
  • 2 tablespoons Japanese tsuyu


How?

Rinse the brown rice, basically just like how you would prepare the rice usually. Once ready, drain and set aside first. 


You can make the Japanese dashi from scratch by soaking the kombu and katsuobushi in water. I have an old post Japanese fried tofu pouch and beef udon, from there you will find more details on how to make Japanese dashi.


However, if it seems too troublesome, simply add some Japanese dashi powder to warm water instead, or use any sort of already made Japanese stock.


Add 2 tablespoons of Japanese tsuyu to the rice then pour in dashi till it reaches about 3.5 cups measurement inside the rice cooker pot. Mine was about 700ml. Give it a quick mix. Set aside while prepping other ingredients.


It's important to soak the rice first especially we are using brown rice. Otherwise the grains can be too tough or not fully cooked through in the end if skipping the soaking time.


Double making sure there are no bones hidden somewhere inside the salmon. Remove the skin before use.


Salmon fillets after removing the skin

Either use hot water to rinse the fried bean curd skin or soak in hot water for a short moment. This will help drawing out excess oil from the tofu skin. Once ready, squeeze out the liquid then cut into strips.


Peel and cut the carrot to strips, like julienne the carrot, but it doesn't have to be too thin. Trim-off the mushroom ends then separate to individual pieces. Destem the Japanese mustard spinach and cut to shorter sections. You can use bok choy instead or other similar Asian leafy greens.


Transfer prepped ingredients to the rice cooker. I would add the carrot first then leafy greens last, putting bean curd strips, hijiki, and mushroom in between.


Adding vegetable ingredients for the salmon takikomi gohan

There is no need to mix the ingredients with rice. Mostly because we are using brown rice, so I prefer to keep the rice on the bottom, suppose to get fully cooked-through more easily that way.


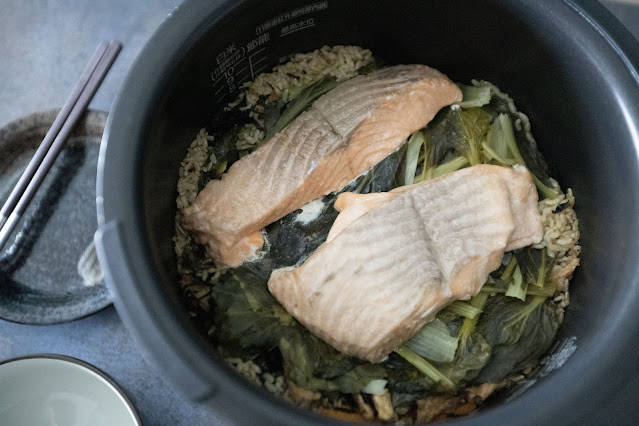
On the very top, transfer salmon fillets over.


Adding salmon fillets for the dashi takikomi gohan

Press that button on the rice cooker and simply cook away. If you have a specific setting for takikomi gohan, choose that instead.


Once ready, remove the inner pot from the rice cooker.


Salmon and dashi takikomi gohan using brown rice

Remove the fish fillets. Fluff the rice and make sure all the ingredients are evenly blended together.


Salmon and dashi takikomi gohan using brown rice before adding back the salmon

Roughly break the salmon into large chunks then add back to the rice mixture. Just give it a few gentle mix again. The salmon rice should be ready to serve.


Salmon and dashi takikomi gohan using brown rice

Salmon and dashi takikomi gohan using brown rice

Remember not to over-mix the rice once adding back the fish. We are aiming for chunky salmon texture, so over-mixing can cause the salmon to break into tiny pieces instead, not good.


Other takikomi gohan recipes:


Jun 18, 2025

Chinese Spicy Sausage and Shrimp Rice Using Rice Cooker

Imgur, the image sharing and hosting service that I've been using for years, just decided to stop letting IPs from Taiwan to upload any more images. What a bummer. 


So all my recent posts images were either uploaded to Imgur before their "execution" date, uploaded directly through Blogger, or uploaded when I was traveling abroad. Not sure why Imgur stopped their service to Taiwan, but I highly suspect it was due to some sort of political reason. 


Oh well, if you have any good alternatives, please kindly drop a message and let me know. I'm not sure how long or how big of the files Blogger will hold.


Chinese spicy sausage and shrimp rice using rice cooker - 


Chinese spicy sausage and shrimp rice using rice cooker


Ingredients (about 4 servings)?

  • 2 1/2 rice measuring cups white rice (I used basmati rice)
  • 2 links Chinese spicy sausage
  • 14 to 15 shrimp
  • 6 medium spiced dried bean curd 五香豆乾
  • 6 dried shiitake mushroom
  • 1 medium bell pepper
  • 120 grams lettuce salad
  • 1 tablespoon soy sauce
  • 1 teaspoon oyster sauce


How?

Quickly rinse the dried shiitake mushrooms and soak in room temperature water. I used filtered drinkable water. Soak till softened.


Soaking dried shiitake mushrooms

Once ready, save the water and remove the mushrooms. Destem then slice the cap.


Peel and devein the shrimps. Destem, pitted, and slice the bell pepper to strips. Cube the spiced dried bean curd. Destem then slice the lettuce to strips.


Slice lettuce salad to strips

Use the Asian rice measuring cup, the smaller kind to measure the rice, not the usual measuring cups. Add to the inner pot of rice cooker, gently wash the rice like you'd usually do.


Drain out the liquid. Mix in shiitake mushrooms, bell pepper, and bean curd.


Adding ingredients for Chinese spicy sausage and shrimp rice in rice cooker

Season with 1 tablespoon of soy sauce and 1 teaspoon of oyster sauce. Place two Chinese spicy sausages on top then arrange shrimps around. Pour in 1 cup of shiitake water, the one used in soaking the mushroom. Then add enough of water until it reaches the "2 cups" indication mark on the pot.


Making Chinese spicy sausage and shrimp rice using rice cooker

Shut the lid and simply press that cooking button. Just wait till it's ready, can't be easier than that.


Once ready, remove the sausages. Slice then mix back to the pot. Gently fold in lettuce strips while the rice is still hot.


Chinese spicy sausage and shrimp rice using rice cooker

I used Asian spicy sausages from Hunan province. It was smoked and got that Asian style spicy note. Such sausage is like a magic ingredient, making everything with it extra delicious.


Chinese spicy sausage and shrimp rice using rice cooker

Chinese spicy sausage and shrimp rice using rice cooker

However, if you're having trouble finding such particular ingredient, I think Cajun spiced sausages will somewhat do the trick too.  


Other recipes using rice cooker:


May 31, 2025

Braised Soy Sauce Chicken Over Rice

Two ways to enjoy this chicken over rice meal, one you can leave the chicken leg as it is and dive into chewing the meat off the bones. Then there's a more elegant way but of course leaving most of the deboning work to the person who's cooking it.


Being a nice cook here, I've decided to pick out all the bones after braising the chicken legs, so whoever's eating it can save the hassles and enjoy mouthful of meat all the way through.


Braised soy sauce chicken over rice -


Braised soy sauce chicken over rice


Ingredients (about 4 to 6 bowls)?

  • 4 or about 1200 grams chicken legs
  • 1/2 cup soy sauce
  • 6 garlic cloves
  • 2 stalks scallion

Actual cooking:

  • 2 to 3 tablespoons preferred cooking oil
  • 2 garlic cloves
  • 2 bulbs shallots (about 1/3 cup peeled and chopped)
  • 2 slices ginger
  • 2 stalks scallion
  • 1/4 cup soy sauce
  • 1/4 cup dark soy sauce
  • 1/4 cup aged Shaoxing wine
  • 1 1/2 cups water
  • 2 star anises
  • 1 aged tangerine peel
  • 1 teaspoon rock sugar
  • 4 to 6 portions cooked rice
  • 1 pack bok choy
  • 1 pinch salt 


How?

Marinate the chicken legs with 1/2 cup of soy sauce, 6 peeled garlic cloves, and 2 stalks of destemed and sectioned scallion. Massage the sauce into the meat then let it marinate in the fridge overnight.


Marinating chicken legs with Asian seasonings

Remember to flip the chicken legs to the other side half way through.


Cook the rice when close to serving time, I prepped some quinoa white rice for extra nutrition boost.


For the braising part, peel 2 extra garlic cloves, destem and section 2 more stalks of scallion. However, do chop or slice some scallion greens diagonally for garnish in the end. Scrape the skin off the ginger then slice to about 2mm thickness pieces, we need 2 slices here. Peel and chop the shallots.


Bring out a big pot, drizzle 2 to 3 tablespoons of preferred cooking oil and switch to medium heat. Add in garlic, shallot, ginger, and scallion sections. Sear till aromatic but not burnt.


Searing Asian aromatics before braising the chicken legs

Move the aromatics aside and transfer marinated chicken legs over skin side down first. Just the chicken legs, in which we will add the marinade later. Once the skin gets that slightly browned sear, flip and cook the other side till colored again.


Searing chicken legs

Pour in all the remaining marinade along with the ingredients inside. Also add additional seasonings over, that means 1/4 cup of soy sauce, 1/4 cup of dark soy sauce, 1/4 cup of aged Shaoxing wine, 2 star anises, 1 aged tangerine peel, and 1 1/2 cups of water.


Braising chicken legs in Asian seasonings

Bring to a boil then adjust the heat to keep it at a medium bubbling stage. Continue to braise for about 20 minutes. Remember to flip the chicken half way through.


Towards the end, add 1 teaspoon of rock sugar and cook till all melted and blended evenly with the sauce.


Towards the end of braising chicken legs in Asian seasonings

While braising the chicken, let's prep the veggies. Have a medium pot filled with water. Bring to a boil then add in one pinch of salt. Add in trimmed bok choy and cook for just about one minute. Drain and set aside for later use.


Water boiling the bok choy

If you want to be more professional or looking for that perfect way of prepping the bok choy, go ahead and dump the cooked leafy greens in icy cold drinkable water. Quickly cool down the temperature in order to better keeping that vibrant green color. As for me? Nah.


So when the chicken is ready, remove the chicken and set side to cool off. When cool enough to handle by hand, pick out the meat and tear to threads. I actually chew on the leftover bones as my reward for cooking this meal. Some might not know, but the meat close to the bones tastes really delicious.


Tearing braised chicken legs to threads

As for the remaining braise, drain and keep the sauce. You'll use it to drizzle all over the rice bowls. And if there's any leftover sauce, use it for future meals such as base sauce for dry noodles.


Scoop some rice to serving bowls, arrange bok choy around it, then add shredded chicken in the center. Drizzle braised sauce all over and garnish with scallion greens we saved earlier.


Braised soy sauce chicken over rice

I didn't realize how much meat I can get from 4 big chicken legs. Thought that skin and bones occupy a huge portion of it. But ended up I got so much meat, more than enough for 4 to 6 portions.


Of course you can braise 2 chicken legs instead, but considering all the work and time involved, if let me choose again I'll still go for bigger portion. The most I'll just store cooked meat in the freezer right?


Extended reading:


Apr 8, 2025

Dried Anchovies and Pea Shoots Congee 小魚乾大豆苗鹹粥

I wouldn't have thought that the congee or the stock used here can be so umami-packed. Well, I did add the entire pack of dried anchovies plus 4 cups of chicken stock, but still surprised by its flavor. Yet the entire congee looks so healthy, indeed it is nutritous with all the veggies used. I can't ask for more, a healthy and balanced meal packed with flavors.


Dried anchovies and pea shoots congee 小魚乾大豆苗鹹粥 - 


Dried anchovies and pea shoots congee


Ingredients (about 5 to 6 portions)?

  • 2 loosely packed cups dried anchovies 小魚乾
  • 1 1/2 cups uncooked white rice (about 2 rice-measuring cups)
  • 4 cups chicken stock
  • 6 cups water
  • 1 bundle pea shoots
  • 1 medium carrot
  • 6 shiitake mushrooms
  • 2 to 3 tablespoons olive oil
  • Some salt
  • Some white pepper powder


How?

Rinse the uncooked white rice to wash away excess starch then set aside for later use.


Rinsing uncooked white rice

Trim the soft leafy greens of your choice. I used pea shoots here so I also tear some thicker stems to thinner strips. Peel and juilienne the carrot. Destem then slice the shiitake mushrooms.


Bring out a big pot, drizzle 2 to 3 tablespoons of preferred cooking oil then switch to medium heat. Once warmed up, add in dried anchovies and cook till slightly browned and aromatic.


Gently searing the dried anchovies

Pour in 4 cups of chicken stock along with 6 cups of water. Bring to a boil then keep the entire thing at a light bubbling stage for five more minutes. Skim-off any foamy bits on top throughout the cooking process.


Add in rinsed rice, also add in the carrot and shiitake mushrooms.


Adding rice, carrot, and shiitake mushrooms for the congee

Keep cooking till the rice reaches desired texture, also until the congee reaches desired soupy consistency. Mine took about 20 minutes.


Add in leafy greens and continue to cook till just wilted.


Dried anchovies and pea shoots congee

Taste and season with salt if needed. I didn't use any for my pot of congee here. But do add a few pinches of white pepper powder for a gentle hint of aroma. The congee is now ready to serve. 


Dried anchovies and pea shoots congee


I was going to use other soft leafy greens for this congee recipe, such as amaranth, some also call it Chinese spinach. However the vendor told me amaranth wasn't in season, so I changed to pea shoots instead. Ended up pea shoots work even better I think.


Dried anchovies and pea shoots congee

But don't let the choice of vegetable bothers you too much. As long as it's tender, I think even baby salad greens can be used here. Just remember don't cook the congee too long once you added the leafy greens. Try to preserve that vibrant green color even after plating. The longer you cook, the darker and "smushier" the vegetables will be.


Extended reading:


Jan 2, 2025

Salmon and Quinoa Rice Stuffed Fried Tofu Pouches

Inari age, the "age" part is pronounced as "aa geh" instead of age like talking about how old you are. This Japanese ingredient is basically fried tofu pouches.


I usually use the inari age like a thick sheet of tofu, mostly sliced to strips then add to my dishes. However, to fully utilize its "pouchy" character, it's extra fun when you actually stuff something inside. The pouch can be closed or opened depending on the style of food you're making. As per my recipe here, it's an opened fried tofu pouch stuffed with quinoa rice and roasted salmon.


Salmon and quinoa rice stuffed fried tofu pouches - 


Salmon and quinoa rice stuffed fried tofu pouches


Ingredients (for six pouches)?

  • 6 pieces inari age いなり揚げ
  • 220 grams salmon
  • 2 strings scallion
  • Some cooked quinoa rice (or simply white rice)
  • Some salt 
  • Some black pepper


How? 

Precook the white rice. I added some quinoa mainly for its nutritional value. Destem and chop the scallion. 


Transfer salmon to a baking sheet lined with foil. Season both sides of the salmon fillet with some salt and black pepper. Use more salt and pepper than usual because this will be the main source of saltiness.


Salt and pepper on both sides of salmon fillet

Let the salmon rest for five minutes, meanwhile preheat the oven to 390 degrees Fahrenheit/200 degrees Celsius. Once ready, transfer salmon to the oven and bake till fully cooked, mine took about 25 minutes.


Bring a medium pot of water to a boil then add in the fried tofu pouches.


Boiling inari age fried tofu pouches

Cook for no longer than a minute, just to soften the pouches a bit while drawing out some oil at the same time. Drain and pat dry with paper towel. Bring out just one chopstick. Use it like a rolling pin to roll the pouches to further flatten them. However, make sure not to cause any opening holes.


Rolling the inari age fried tofu pouches

Use a scissor and cut a slit on on side, that way you'll get a pouch with one opening.


Cutting an opening for the inari age fried tofu pouches


By now the salmon should be fully cooked, remove the salmon from the oven and peel-off the skin if any. Tear the fish to smaller pieces and mix with chopped scallion. Taste and add more salt if needed.


Roasted salmon flakes mixed with chopped scallion

Stuff some rice to the fried tofu pouches, about half way through. Then fold in the openings inward, that way you'll get a smoother rounded openings on top.


Stuffing quinoa rice to fried tofu pouches and folding in the opening

Stuff in more rice, about 80% full then top the rice with generous amount of salmon and scallion mixture. 


Salmon and quinoa rice stuffed fried tofu pouches

I like the simple taste of it, especially when very good salmon was used. Also this dish doesn't have be to served hot. As long as the quality holds, eating it under room temperature is delicious too. In fact, I think that way you get to enjoy bouncier bite of the rice.


Salmon and quinoa rice stuffed fried tofu pouches

If you prefer something heavier or saltier, you can drizzle some sauce all over, I think Japanese mayonnaise or Sriracha would be two good options, or if teriyaki sauce is available, that would be great too. 


Other recipes using inari age いなり揚げ:


Dec 2, 2024

Savoury Chinese Congee Using Jinhua Ham and Vegetables 金華火腿鹹味臘八粥

This congee meal showed up at the right time. The thing is that I'd like to plan ahead what I'm going to cook for the following weeks, and it was congee's turn when both Mister and I caught a cold.


Congee really helped in remedy some uncomfortable symptoms such as sore throat and lost of appetite. It provided some warmth while easy to eat. Also easy to prep for the person who cooks the meal, yes, that's me, one other sick person in the house. 


Savoury Chinese congee using Jinhua ham and vegetables 金華火腿鹹味臘八粥 - 


Savoury Chinese congee using Jinhua ham and vegetables 金華火腿鹹味臘八粥


Ingredients (for 6 to 8 servings)?

  • 150 grams boneless Jinhua ham pieces
  • 1/2 medium small cabbage
  • 1 medium carrot 
  • 1 medium daikon radish
  • 4 shiitake mushrooms
  • 4 Chinese bean curd
  • 3/4 cup peas
  • 1 stalk garlic sprout
  • 2 cups short grain white rice
  • 12 cups water
  • 2 to 3 tablespoons preferred cooking oil
  • Some salt (optional)
  • Some roasted peanuts (optional)


How?

Trim-off the very center tough area for the cabbage then chop the remaining section. Peel and cube the carrot. Peel and cube the daikon radish. Cube the Chinese bean curd. Destem and cube the shiitake mushrooms. Destem and slice diagonally for the garlic sprout.


Slice the Jinhua ham to strips.


Jinhua ham strips

Bring out a big pot and drizzle 2 to 3 tablespoons of preferred cooking oil. I simply use olive oil for most of my cooking. Add in Jinhua ham strips and use medium heat to sear till aromatic.


Add in both the carrot and daikon radish cubes. Stir and cook for about 5 minutes, perhaps switch to medium low heat if needed.


Cooking the carrot and daikon radish with Jinhua ham strips

Pour in 12 cups of water and bring the entire pot to a boil. Pour in 2 regular measuring cups of short grain white rice. Also add the cabbage, shiitake mushrooms, and bean curd.


Cooking Jinhua ham and vegetable congee

Only add in peas here if using bigger tougher version of peas. The peas I'm using is small and very delicate, so I decided to add them towards the end of cooking instead. 


Cooking Jinhua ham and vegetable congee

Bring the pot to a boil again then lower the heat to keep it at a light bubbling stage. Continue to cook for 20 to 30 minutes. Remember to stir once a while. Mine took about 25 minutes.


After that, if using tender peas, it's time to add the peas now. Also add in the garlic sprouts. Cook for 1 to 2 more minutes. Taste and adjust the flavor with salt if needed. Or perhaps add more liquid for a more soupy consistency.


Adding garlic sprouts to Jinhua ham and vegetable congee

Some people like to serve the congee with some crushed roasted peanuts. It surely will add another layer of aroma, but me and Mister were having a cold so the peanuts are out of the picture for our throats' sake. 


Savoury Chinese congee using Jinhua ham and vegetables 金華火腿鹹味臘八粥

Savoury Chinese congee using Jinhua ham and vegetables 金華火腿鹹味臘八粥

If you can't finish all the congee at once, just remember to add more liquid, maybe drinkable hot water or chicken stock when reheating. Otherwise the rice will keep soaking in the liquid and the congee will turn to risotto-like consistency instead.  


Extended reading:


Oct 27, 2024

Pomodori Ripieni di Riso / Italian Rice Stuffed Tomatoes

Have you ever heard of a super simple recipe using one whole tomato with rice cooker? Basically you just cook the rice using rice cooker as usual, but with an extra big tomato. Once done, break the softened tomatoes into the rice.


That recipe got quite popular in Asia back then, and that's how I can be double sure that tomato with rice makes a delicious combo. Which leads me to this Italian recipe, also tomato and rice, but with more actual or common cooking steps involved. Thanks to my previous understanding about tomato and rice, I know this Italian rice stuffed tomatoes would be a killer too.


Pomodori Ripieni di Riso / Italian Rice Stuffed Tomatoes -


Pomodori ripieni di riso / Italian rice stuffed tomatoes


Ingredients?

  • 4 big or 5 medium tomatoes
  • 4 fistful basmati rice
  • 1 big potato
  • 1 garlic clove
  • Small bundle basil
  • Small bundle parsley
  • 1 teaspoon dried oregano
  • 1/2 teaspoon dried rosemary
  • Some olive oil
  • Some salt


How?

Use big tomatoes if possible, I can only find medium ones so I used five instead of four. Slice-off the top of the tomatoes, but not too thin because we're going to use them like a cap or a lid later.


Scoop out the inside, but not the pulp. I actually save most of the pulp and juice in a separate bowl and plan to utilize that in other dishes. Nothing goes to waste.


Tomato containers

Roughly chop the inside meaty part and transfer to a mixing bowl. To that, also add 4 fistful of basmati rice. Usually it would be one fistful of rice for one big tomato, just remember that rice will puff up a little more during the cooking process.


Peel and finely chop one garlic clove, add that to the mixture. Also add 1 tablespoon of chopped basil, 1 tablespoon of chopped parsley, 1/2 teaspoon of dried oregano, 1 teaspoon of salt, and 1 tablespoon of olive oil. Give it a quick mix and rest for 30 minutes to one hour.


Rice stuffing for pomodori ripieni di riso

Preheat the oven to 350 degrees Fahrenheit/180 degrees Celsius. Peel and slice the potato to wedges. Toss with 1/2 teaspoon of dried oregano, 1/2 teaspoon of dried rosemary, 1 teaspoon of salt, and 2 tablespoons of olive oil.


Seasoned potato wedges

Before stuffing the tomatoes, make sure to pour out any remaining liquid inside. Usually more juice will accumulate on the bottom as time goes by.


Scoop the rice mixture to the tomatoes. You can gently pressed down the stuffing but don't overdo it, otherwise the tomato will break after baking. Lay these stuffed tomatoes in a baking dish and cover with the "lid." 


Making pomodori ripieni di riso / Italian rice stuffed tomatoes

Scatter seasoned potato wedges around these tomatoes. Sprinkle a little bit more salt all over, also drizzle some more olive oil on top. Into the oven and bake for 50 to 60 minutes. You'll know it's ready when the lid part appears slightly charred.


Remove from the oven and garnish with some chopped parsley, basil, or both. Serve right away.


Pomodori ripieni di riso / Italian rice stuffed tomatoes

It's been confirmed once again, tomato and rice truly makes a delicious combo. Adding potato wedges throughout was a great idea too because they get to absorb the tomato juice leaking to the bottom, creating a fluffy yet also moist texture in the end.


Pomodori ripieni di riso / Italian rice stuffed tomatoes

Pomodori ripieni di riso / Italian rice stuffed tomatoes

Almost forgot, the juice saved earlier when scoop out the inside for the tomatoes, you can add that to stew, soup, or even substitute with some part of water when making the simple steamed rice.


One other "stuffed" recipe: