My new year's resolution, eat healthier "time-wise." I tend to skip dinner then dive straight into big breakfast. The extended time frame is not a good thing for my digestive system. So to ease into a better habit, I cut down a small portion of breakfast and set up a rule that I have to eat something during late afternoon.
Fruits and toasts are two options for my light afternoon meal. Lately, I've been eating some boiled chicken too. Once in a while, something more satisfying and of course with higher calories came into the picture. Just need to refrain myself not to reach out for the second one.
Zucchini and Cheddar cheese muffins -
Ingredients (for 8 to 10 medium sized muffins)?
- 1 1/4 cups all purpose flour
- 1/2 cup semolina flour
- 1 1/2 teaspoons baking powder
- 1 teaspoon baking soda
- 1/2 teaspoon salt
- 1/4 cup or half stick melted butter
- 1 cup whole milk
- 1 3/4 cups shredded Cheddar cheese
- 1 medium zucchini
- 1 egg
- Some ham cubes
How?
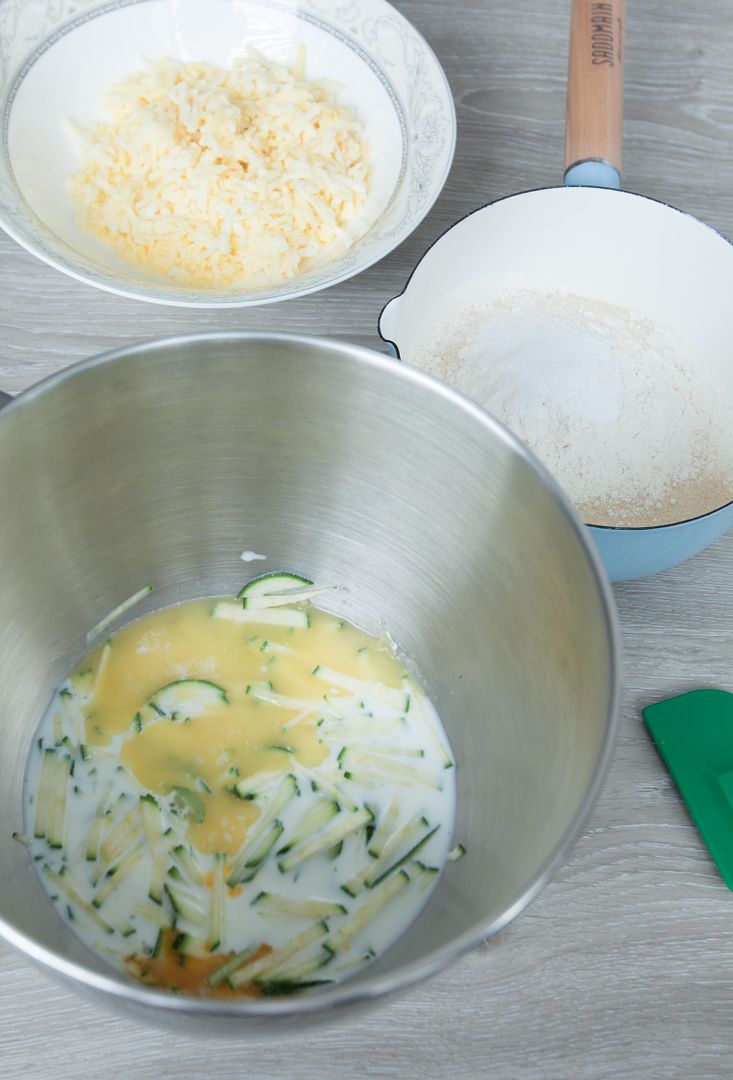
Cut the zucchini into strips or simply shred it with food processor.
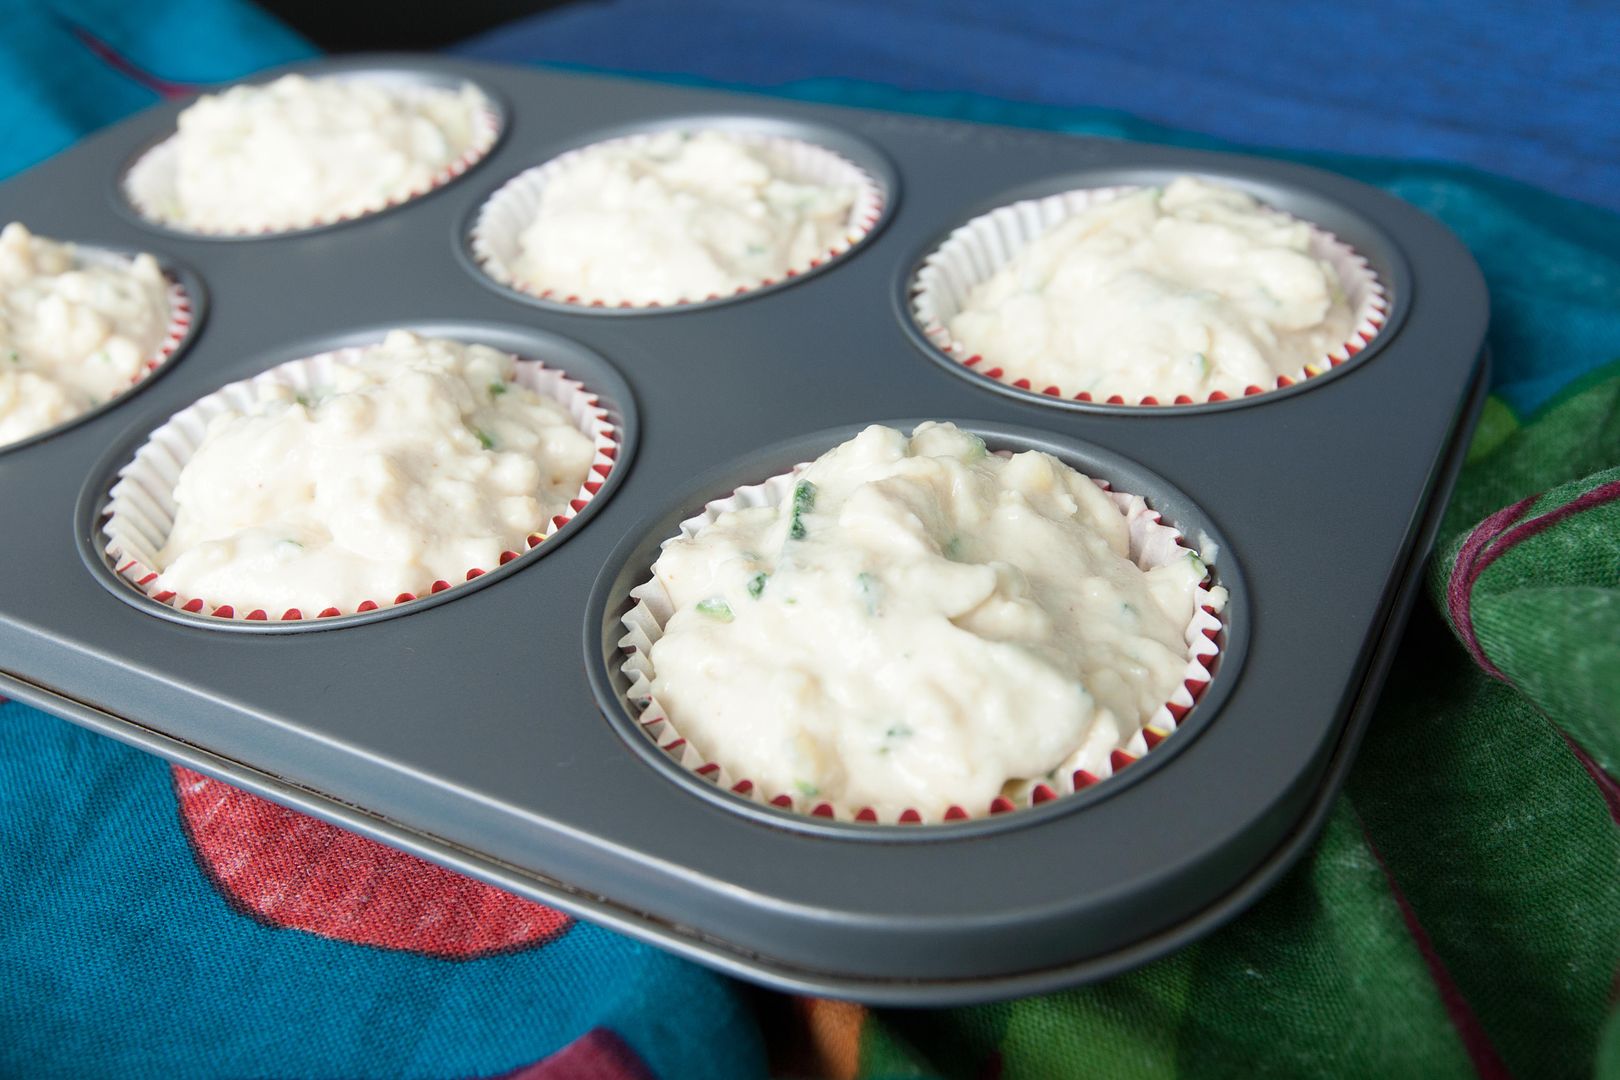
Preheat the oven to 350 degrees Fahrenheit. Line the muffin tray with paper muffin cups. Just to be safe, spray the liners with non-stick cooking spray.
Prepare a big bowl and mix in all purpose flour, semolina flour, baking powder, baking soda, and salt.
Prepare another big bowl. Add in melted butter, egg, milk, zucchini and blend together.
Pour the dry mixture into this wet mixture. Mix together then fold in the cheese. Pour the mixture to the muffin cups.
Into the oven and bake for around 5 minutes. Take out the muffin tray and push some ham cubes into the muffin mixture, also garnish some ham cubes on top of the muffins.
The reason why we add the ham cubes now is that the ham will set "on" the muffins instead of "sinking" to the bottom.
Transfer the tray back to the oven and bake for another 27 to 30 minutes, at least till the edges turned slightly browned. Test with a toothpick by sticking it into the muffin, if it comes out clean, then the muffin is ready. I do recommend baking the muffins a little bit longer for that extra crunch on the edges.
Once ready, remove from heat and wait till it cools down a little before popping the muffins out.
Other savory muffin recipe:
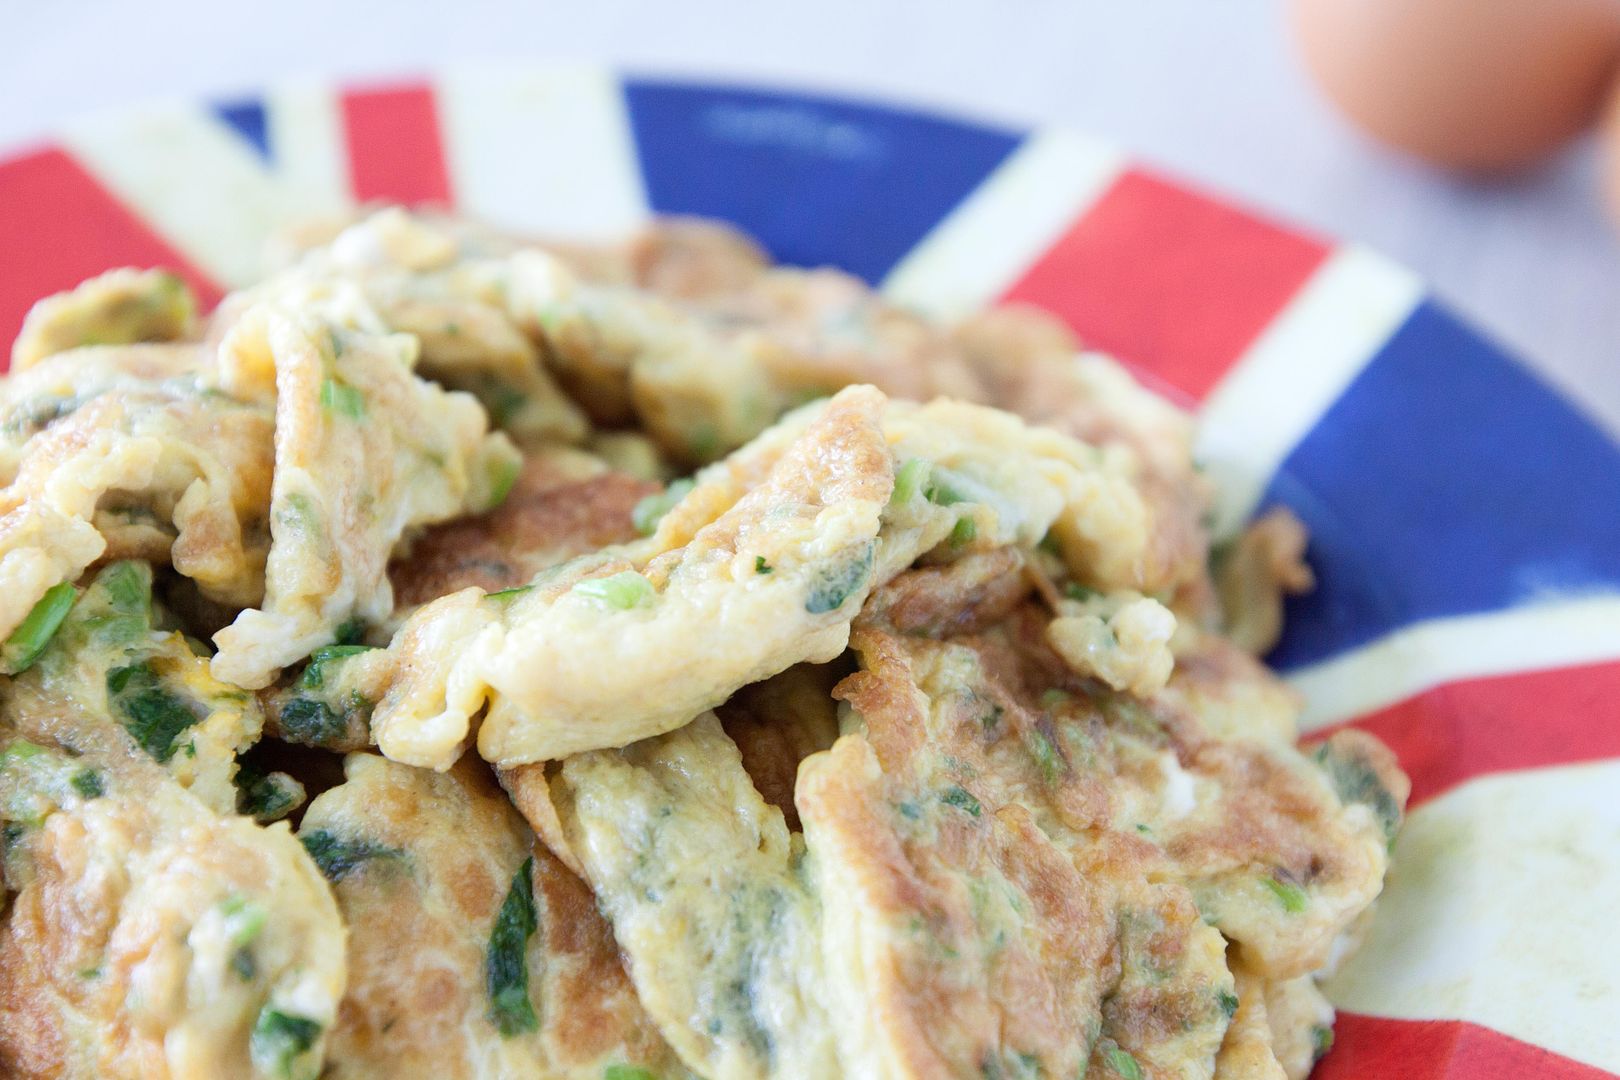
Let's put cilantro stems into good use. Those stems are just as aromatic as its leafy counterpart. In addition, the stems are actually quite soft compared to other herbs such as thyme and rosemary. So instead of tossing the cilantro stems, why not put them into good use and brightens up a simple scrambled eggs recipe?
Scrambled eggs with cilantro -
Ingredients?
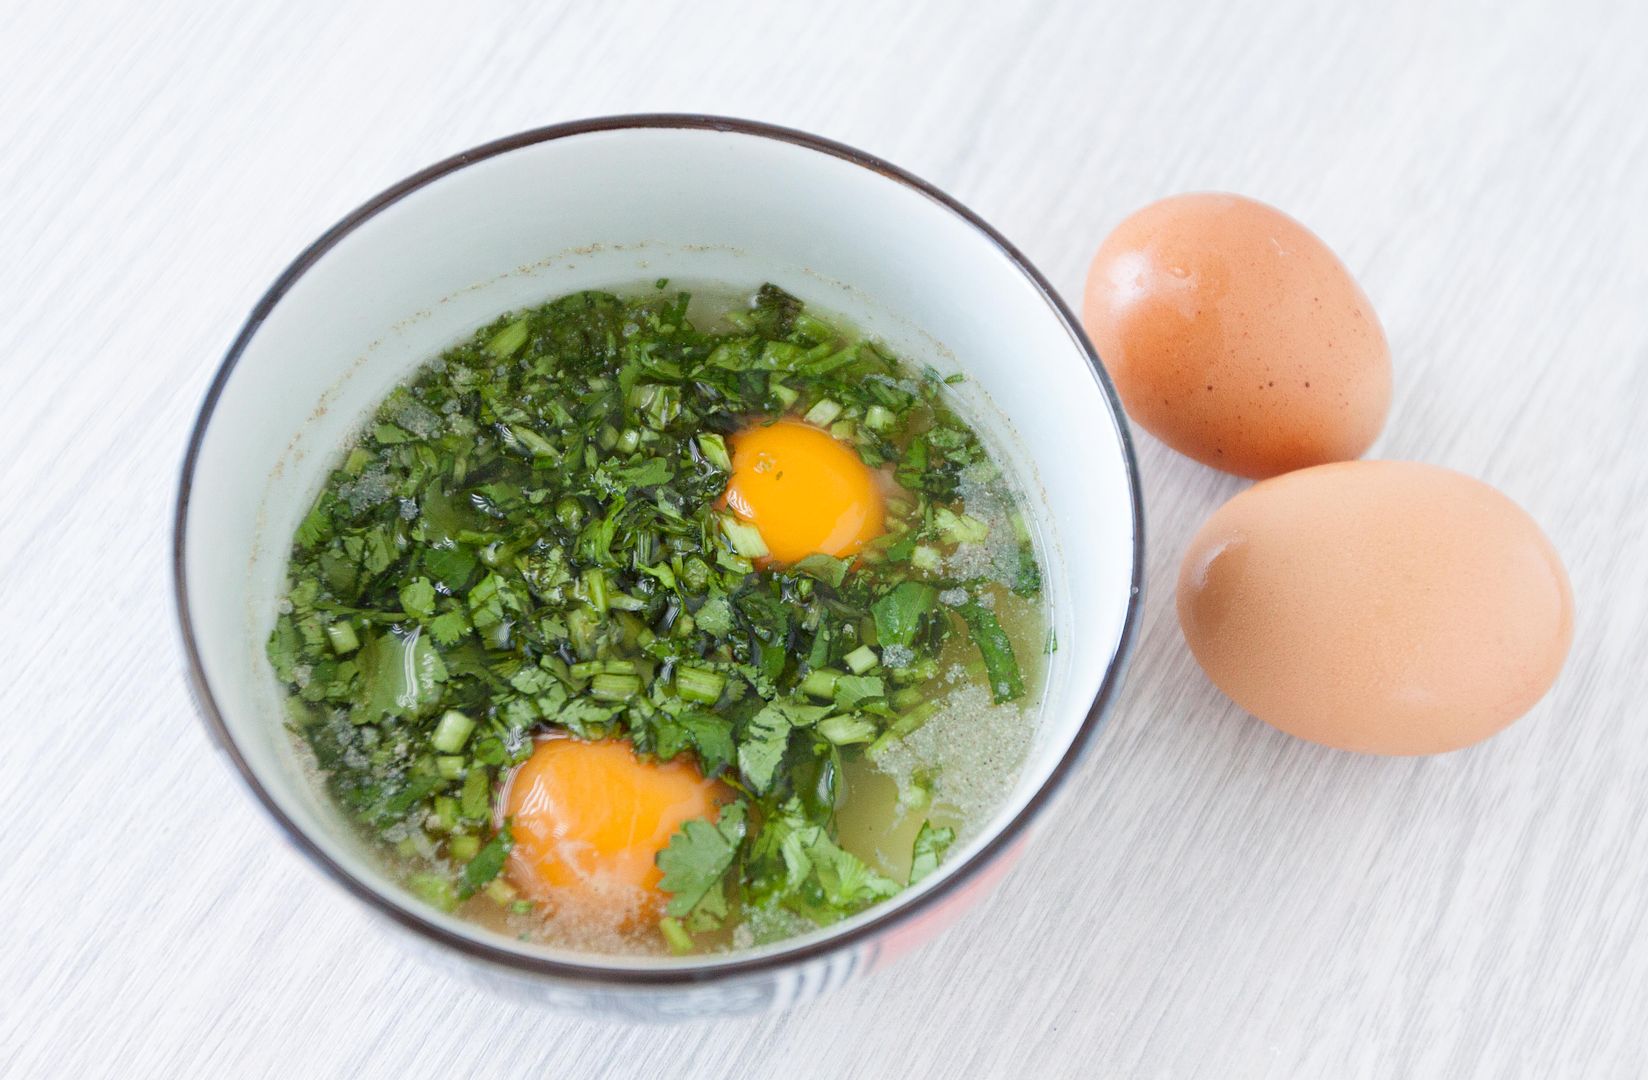
- 4 large eggs
- 3 tablespoons finely chopped cilantro
- 2 tablespoons olive oil
- 1 tablespoon water
- 1/2 teaspoon salt
- Some white pepper powder
How?
Break the eggs into a medium bowl. Add in finely chopped cilantro, including the stems. Also add in salt, water, and about two dashes of white pepper powder.
Beat the mixture till fully combined.
Drizzle some olive oil to the pan and turn to medium high heat. Wait till the oil turns warm then pour in the egg mixture.
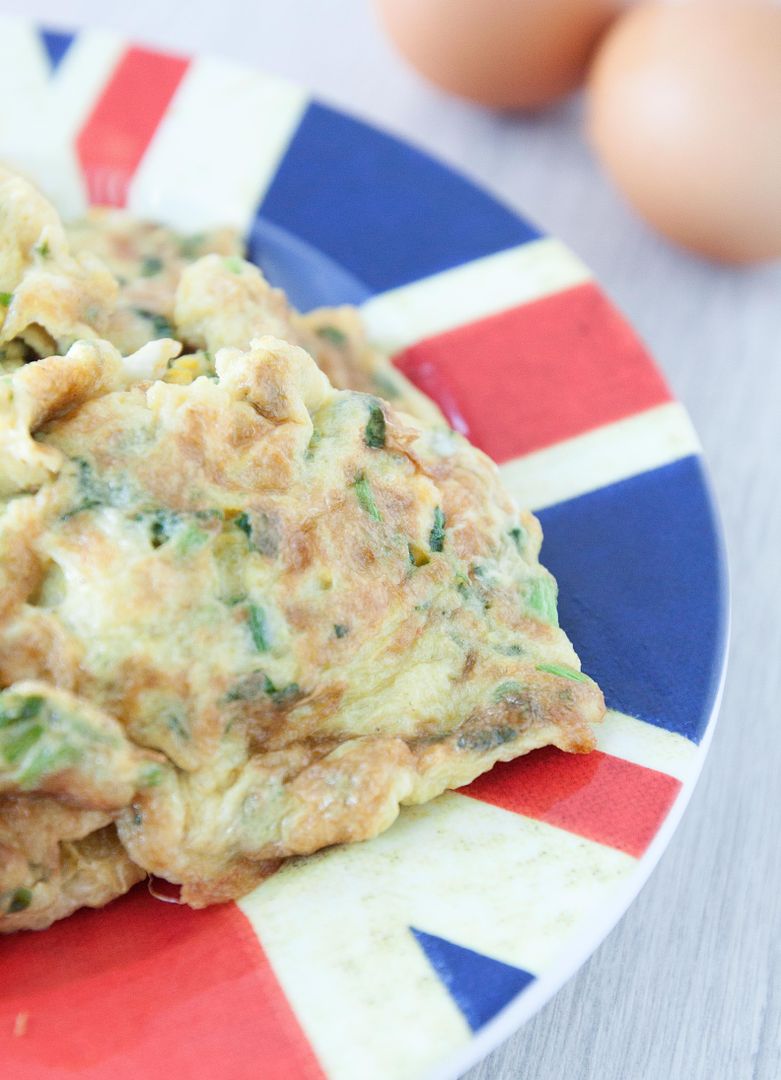
Even though it's a "scrambled" eggs recipe, but try not to scramble it too much in order get larger bite size pieces. Only lightly scramble it in the beginning then just let the mixture "sear" on the pan till the bottom turns slightly browned.
Flip the pieces and continue to "sear" till slightly browned. Transfer onto a serving plate.
Use more salt if preferred. This recipe only use minimal amount of salt so that the cilantro aroma can shine through.
Serve with Sriracha if desired.
Reading food related articles daily comes with one major benefit - it broadens my cooking options. All these wonderful dishes and even recipes from the readings always intrigue me. When curiosity takes over, or more so when these words and pictures put me into a very hungry mood, that's when these knowledge turn into real food, in my own kitchen.
Tasting Table published an article back in early 2016 talking about bang bang sauce - chef Phet Schwader's version of a tradition Laotian sauce called jeow som. I can almost taste its flavors through my imagination, a sauce consists of ginger, sugar, chilies, and cilantro. I must try it myself. So a little research and a little improvisation, here is my take on Laotian spicy sauce.
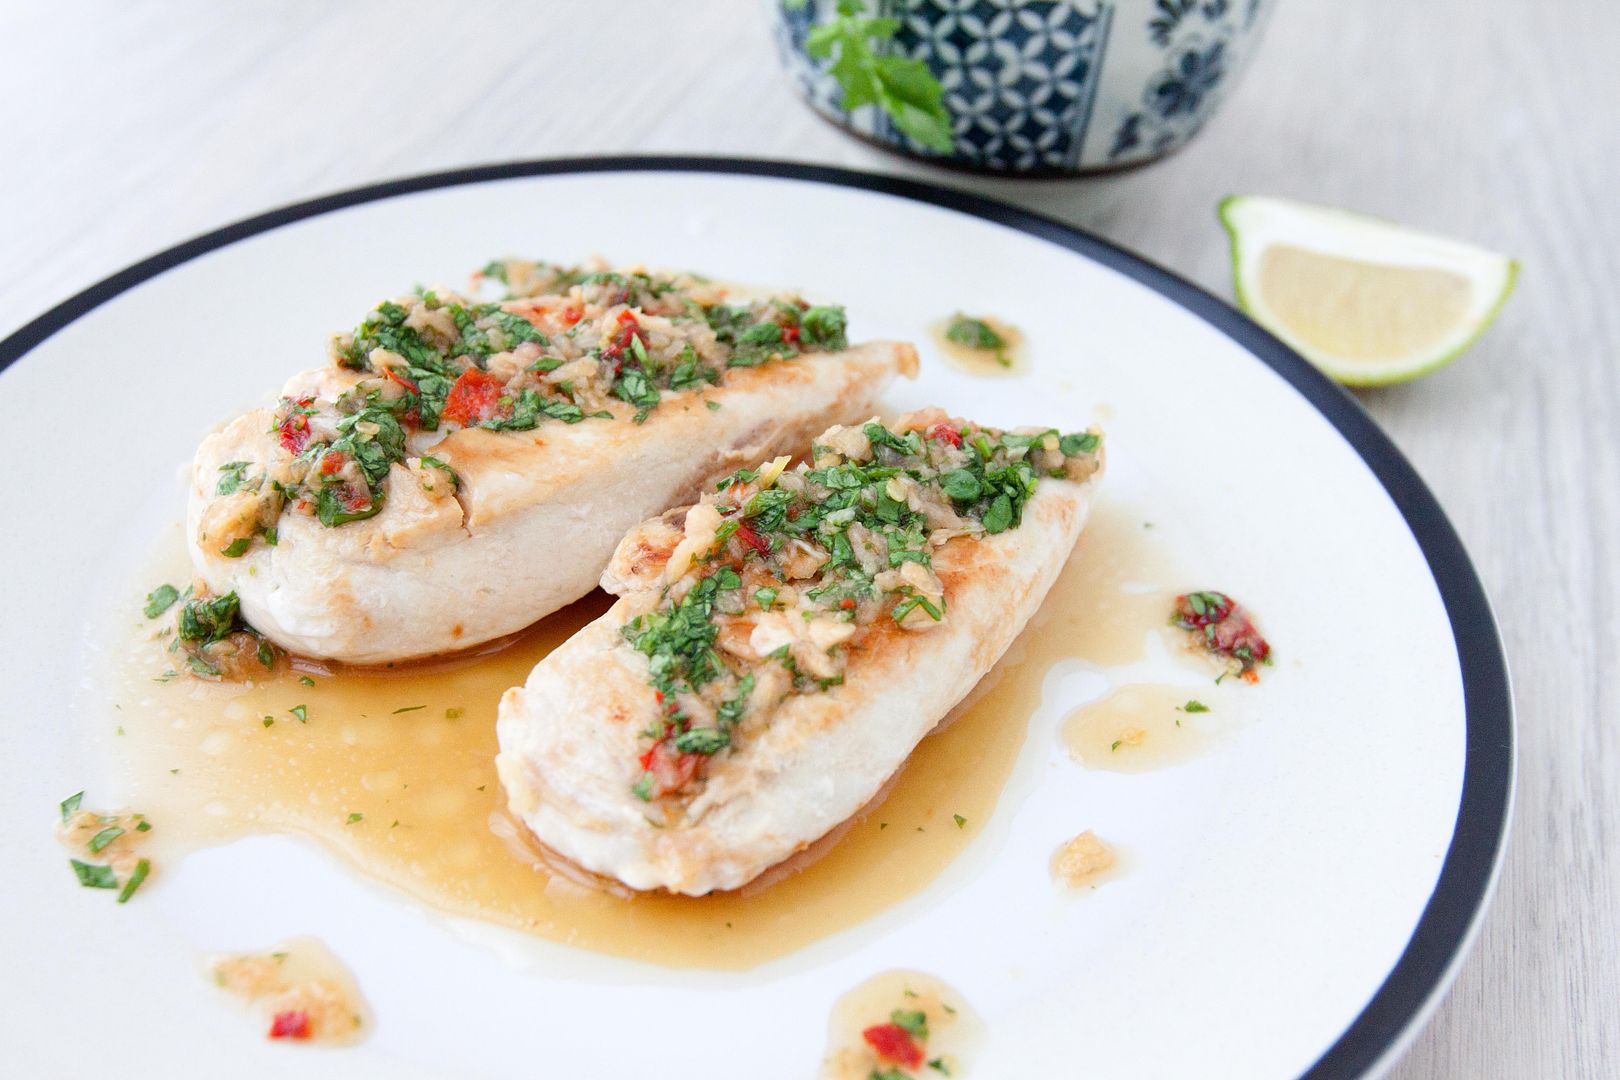
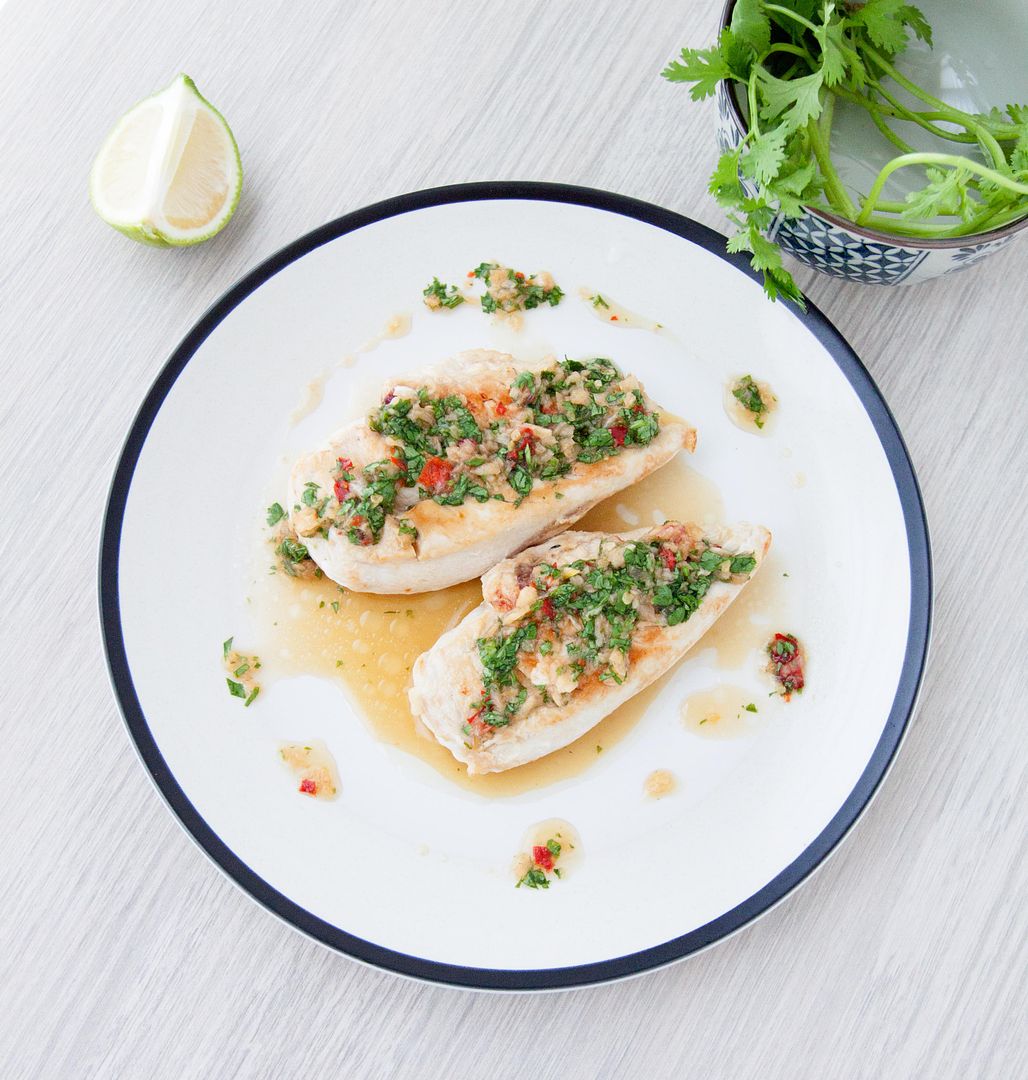
Seared chicken with Laotian spicy sauce -
Ingredients?
- 1 large or 2 medium chicken breast
- Some olive oil
Sauce:
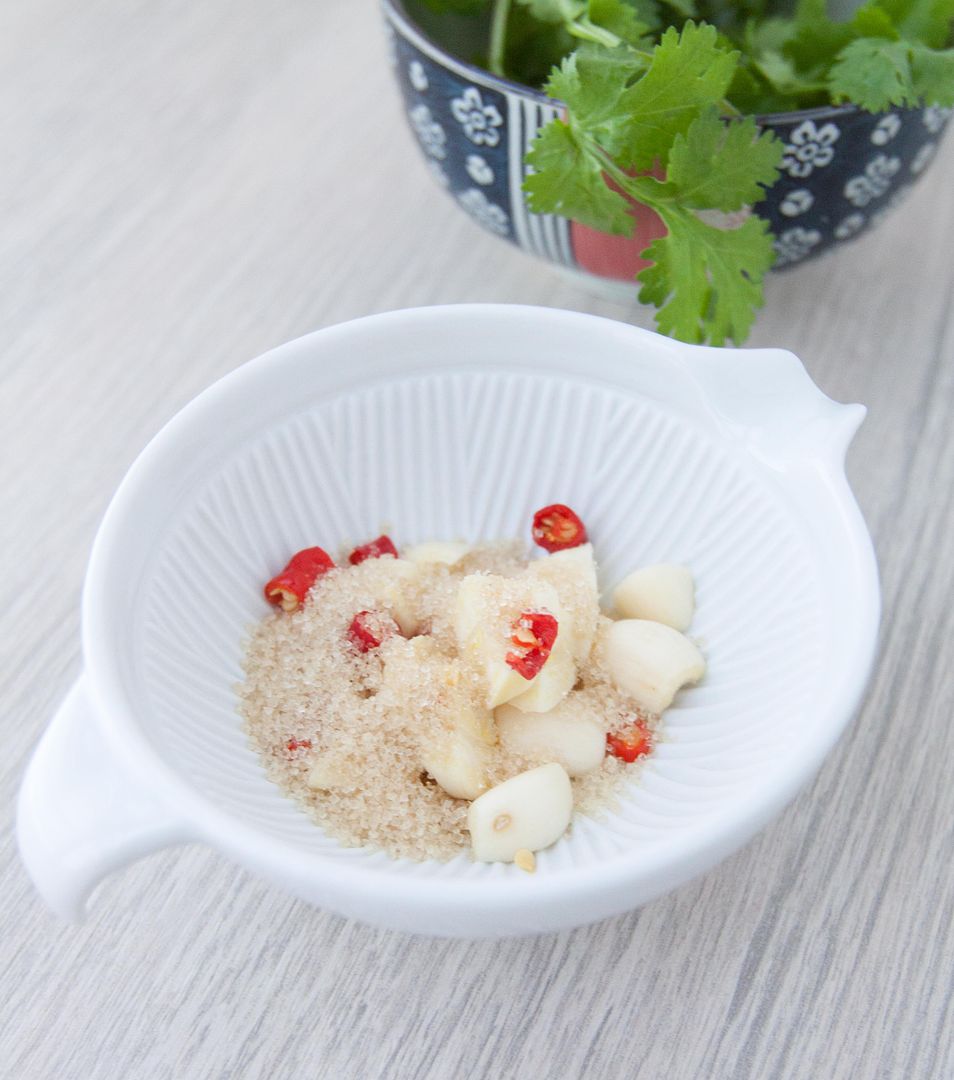
- 4 garlic cloves
- 2 red chilies (Thai chilies preferable)
- Small bundle cilantro
- 2 tablespoons fish sauce
- 2 tablespoons lime juice
- 1 tablespoon granulated sugar
How?
Cut several gashes on the chicken breast and make sure not to cut all the way down. Drizzle just enough olive oil to evenly coat the bottom of the pan. Turn to medium high heat. Once the pan gets hot, add in the chicken and sear both sides till slightly browned and almost fully cooked through.
Transfer the chicken to a serving plate. The residual heat will continue to cook the chicken, and the texture should be perfect when it's ready to serve.
Peel and give the garlic cloves a few chops. Trim off the chili stems and roughly chop the remaining. Finely chop the cilantro, this recipe needs about 2 to 3 tablespoons of chopped cilantro.
Add garlic, chilies, and sugar to a grinding tool or use mortar and pestle.
Crush and grind these ingredients till it turns into paste. It doesn't need to be smooth, just make sure all the ingredients are well incorporated. Add the lime juice and fish sauce. Mix till combined.
Lastly, mix in chopped cilantro. Taste and adjust with lime juice and fish sauce if needed.
Pour this pungent sauce all over seared chicken right before serving. The sauce tastes so good that I even pour it on steamed rice.
My Laotian sauce recipe yields a more toned down version in regards to spiciness. You know, these tiny red chilies can be very fiery at times.
Other Asian style chicken recipes:
Red miso is the key savory component for this rice bowl recipe. The red miso not only boosts up the saltiness and also creates a umami punch. However, this fermented ingredient can be too powerful at times, and that's when the egg yolks come into the picture, providing a smooth touch and degrees of comfort.
Red miso ground beef rice bowl/donburi -
Ingredients (for 3 to 4 portions)?
- 3 to 4 portions steamed white rice
- 1.2 lb ground beef
- 8 to 10 okra
- 3 to 4 egg yolks
- 1/3 cup peeled and chopped shallots
- 2 garlic cloves
- 1 stalk scallion
- 2 tablespoons olive oil
- 1 1/2 tablespoons red miso
- 1 tablespoon soy sauce
- 1 tablespoon mirin
- 1/2 teaspoon Sriracha sauce
- 1/8 teaspoon salt
- 1/8 teaspoon black pepper
How?
Peel and finely chop the shallots. Peel and finely chop the garlic cloves. Trim off scallion stem and chop the remaining. Trim off the okra stems and slice the remaining. If not using Sriracha sauce, chop up two fresh chilies instead.
Drizzle some olive oil to evenly coat the bottom of the pan. Turn to medium high heat. Add in shallots, salt, and pepper. Give it a quick stir and cook till the shallots turn translucent.
Add in garlic and most of the chopped scallion, save some for garnish later on. Add in the chilies if needed. Cook till garlicky aroma comes out but not burnt.
Add the ground beef and stir-fry till all the pieces are separated, meaning no lumps or big chunks present.
Add red miso, soy sauce, mirin, and Sriracha. Stir occasionally and cook till the juice has been reduced and almost completely dried.
Mix in okra and cook for another 30 seconds or so.
Scoop some rice to a bowl and top with the red miso ground beef. Make a shallow hole in the middle to better nesting the egg yolk. Carefully add the yolk to the center then garnish with reserved scallion. Serve immediately.
If you can't find red miso, regular white miso works too just the flavor won't be as expansive. Also use more white miso for this recipe, since it's not as salty as its red counterpart.
Other rice bowl recipes:
Instead of serving mashed potatoes as a side for my braised beef, I've decided to give cheese grits a try. Creamy as well, and using cornmeal kind of tricking me into thinking I'm actually eating healthier and not just piling up carbs. And let's not staring at the bread and cheese platter on the table.
Cheese grits -
Ingredients (for 2 to 3 portions)?
- 1 cup whole milk
- 1 cup water
- 1/2 cup cornmeal
- 1/3 cup sharp Cheddar (shredded)
- 2 tablespoons unsalted butter
- 1 to 2 tablespoons heavy whipping cream
- 1/2 teaspoon salt
- Some freshly ground black pepper
How?
Prepare a medium pot and pour in milk, water, and salt. Bring to a light boil then turn to low heat.
Pour in cornmeal and whisk constantly to prevent lumping and browning. It should take around 20 to 25 minutes, till cornmeal starts to feel like creamy mashed potatoes.
Remove the pot from heat and stir in Cheddar and butter. Whisk till fully combined. Add 1 to 2 tablespoons of heavy whipping cream for an even creamier taste.
Sprinkle some freshly ground black pepper right before serving.
It's better to serving the grits immediately. However, to save some hassles while preparing for a big meal, this can be made one day ahead and store in the fridge, but skip the heavy whipping cream part. Add the heavy whipping cream when heating up the grits, and keep whisking till that creamy mashed potatoes-like texture comes back to life.