The line was insane when Bruxie first opened in Southern California. People were crazy about this waffle sandwich concept - "the bold fold," says the restaurant's tag line.
You can read all about how this popular Belgian/American waffle sandwich started by clicking the link, for sure it'll do a better job explaining the whole stories behind. As for me, I'm here to share my first dine in experience at the Irvine branch. Just to sum it up, the food was lighter and better than expected!
Located inside the Irvine Heritage Plaza close to the 5 freeway, you won't see long lines waiting outside this branch since the initial frenzy has passed. However, Bruxie can still get quite busy during lunch and dinner rush hours. Short waiting time can be expected because all the waffle sandwiches are made to order to ensure customers get hot and crisp bites every time.
Spacious indoor dining area; there are also a few outdoor tables overseeing the parking lot.
I had to admit that I've been reluctantly to give waffle sandwich a try, unlike the cronut craze that got me all excited when it first started. Never a big fan of waffles, it's too heavy and makes my tummy bloated easily. However, being a foodie, shredding away all the presumptions is a must, on top of that, stereotypes. So here I am, standing in line with my other girl friend ordering not just one, but three waffle sandwiches. Might as well try more varieties all at once.
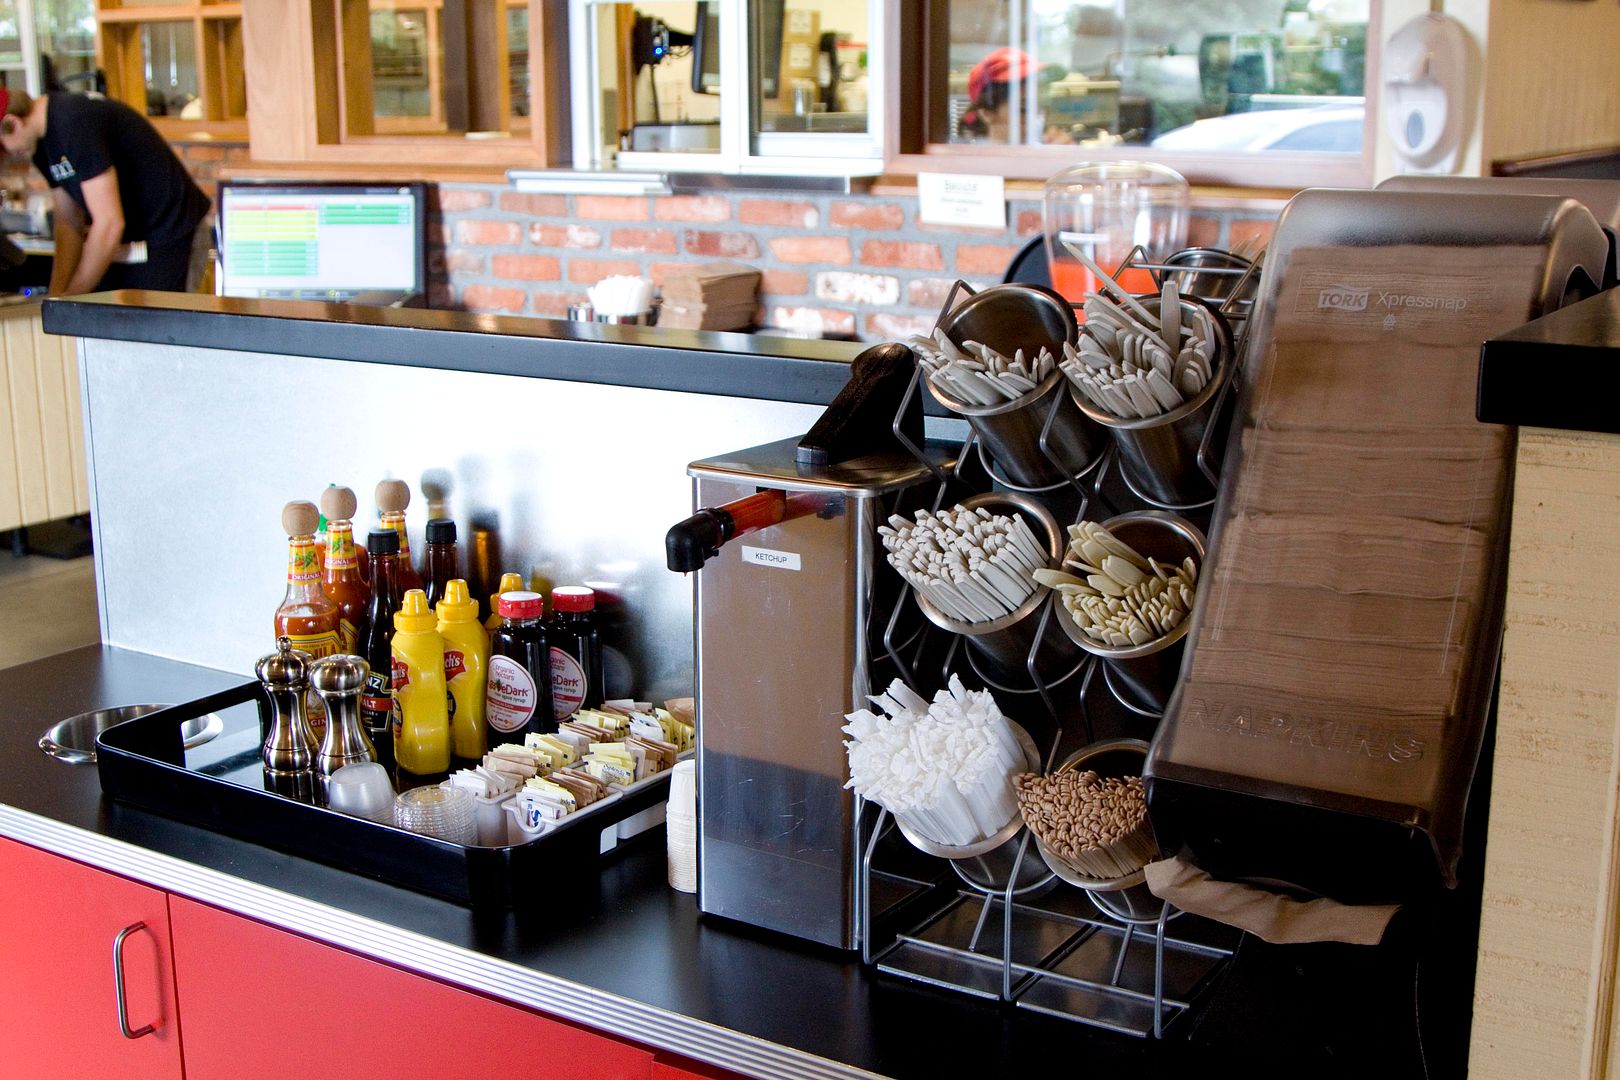
Self-serving station -
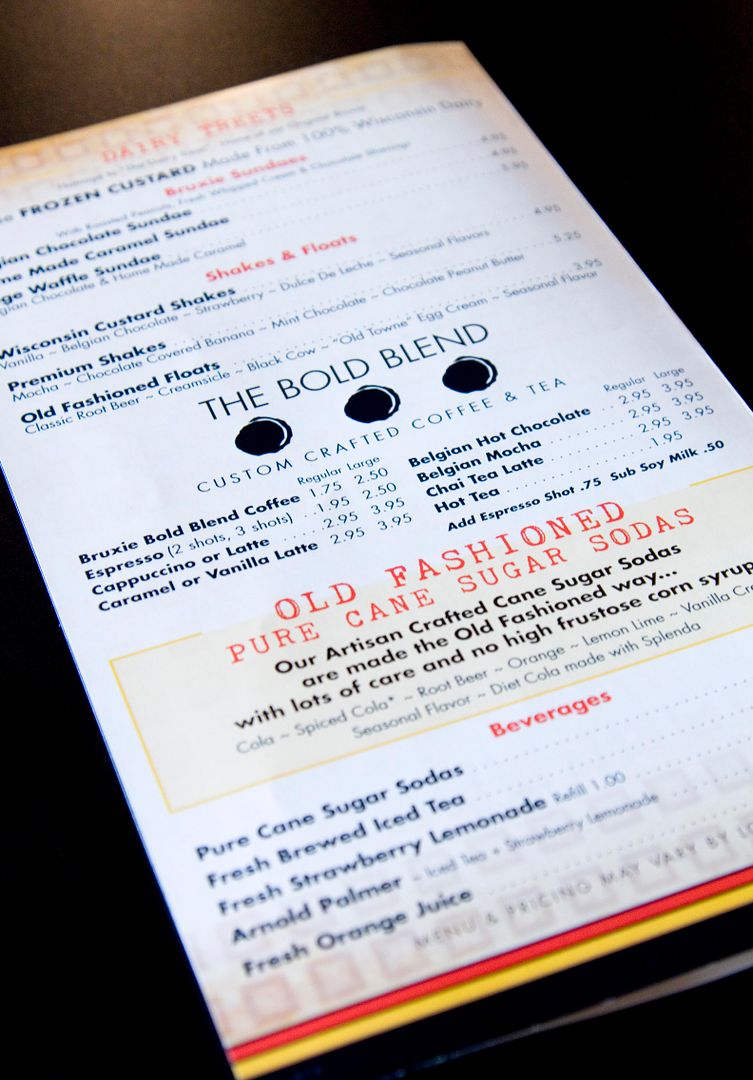
Menu, they even have waffle cut fries!? Too bad three waffle sandwiches might already hit the lunch capacity for two Asian girls -
*Click on the image for an enlarged view.
Sundaes, shakes, floats, and other drinks -
The server delightfully took down our order and handed over a pager -
The wait wasn't too bad plus we got our drinks first. Took about 10 minutes before receiving our savory waffle sandwiches. The sweet sandwich can either be served first or can be hold till you're ready for it. Just tell any of the servers and show them the receipt. They'll start making it in the kitchen. That way you'll get freshly made hot waffles from the beginning till the end.
Ice tea and Belgian mocha -
The Belgian mocha is blended with chocolate, you can request lighter on the chocolate if less sweetened taste is preferred.
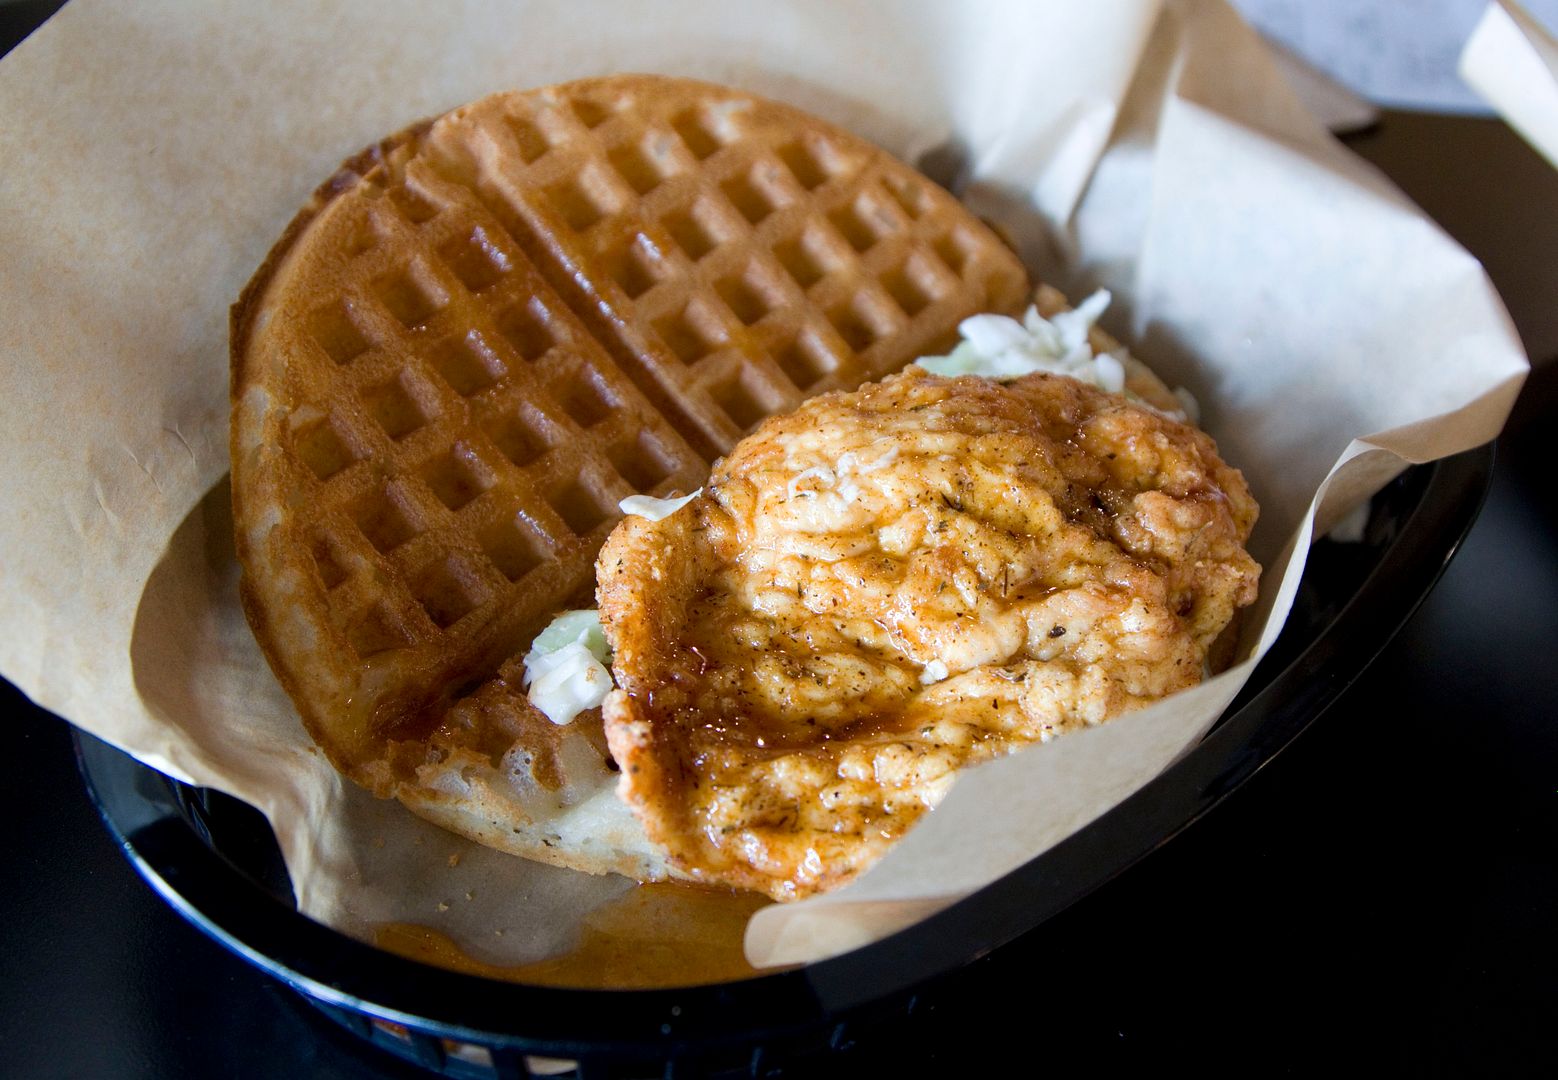
I would say the most popular savory waffle sandwich at Bruxie is the buttermilk fried chicken dressed in chili honey and cider slaw $7.5 -
It comes with the option of adding 100% pure Vermont maple syrup for extra $1.
My very first bite of waffle sandwich, it's all yours Bruxie.
Surprisingly light and flavorful. I thought the waffle itself was going to be a heavy with chunky load of dough that'll stuck in my tummy for the rest of the day. But no, Bruxie modified the regular recipe and created burden-less and airy waffles. Even though on the website Bruxie states that the waffle is not sweet, but it does has that naturally sugary taste from the flour, and perhaps enhanced even more during the iron pressing process.
The square edges on the waffle create extra crunchiness for each bite. Chicken breast was used but not dry as regular white meat, for sure the honey dressing helps in adding moisture.
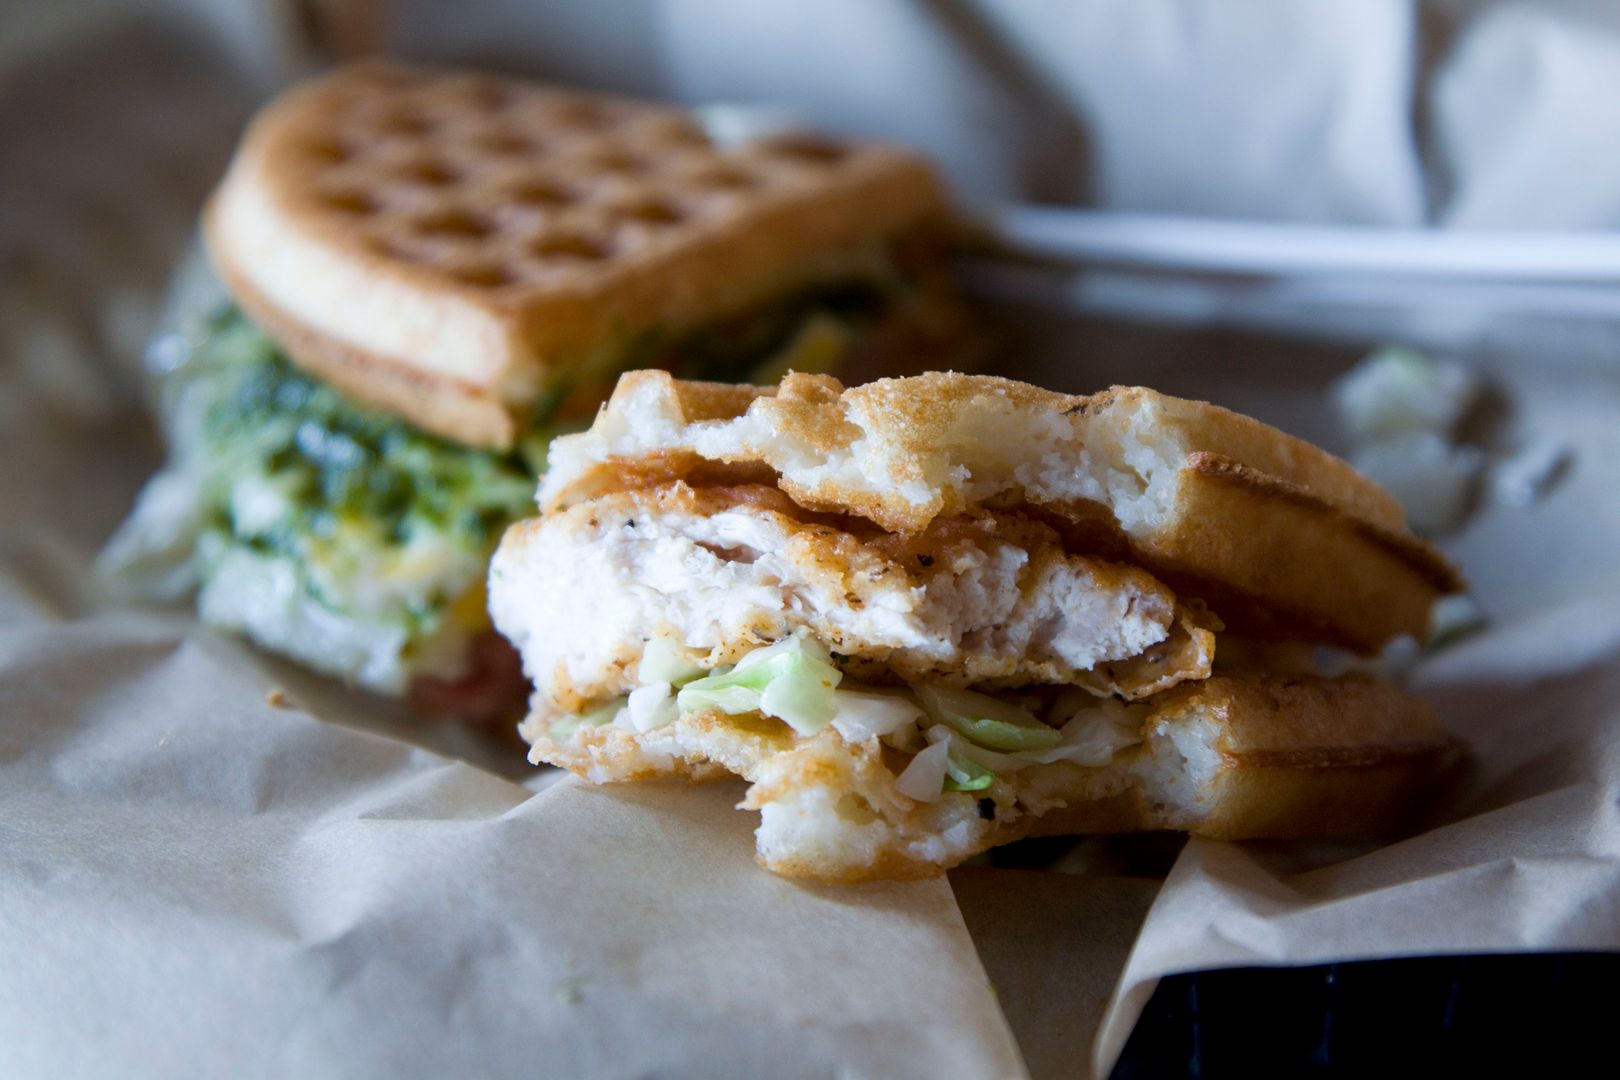
Green eggs and ham $7.25 -
"Grilled ham, Tillamook cheddar, mayo, jumbo egg, arugula pesto."
This one has a more delicate flavor profile compared to the tried and true country fried chicken. The semi-cooked egg yolk is the best part, adding something comforting to this rather light waffle sandwich. Female customers might fall for this one.
Done with the savory items, now off to sweet treat. Nutella and bananas with sweet cream $5.95 -
Who doesn't love nutella, especially when paired with ripe bananas?
The sweet cream inside tastes like light yogurt. There's a hint of sourness, which works great in cutting down the sweetness from the nutella spread.
Overall my first visit was a wonderful experience and the waffle itself was way better than expected. The savory items were lighter than imagined, which is not a bad thing. The sweet waffle with nutella, well, anything with nutella can never go wrong. I wouldn't mind coming back for more when craving for some comforting yet delicate lunch meal.
Cindy's rating: 7 (More like 6.5)
Bruxie (Irvine Branch)
Irvine Heritage Plaza
14376 Culver Drive
Irvine, CA 92604
(949) 556 - 4894
http://bruxie.com/
Operating hours:
Sun - Thu from 8 a.m. to 9 p.m.
Fri - Sat from 8 a.m. to 10 p.m.
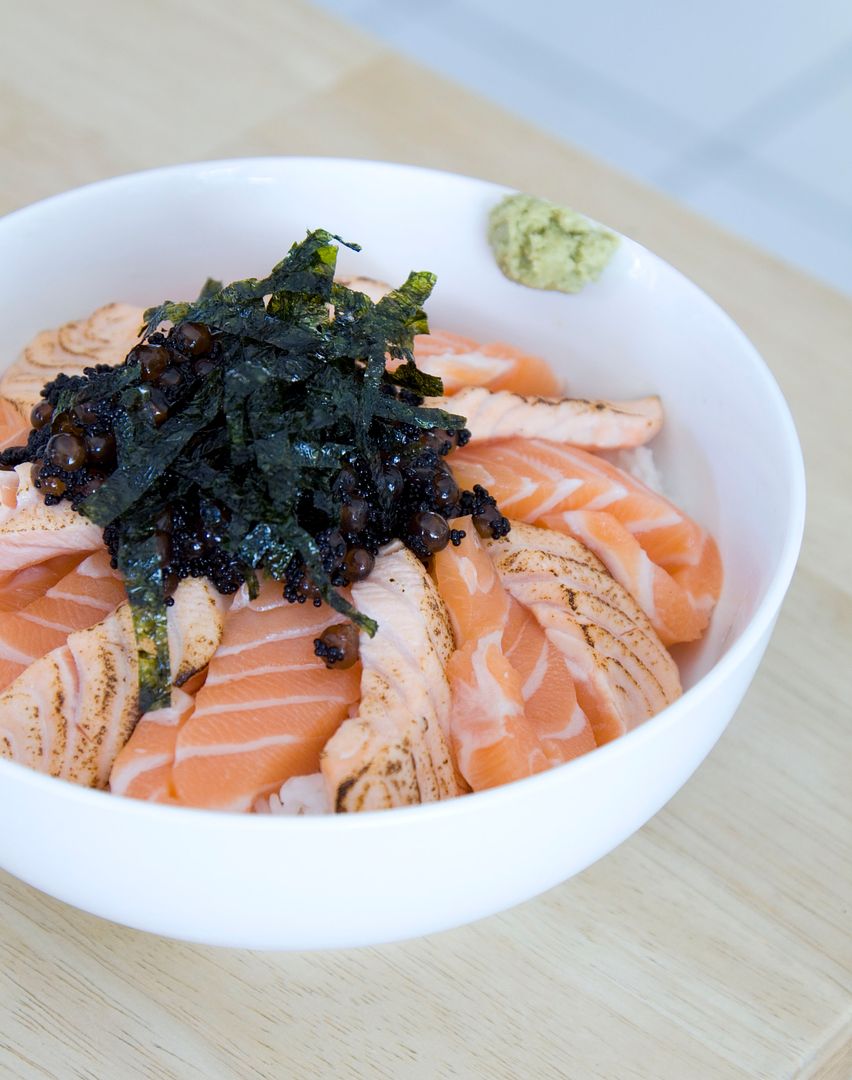
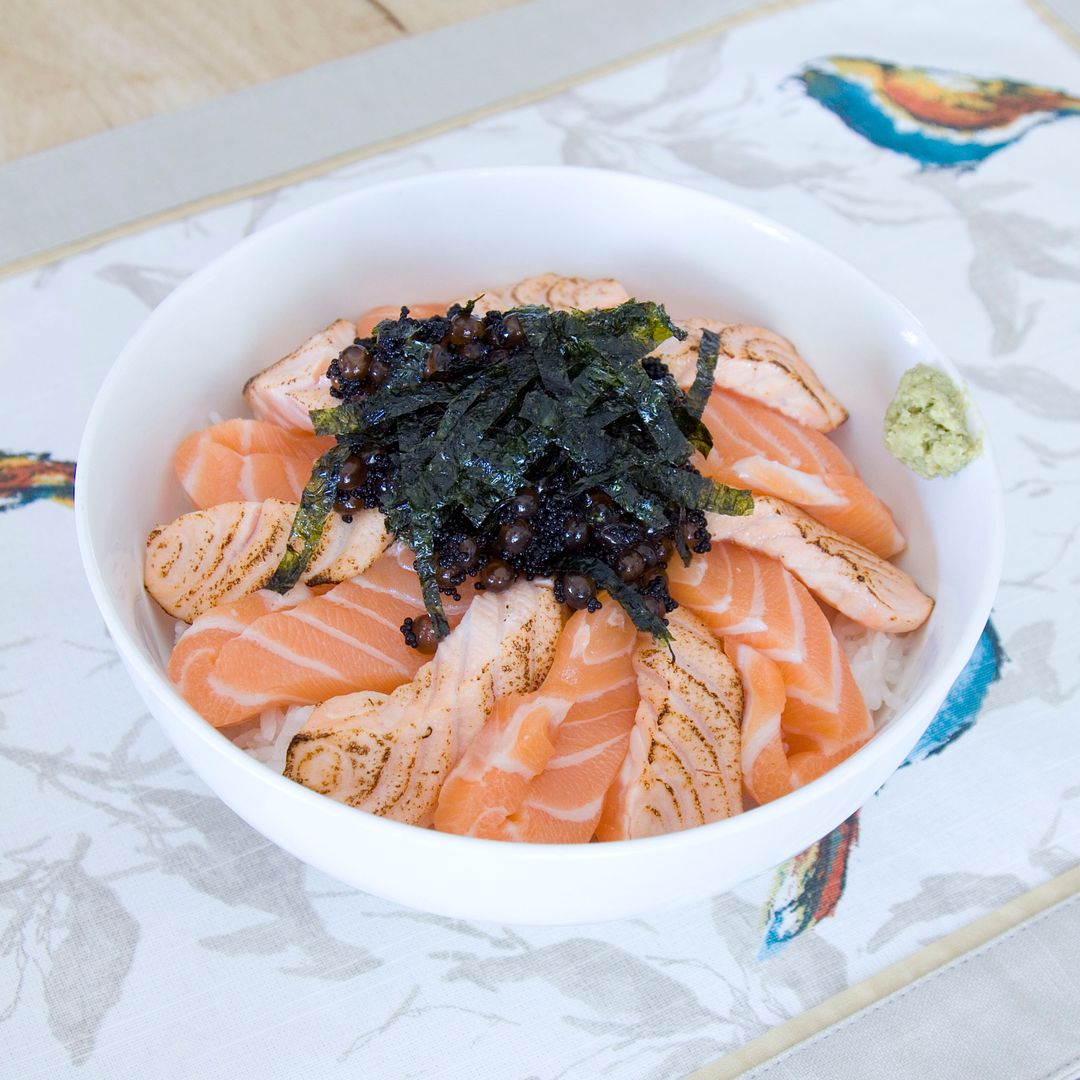
Have you ever heard of Japanese oyakodon? The name "oyako" implies parents and children, that's why oyakodon's two main ingredients are chicken and chicken eggs. The recipe we're making here carries the same concept, but instead of chicken, it's salmon oyakodon using sashimi grade salmon and salmon fish roe called ikura.
Ingredients (for two)?
Sushi rice:
- 2 cups of sushi rice or short grain rice
- 2 tablespoons of rice vinegar
- 1 tablespoon of granulated sugar
- 1/4 teaspoon of sea salt
- 1 lb of sashimi grade salmon
- 0.2 lb of ikura
- 0.15 lb of black tobiko fish roe (other color works even better)
- Some dried seaweed threads
- Some wasabi (usually it'll come with sashimi salmon)
- Some light soy sauce
How?
Sushi rice recipe can be found here from my previous blog post. It's a simple method for making sushi rice at home. Just remember not to overly fluff the grains to prevent the rice from turning into mochi-like texture. *Lesson learned from my mistakes.
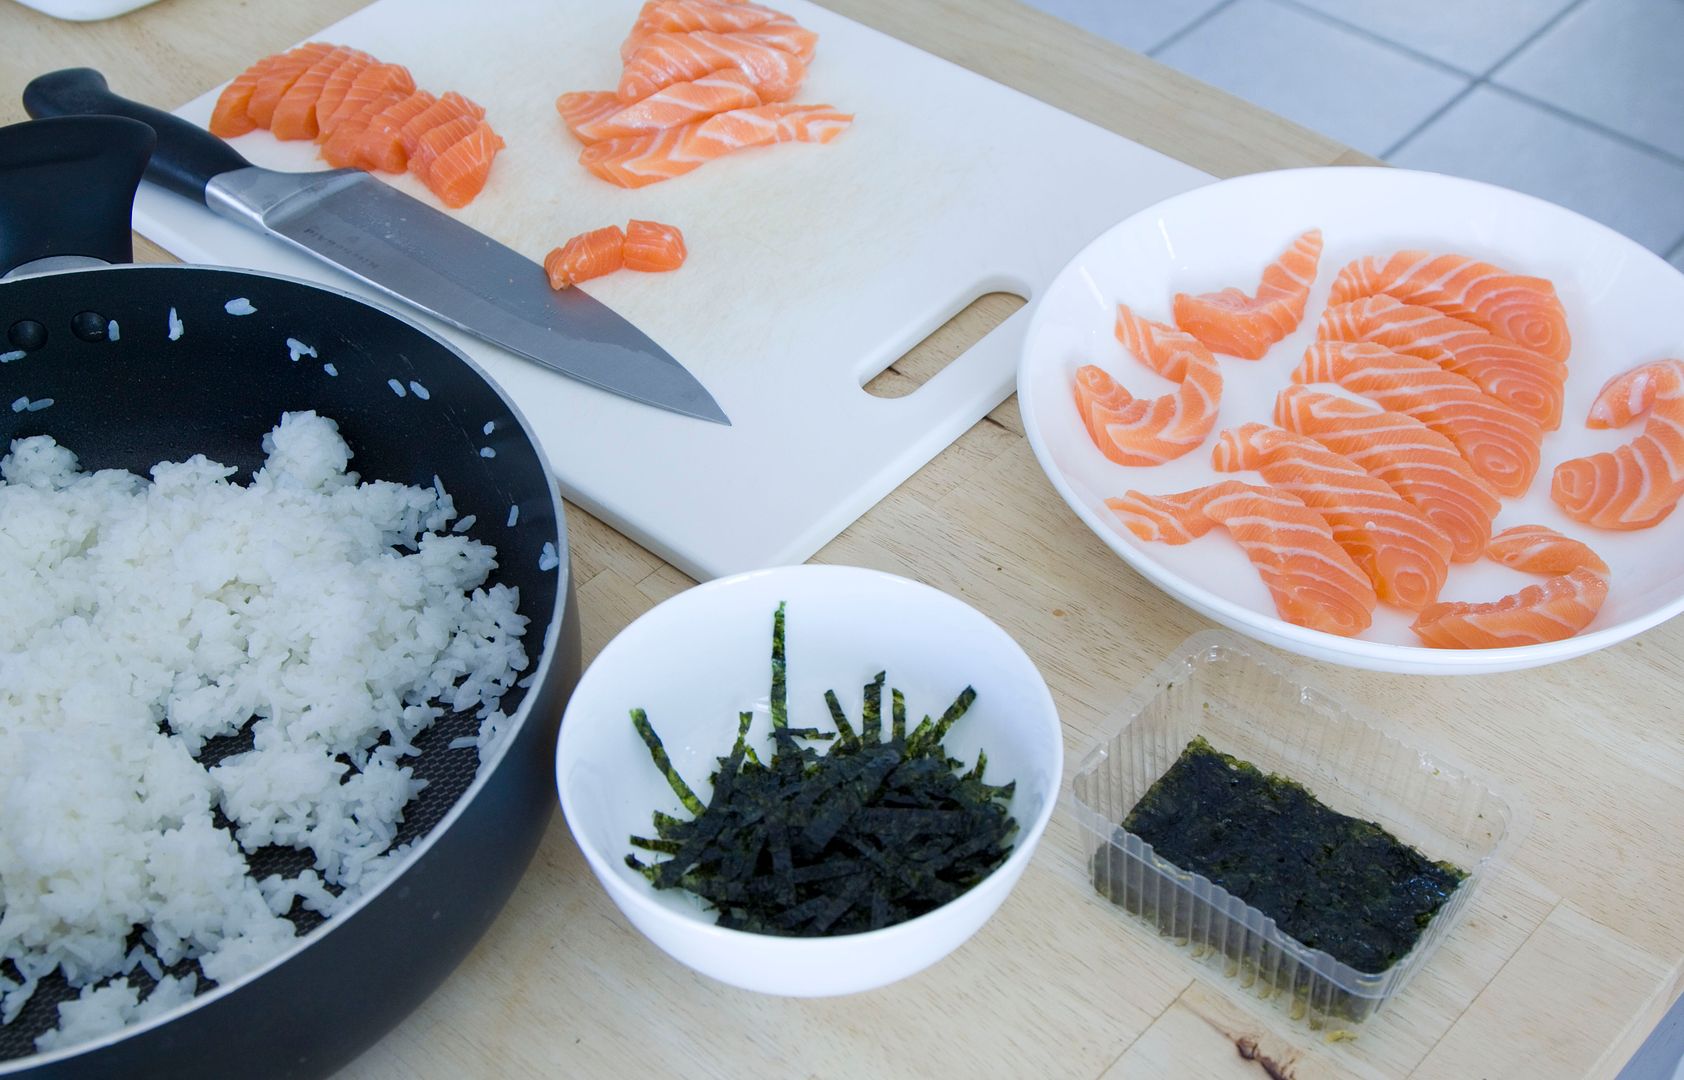
Store bought dried seaweed threads might be hard to find. In that case, take larger pieces of dried seafood and chop into thin strips with very sharp knife, scissor works just as well.
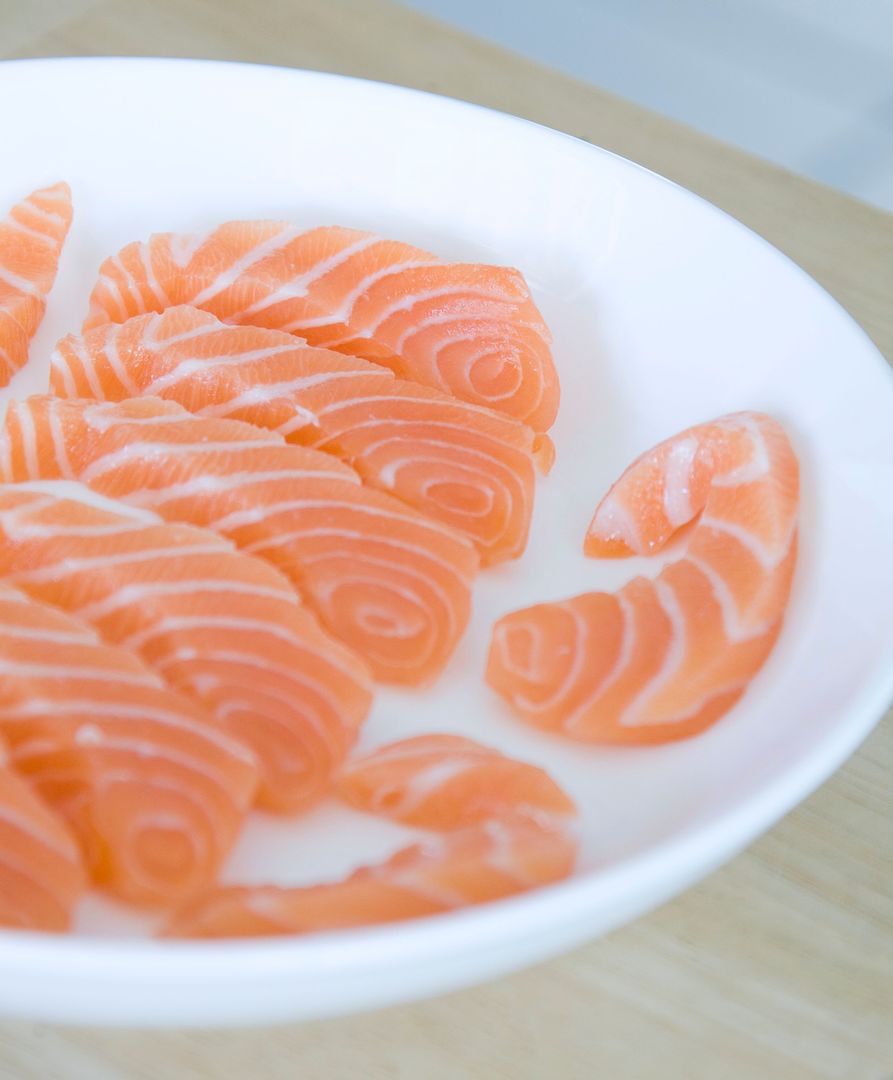
Slice the salmon to about half inch thickness and torch half of the fish -
You'll know it's ready when the surface turned slightly burned and the smoky aburi aroma comes out -
Leave the other half the way it is -
Mix the tobiko together with ikura. The color combination actually looks better with green or yellow tobiko roe. However, I was curious about pitch black fish roe that was dyed with squid ink. As a result, the color further dimmed my orange ikura to a point of no return..
Scoop some sushi rice to a bowl. Evenly arrange the salmon slices around, one torched and one un-touched till the fish finally formed a circle (that's a lot of salmon! We are eating like kings and queens at home). Put the tobiko and ikura mixture in the center and top with dried seaweed threads. Put some wasabi on the side and serve with light soy sauce.
The tobiko and ikura mixture is on the salty side so give it a taste first before using the soy sauce. I'm sure this meal will give you a big boost in omega-3 fatty acids, which is very good for your heart!
Other similar recipe:
Festive Japanese food at home - colorful chirashi as easy as 1 2 3!
Salted duck egg is one of the commonly used ingredients in Taiwanese cooking. It's a type of preserved product by soaking the duck eggs in highly salted water for few weeks. The eggs will then steamed, packed, and sold in grocery stores.
You can crack the shell and serve the egg straight up, usually with porridge for breakfast. You can also crush the egg and cook in oil for few minutes to enhance the aroma. This will then be used as the base sauce or seasonings for other ingredients, the more common pairings are fried king oyster mushroom and fried shrimps.
For this recipe, I'm going to utilize the second method of cooking the salted eggs first then mix with my fried rice ingredients. It's nice to steer away from the regular chicken eggs and substitute with heavier tasting salted duck eggs once a while.
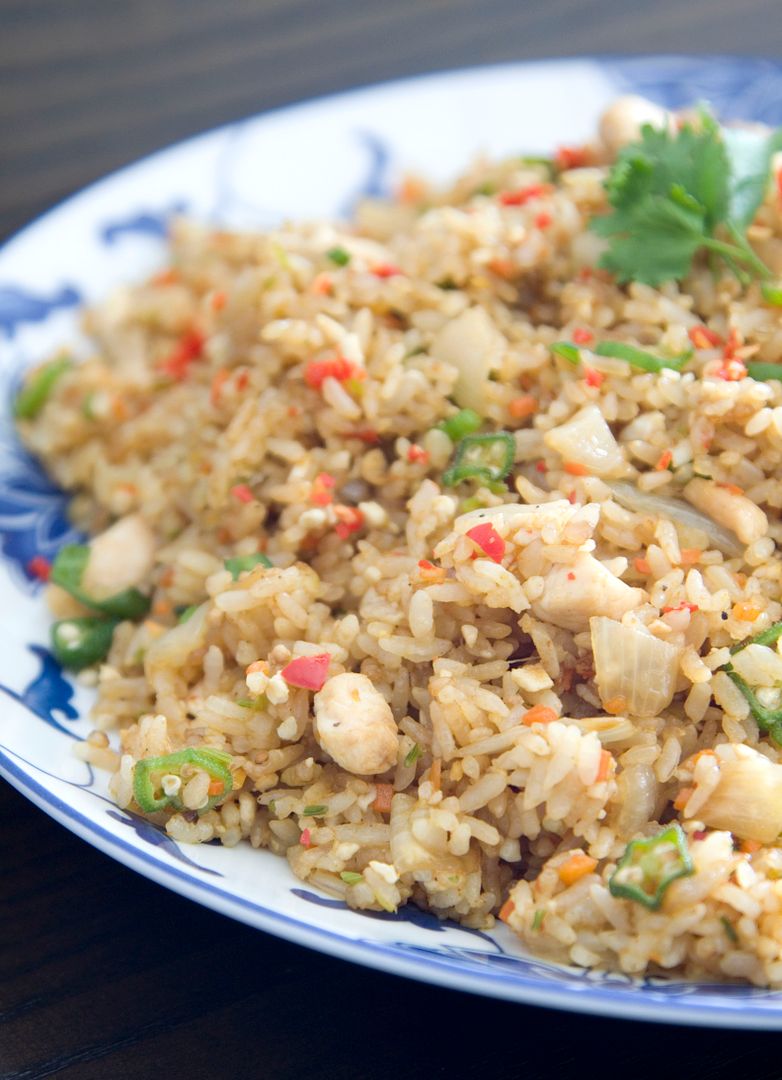
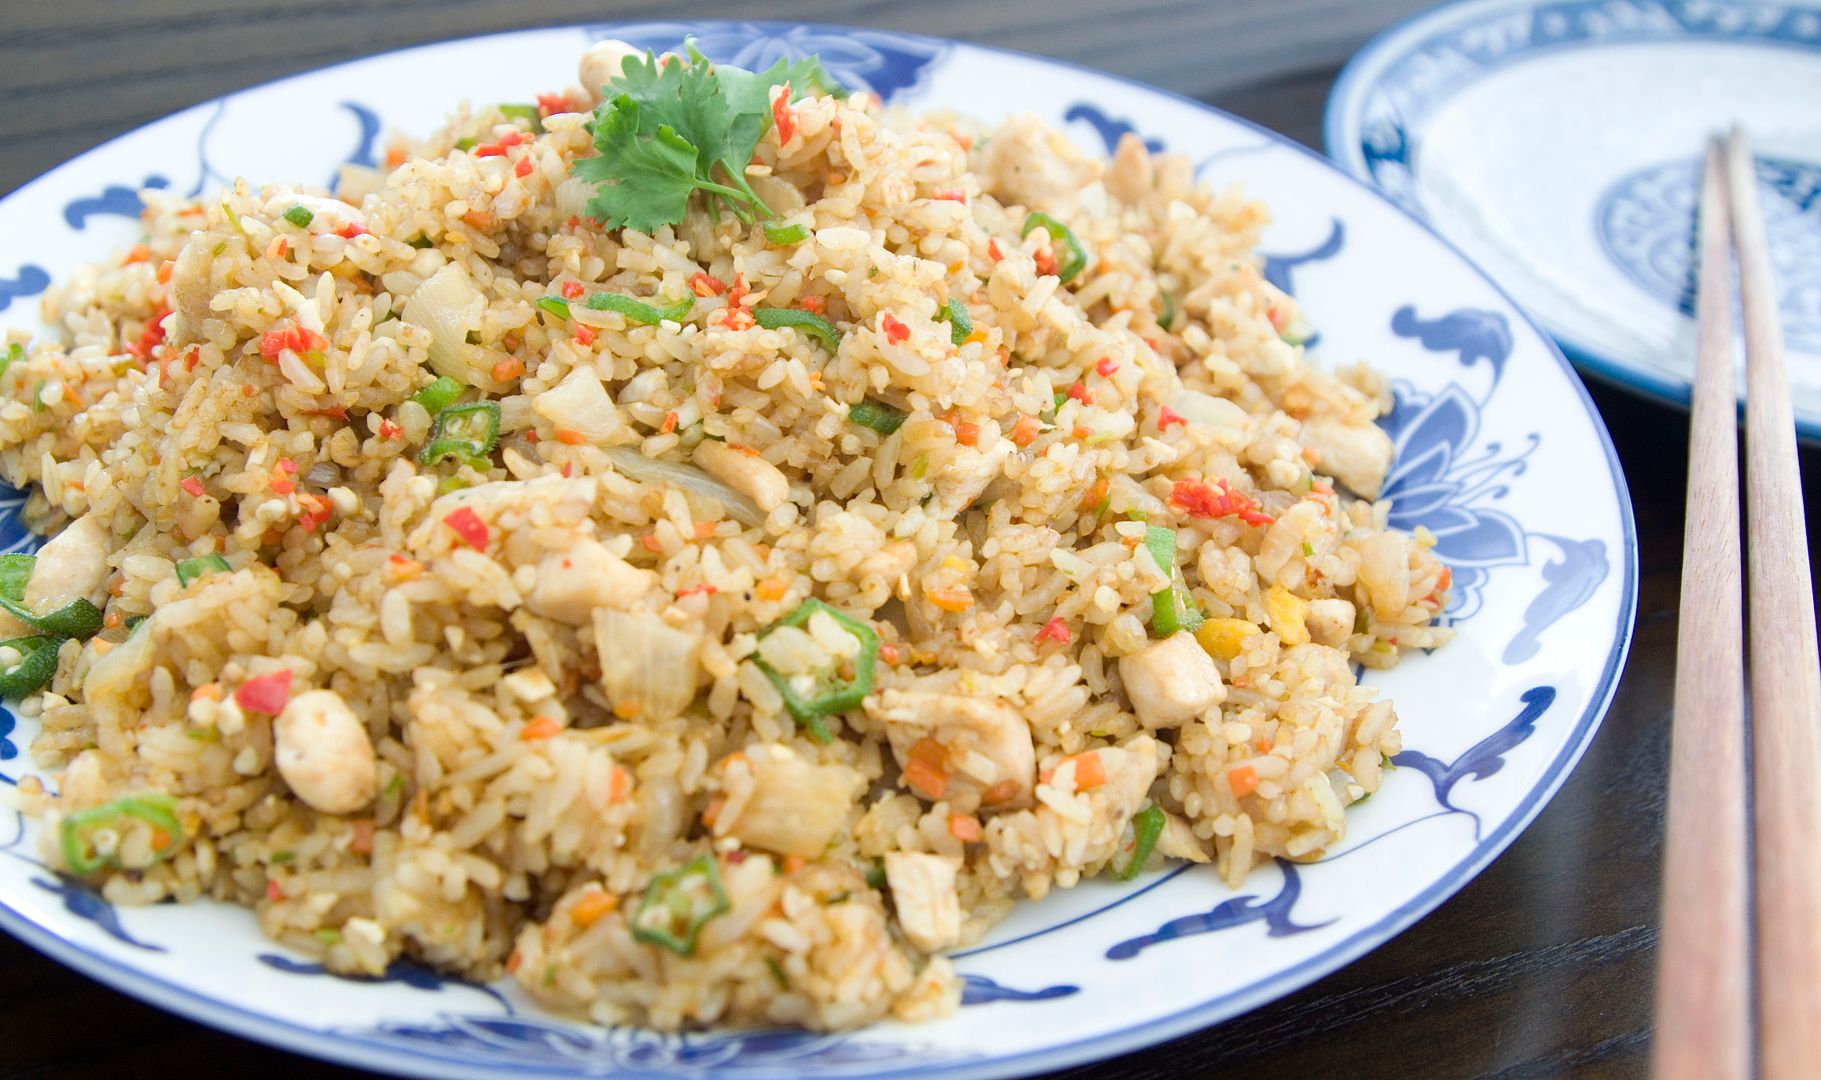
Chinese fried rice with salted duck eggs, okra, and chicken -
Ingredients (for 3 to 4 portions)?
- 5 chicken tenders
- 12 okra
- 2 salted duck eggs
- 3 fresh red chilies plus extra for garnish
- 1 small carrot
- 1 small onion
- 2 cups of steamed rice
- 4 tablespoons of olive oil
- 1 tablespoon of soy sauce
- Small pinch of salt
- Small pinch of freshly ground black pepper
- Small pinch of white pepper powder
- 1 small bundle of cilantro stems plus some leaves for garnish
How?
Cook 2 cups of white rice but use a little bit less water than usual. This way you'll get chewier freshly cooked grains, which is the texture we are looking for to use in fried rice recipe. Overnight leftover rice also works well.
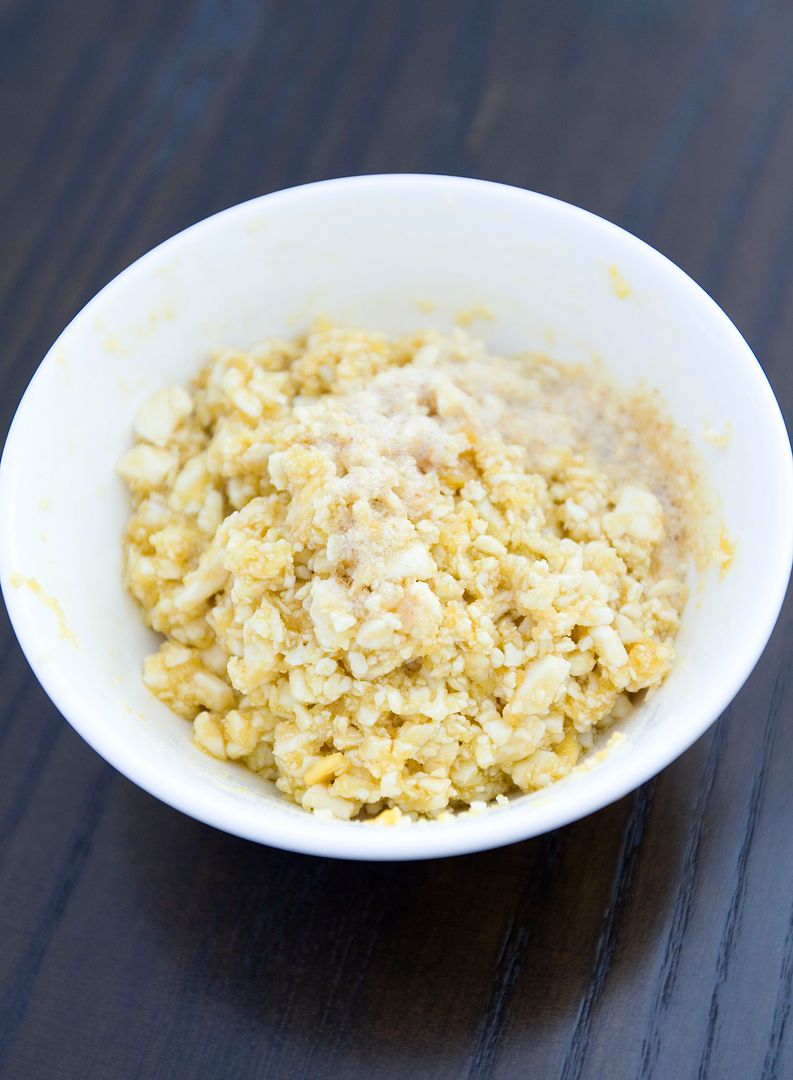
Crack the duck egg shells and smash both the egg white and yolk in a small bowl.
Remove the chili stems and finely chop the remaining. Remove the okra stems and slice the remaining. Peel and chop the onion into small square pieces. Peel and chop the carrot into tiny cubes. Discard the very bottom root of the cilantro and finely chop the remaining stems, save some leaves for garnish. Cut the chicken tender into smaller pieces, there's no need to marinate for this recipe.
Drizzle about 2 tablespoons of oil into the pan and turn to medium heat. Add in smashed duck eggs. It'll start bubbling slightly when heated up, make sure to stir constantly to prevent from burning. Wait till the color changes to darker yellow hue and the aroma comes out then scoop to a bowl for later use.
Drizzle another 2 tablespoons of oil into the pan and turn to medium high heat. Add in chopped onion along with small pinch of salt and small pinch of black pepper. Give it a quick stir and cook till slightly browned on the edges, about 5 minutes. Add in the chilies and cilantro stems. The stems are tougher so need to cook earlier during the process.
Transfer the carrot into the mixture and cook for 2 minutes. Once done, add in the chicken and cook for 2 minutes, then okra for another 2 more minutes.
Pour in the duck egg paste, pour in the soy sauce along the rim of the pan, the heat will draw out more soy aroma this way. Add a little bit of white pepper powder. Give the mixture a quick stir.
Add in cooked rice and lower the heat. Gently mix the ingredients together with the rice, making sure every grain are coated with the seasoning. You can tell by looking at the color of the rice. Try to break apart any white rice chunks if there's any.
Lastly, garnish the fried rice with some chopped chilies and cilantro leaves before serving. Noted I didn't use much salt for this recipe since the duck eggs are salty enough. However, I added just a little bit of soy sauce to boost the aroma.
Usually I prefer to use additional seasonings when eating fried rice, such as Sriracha or homemade chili sauce, but not this time! The salted duck egg really adds lots of flavors so the fried rice is pretty good just the way it is.
Other fried rice recipe:
How's your 4th of July weekend? Spent a lot of time chilling, barbecuing, and hanging out with families and friends?
My long weekend break was filled with tons of unhealthy but man...delicious and satisfying food. How much I wish this break can go over and over again piled with fried munchies and melted chocolate.
Unfortunately, it's time to face the reality and get the healthier diet back on track. Don't be sad, healthier doesn't necessarily mean dull and tasteless food. Salad might be hard to swallow after spoiling the palate and stomach with high oil content food over the weekend. So how about stir frying some veggies that are high in fiber, anti-oxidant vitamins, and low in calories?
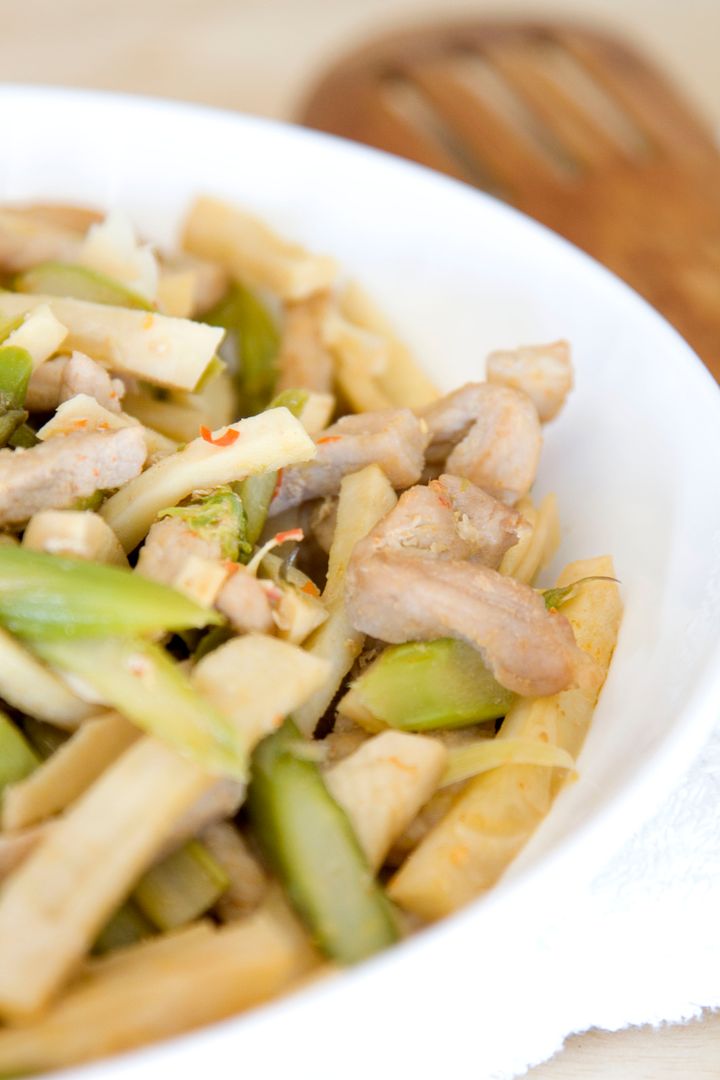
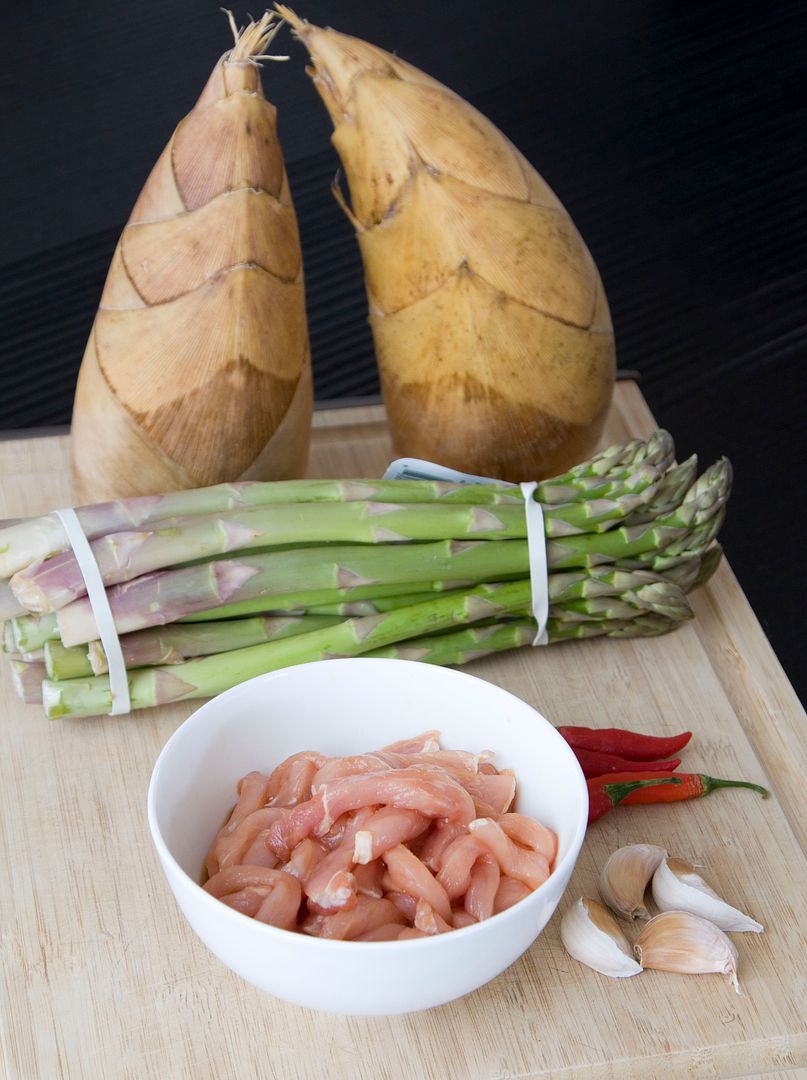
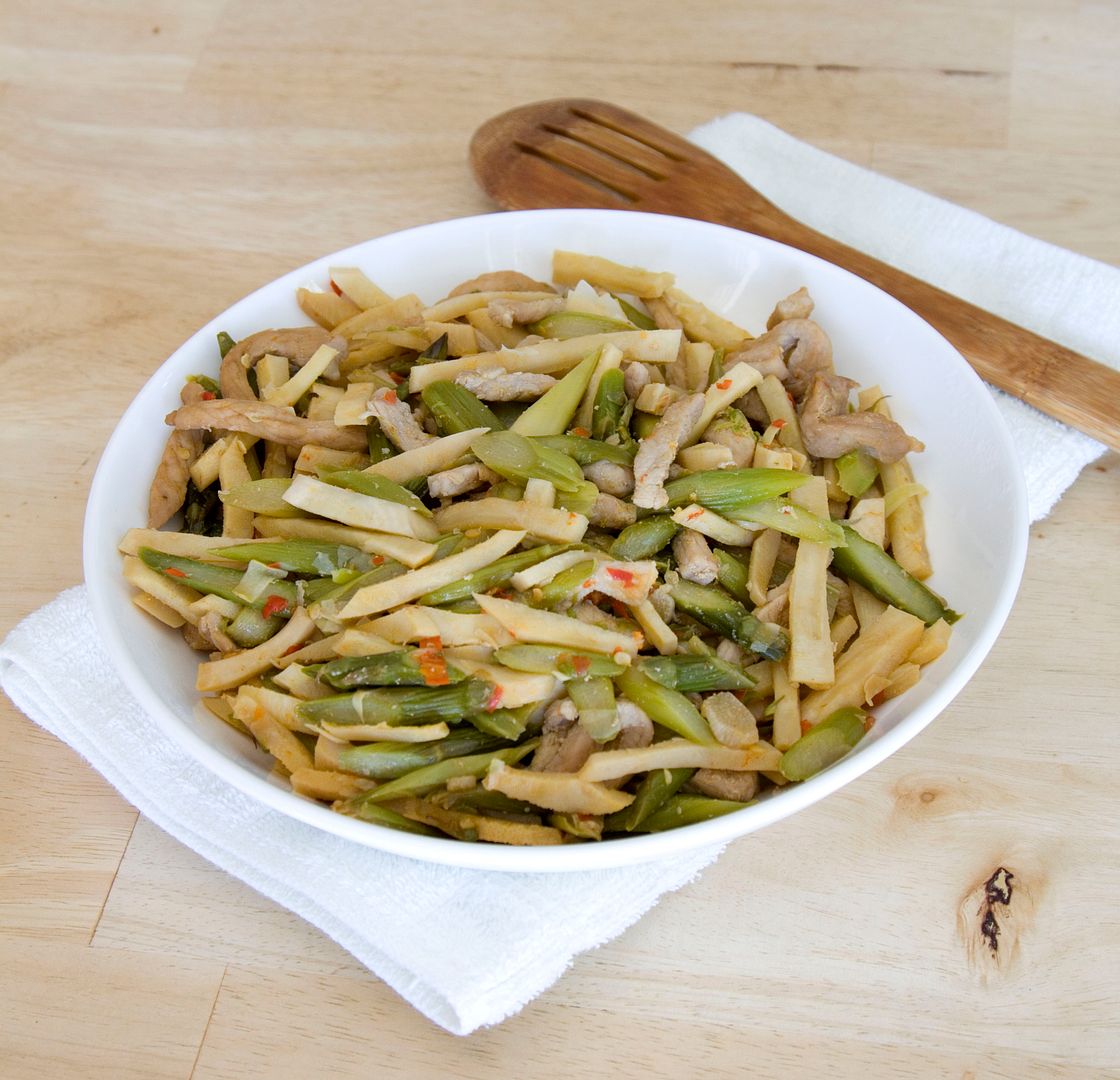
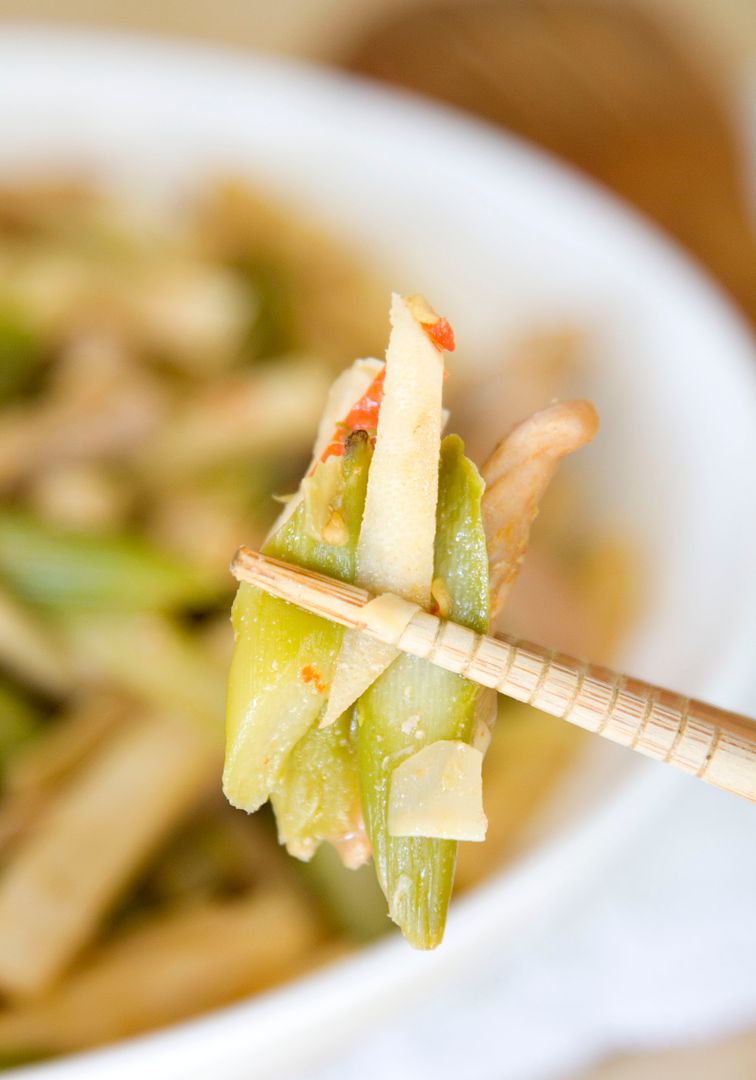
Simple Chinese stir fry using bamboo shoots, asparagus, and pork loin strips -
Ingredients?
- 2 bamboo shoots
- 16 or 1 bundle of medium thickness asparagus
- 0.5 lb of pork loin strips
- 4 garlic cloves
- 4 red chilies
- 3 tablespoons of olive oil
- 2 tablespoons of soy sauce
- 1 tablespoon of Chinese rice cooking wine
- 1/4 teaspoon of salt
- Some water
- Some sesame oil
How?
Marinate the pork loin strips with 1 tablespoon of soy sauce and 1 tablespoon of Chinese cooking wine. Massage the meat for a little bit so the seasonings get to soak into the meat.
Let's prepare other ingredients in the meantime.
Peel and slice the garlic cloves. Discard the chili stems and chop the chilies into small pieces.
Chop off the tough end roots from the asparagus, also see if the stalks need to be peeled slightly to remove any tough layer. Slice the asparagus with an angle/diagonally.
Chop off the tough bottom section from the bamboo shoots and peel away the outer skin. The bamboo shoots usually will be about half of its original size after removing all the hard to chew parts. Slice the bamboo shoots then chop into strips.
Drizzle about 3 tablespoons of olive oil into the pan and turn to medium high heat. Add in the garlic, chilies, and 1/4 teaspoon of salt. Give it a quick stir.
Add in the pork strips along with its marinade. Cook till about half way through then add in the bamboo shoots and asparagus. Turn to high heat and stir fry for one minute.
Drizzle in the soy sauce along the edge of the pan, so the heat will further help releasing the soy aroma. Cook for another minute. Pour in water till about 1/3 of the ingredients are submerged under the liquid. Cover the pan with a lid and cook till no more excess liquid is present, about 12 to 15 minutes depending on the heat.
Drizzle a little bit of sesame oil before serving. You can also sprinkle some white pepper powder if desired.
If you had too much meat over the weekend, these fibrous veggies will definitely come to rescue, if you know what I mean (wink*).
Other similar recipes:
While waiting for the long weekend to come, here's a comforting Chinese beef brisket stew to help you get through the time waiting. But be careful, this stew also comes with a spicy kick to keep you awake before the Independence Day.
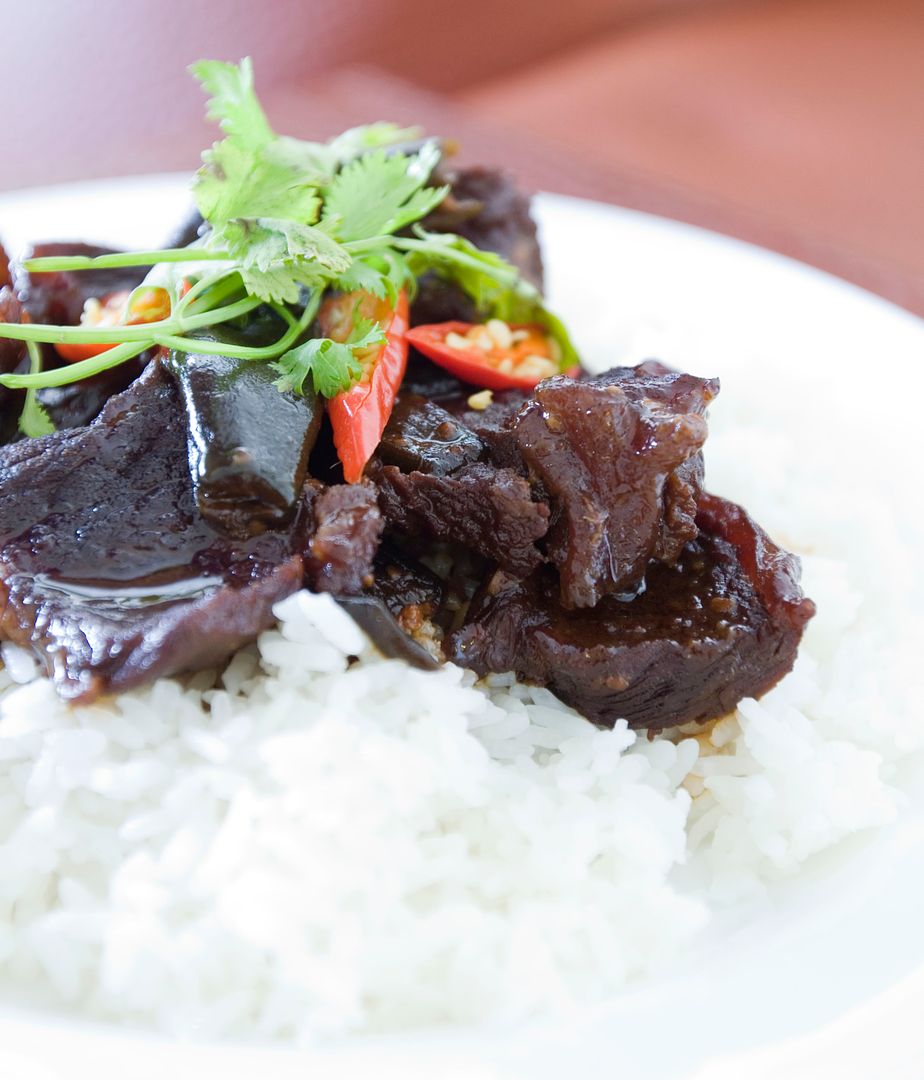
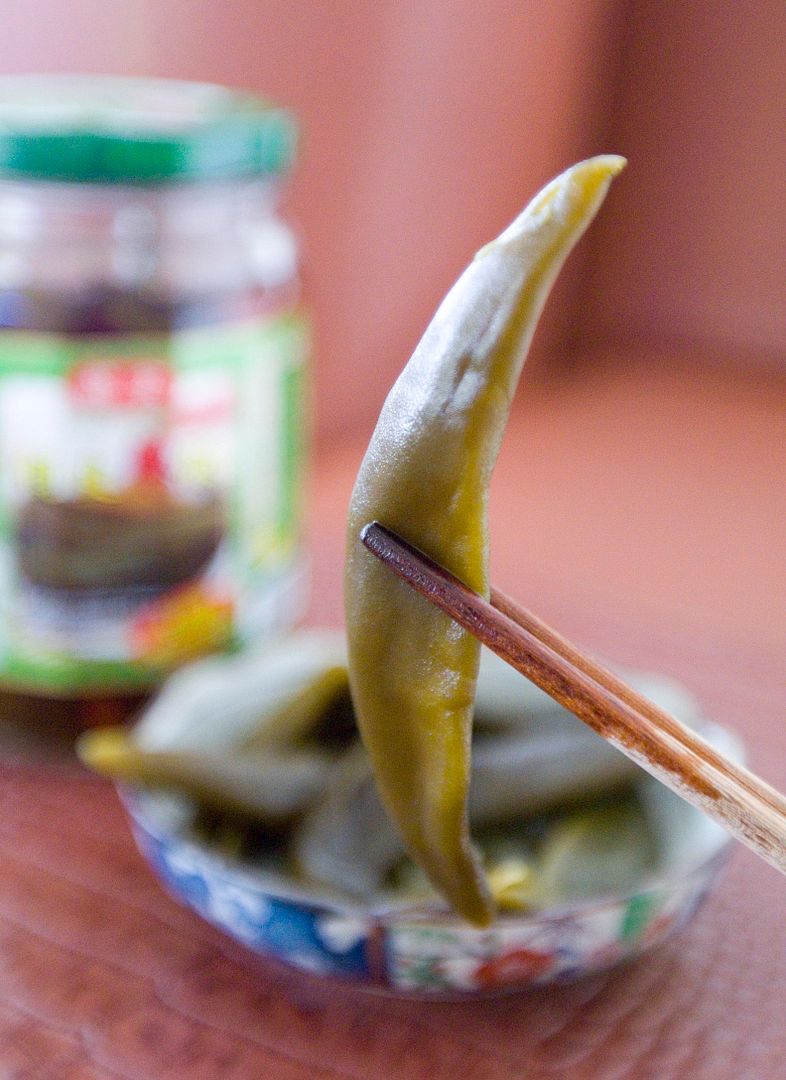
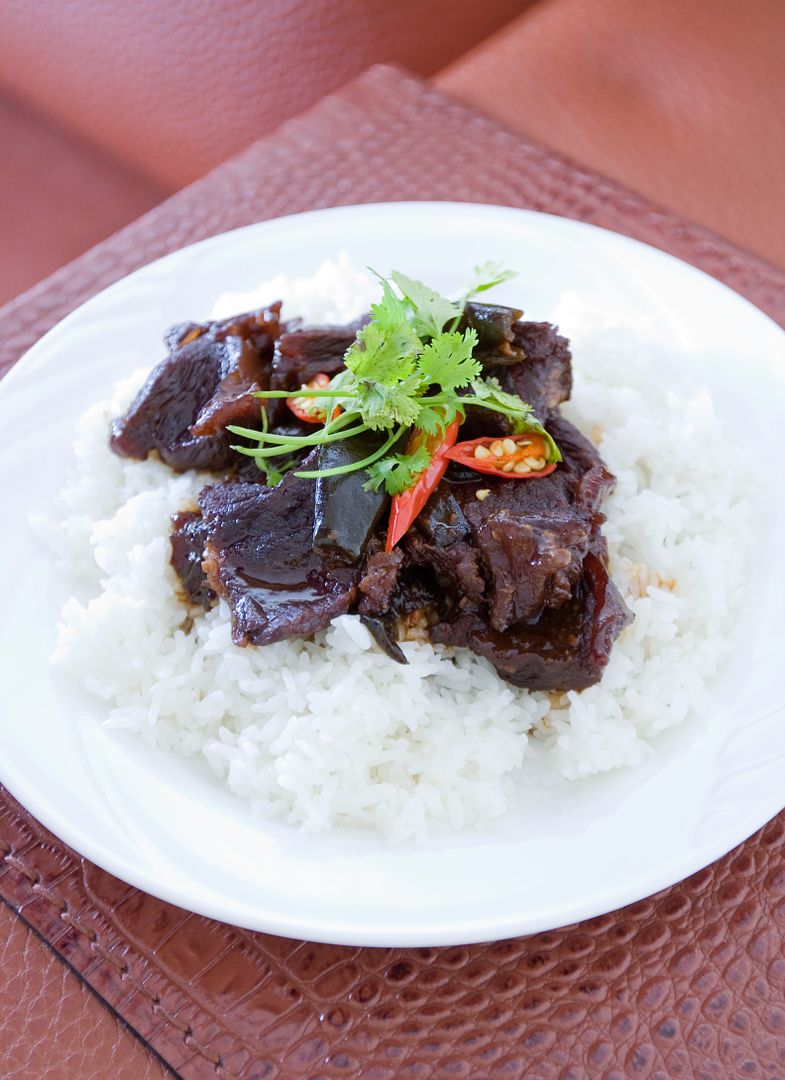
Stewed beef brisket with Chinese marinated peeled chilies 紅燒剝皮椒牛腩 -
Ingredients?
- 1.5 lbs of beef brisket
- 4 garlic cloves
- 1 medium shallot
- 8 Chinese marinated peeled chilies
- 2 tablespoons of the marinade juice from the peeled chilies
- 2 tablespoons of olive oil
- 4 1/2 cups of water
- 1/3 cup of soy sauce
- 1/4 cup of black bean soy sauce (stickier kind)
- Tiny pinch of black pepper
- Some cilantro
- Some fresh red chilies
How?
The Chinese marinated peeled chilies can be found at local Chinese grocery stores. However, you can always substitute with Mexican pickled jalapenos since these two carry similar spiciness with a hint of sourish taste.
Most Chinese people like to use the pickled green chilies to make chicken soup. However, it can also add lots of flavors to stew dishes such as this recipe. The spiciness actually tones down a bit and the flavors gets to permeate into the meat after hours of cooking.
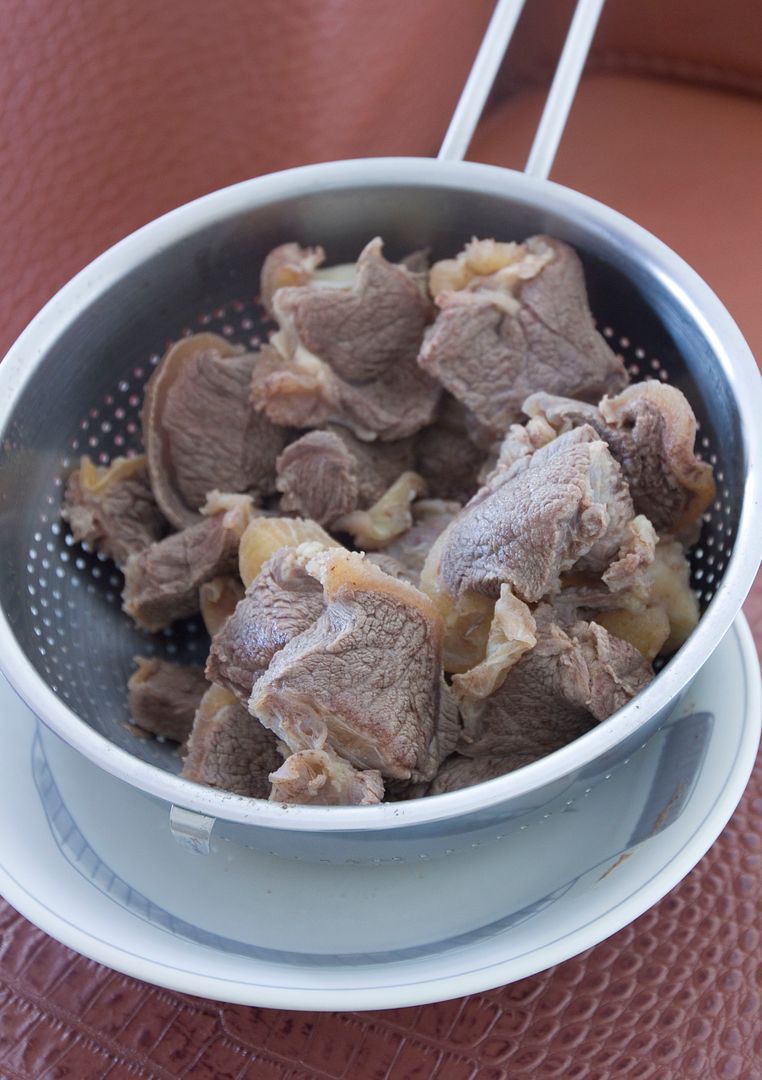
Cut the beef into large bite size pieces. Peel and slice the shallot. Peel the garlic cloves.
Start boiling a pot of water and put the brisket into the pot. Bring to a boil and let it cook for couple minutes to draw out the dirty grayish bits. Drain the liquid and set the beef aside for later use.
Drizzle about 2 tablespoons of olive oil into a big pot, enough to evenly coat the bottom. Turn to medium high heat and add in sliced shallot, whole garlic cloves, and just a tiny pinch of black pepper for extra hint of spice. Sear till the shallot and garlic turned slightly browned.
Transfer the beef into the pot and sear for couple minutes. Pour in the soy sauce along the side so the higher heat from the pot can further bring out the soy bean aroma. Also pour in the black bean soy sauce, marinated chili juice, and water.
Give it a quick mix and bring to a boil. Lower the heat a little and put the lid on, make sure the pot stays slightly boiling throughout the remaining cooking time. The stew is ready when almost all the liquid has been cooked down and the brisket is fork tender.
It took about 3.5 hours for me but the time can varies depending on the quality of the beef. Some tends to stay tough and chewy and might take couple more hours to break down. In that case, add a little more liquid to prevent from burning.
Garnish the stew with some cilantro and red chilies. Make sure to serve this dish with some steamed white or brown rice, otherwise eating the stew alone can be too salty.
The best part is the glutinous section from the beef and the juicy marinated green chilies. The chilies aren't too spicy after hours of cooking. In addition, all the flavors and liquid from the stew have been fully absorbed by the chilies.
This dish got both the comforting and the spicy kick characteristics. Hope it'll help you get through one or two more days before the long weekend arrives!
Other Chinese stew recipes:
Taiwanese Fu Cai and Meatballs Stew 福菜肉丸
Braised Pork Shoulder with Chinese Aged Shao Hsing Rice Wine
Taiwanese Style Stewed Pig's Feet - 滷豬腳
No Fuss Onion and Black Pepper Beef Stew