Happy New Year fellow bloggers and readers!
Are you ready for holiday binge eating?
Roasted chicken, prime ribs, grilled steak,
Maybe some Asian goodies like spicy hot pot and shabu shabu?
(Or you want them ALL!)
Let's all pack up some extra layer of fat to get through this bone chilled winter time!
Anyways,
I just can't believe it's gonna be my last post for 2010 (tears..),
Next time you see a new post coming up,
I will no longer be the same "Cindy,"
Possibly a more mature, all grown-up one?
Nah~ More likely just gonna be a (rounder) me.
So before all that oily, fatty goodies on new years eve, and days after that,
How about we start out with something lighTER?
Seafood risotto with saffron -
Ingredients (for 3)?
0.7 lb/18~20 shrimps (peeled and deveined)
0.3 lb/10 mussels
0.1 lb/handful squid
2 cups of Arborio rice
Some chicken stock (seafood stock is even better, but I couldn't get a hold of it)
4 cloves of garlic
4 tablespoons of shallots
1/2 teaspoon of red pepper flakes
1 tablespoon of unsalted butter
1/4 cup of dry white wine (plus few more tablespoons)
0.2 gram/tiny pinch saffron
Some Italian parsley
Some olive oil
Some sea salt
Some freshly ground black pepper
How?
Clean all the seafood and set aside -
Drizzle some olive oil in the pan and turn to high heat,
Add in finely chopped shallots, some salt, and pepper,
Cook for about one minute then add in finely chopped garlic and red pepper flakes.
Before garlic gets burned, toss in all the seafood and give it a quick stir,
Now pour in 1/4 cup white wine, wait till the seafood is about 80% cooked through,
Transfer the seafood to another plate.
In the same pan, add one tablespoon of butter,
Stir in 2 cups of Arborio rice and cook for couple minutes so every grain gets coated with that lovely juice -
Now back to regular risotto cooking steps,
Add a little bit of stock at a time, give it a quick stir,
When the soup is nearly being fully absorbed by the rice,
Pour in more stock and repeat the steps.
Don't forget to add our lovely but $$$ saffron threads during the process -
I also substituted a small portion of chicken stock with few more tablespoons of white wine,
What can I say, white wine, especially the fruity kind, just tastes so good with seafood!
It'll take about 20~25 minutes till the rice is ready,
Some salts might be needed to add more flavor when cooking this risotto,
I cooked mine "al dente," but left it a wee bit on the harder side,
Why?
Because the seafood is gonna get tossed back to the rice and cook for at least 3 more minutes,
(Or till fully cooked through)
It'll prevent my rice gets overcooked or turned smooshy.
Just sprinkle some chopped parsley all over when ready to serve,
Very light but fragrance dish -
That's all for today, well, 2010,
Hopefully I'll start off my new year with slow roasted pork belly and boba milk tea!
*Or maybe just a nice large bowl of soup noodles will do.
PB&J?
You mean...peanut butter and jelly? Yes that's right!
My first PB&J was way back then, when I started to live in the states,
Believe it or not,
There's no such thing in Asia (well, at least not as common and most of the time, it can be a rare find).
Who would have thought mixing peanut butter together will fruit jam can create such a balanced and addictive flavor profile,
So I, once a little Asian girl, fell in love with it right after that very first bite.
And here's my take on PB&J,
The basic taste remains, but in a cuter/rounder form.
Ingredients?
Minimum of 2 slices milk toasts/white toasts/or whole wheat toasts
Creamy peanut butter
Strawberry and guava jam (or any other kind of preferred jam)
Chocolate sauce
How?
Just like how you make peanut butter and jelly,
Let's spread the peanut butter on one toast, jam on the other,
Stick them together with the peanut butter and jam sides in the inner part.
With a medium round-shaped cookie cutter,
Or you can substitute with any circular shaped objects,
Guess what did I use?
Wine glass!
So press the cutter down,
You might want to twist it around in order to cut through the toasts.
Now you have a perfectly round shaped, semi-finished PB&J,
Go ahead and seal the edges by pressing the toasts down with your fingers.
Once done, heat up a skillet and toast both sides of the bread for a wee bit,
Before serving, simply transfer the tiny PB&J to the plate,
Drizzle some chocolate sauce over to make it even better!
Please enjoy.
Cindy's Rating: 7
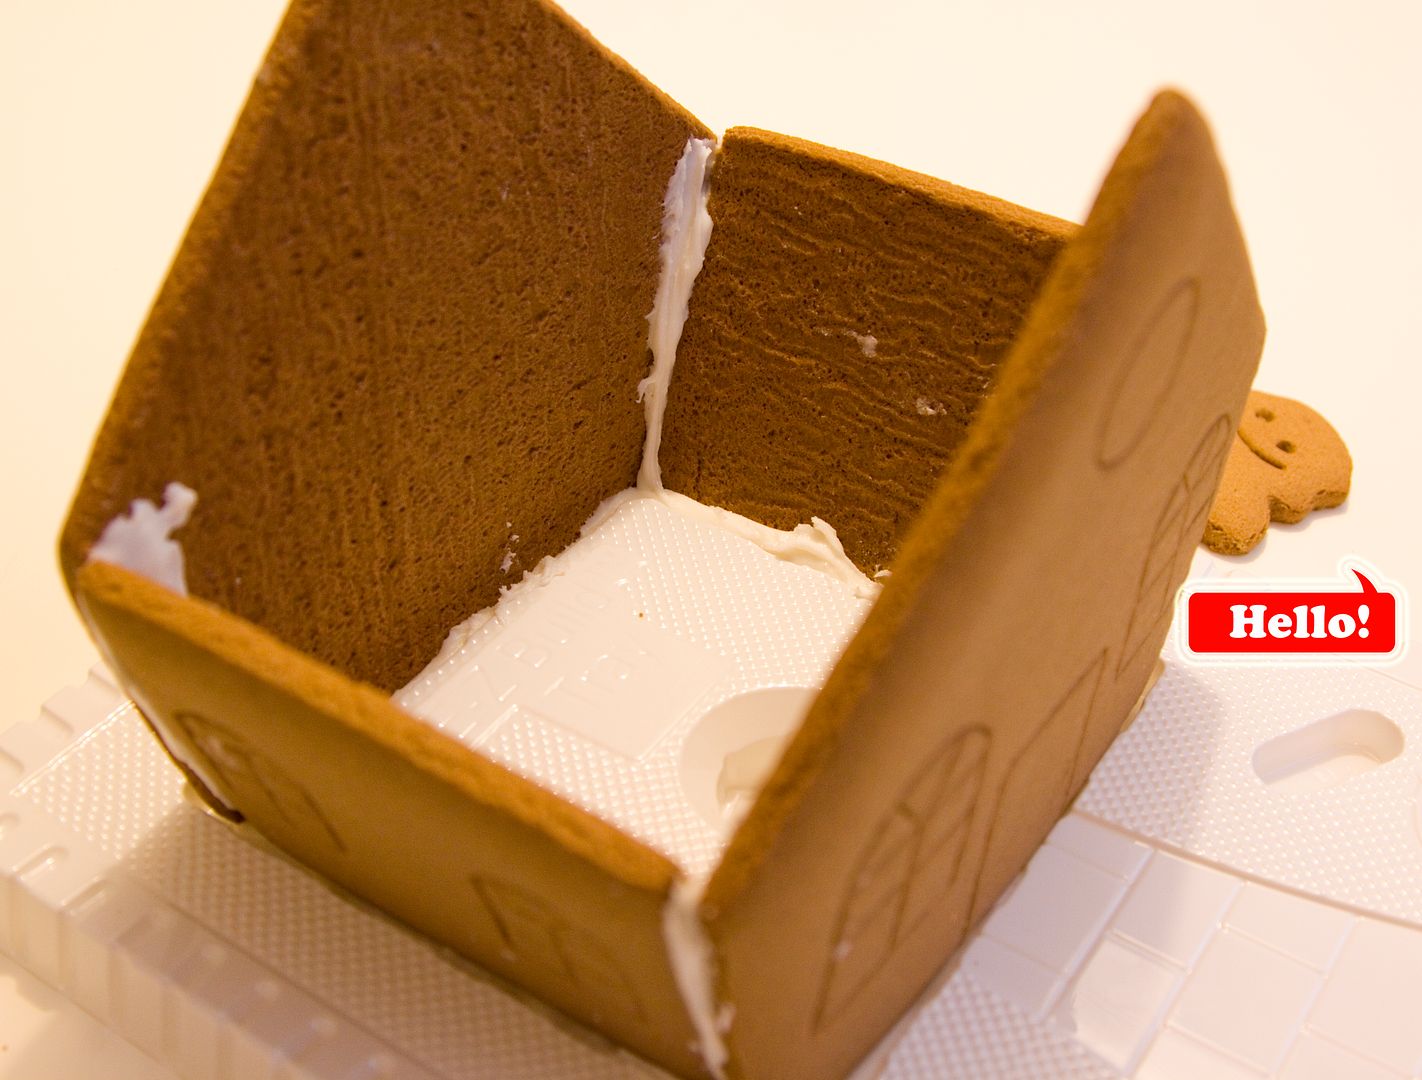
Setting: Gloomy day in the living room, pardon my yellowish pictures.
*(been rainy for weeks in SoCal, glad it finally stopped right before Christmas)
Intent: Having a beautiful gingerbread house for my Christmas display.
So what happened?
Let the pictures lead you through my gingerbread house experience 2010.
Got this gingerbread house kit on the day before Christmas Eve -
It comes with some premade house-shaped gingerbread cookies -
So far so good, even though my hands were covered in sticky icing -
Ground work completed -
Wait for 15 minutes...then it's time to decorate the house! -
After battling with gooey icing and uncooperative fingers -
Snowman close-up -
Immediately after taking the picture...
Cindy's gingerbread house 2010 - lasted for 5 minutes,
I blame it to the weather.
My kitchen resembles a 3/4 empty shell at the moment.
Since the majority of my stuff was packed yesterday, ready to ship oversea back to Taiwan,
I have nearly nothing left to cook with.
No knives, no pots, no blender, no fancy plates,
Just a few small bowls and utensils scattering here and there,
Oh, and an ancient old Teflon pan in the corner.
That also means I've been dining out for the past few days,
My tongue and tummy are crying out for some homemade food (partially I think they're just spoiled!),
MSG-loaded food no more, today, I shall have my simple homemade lunch in da house!
Plus this super easy appetizer below!
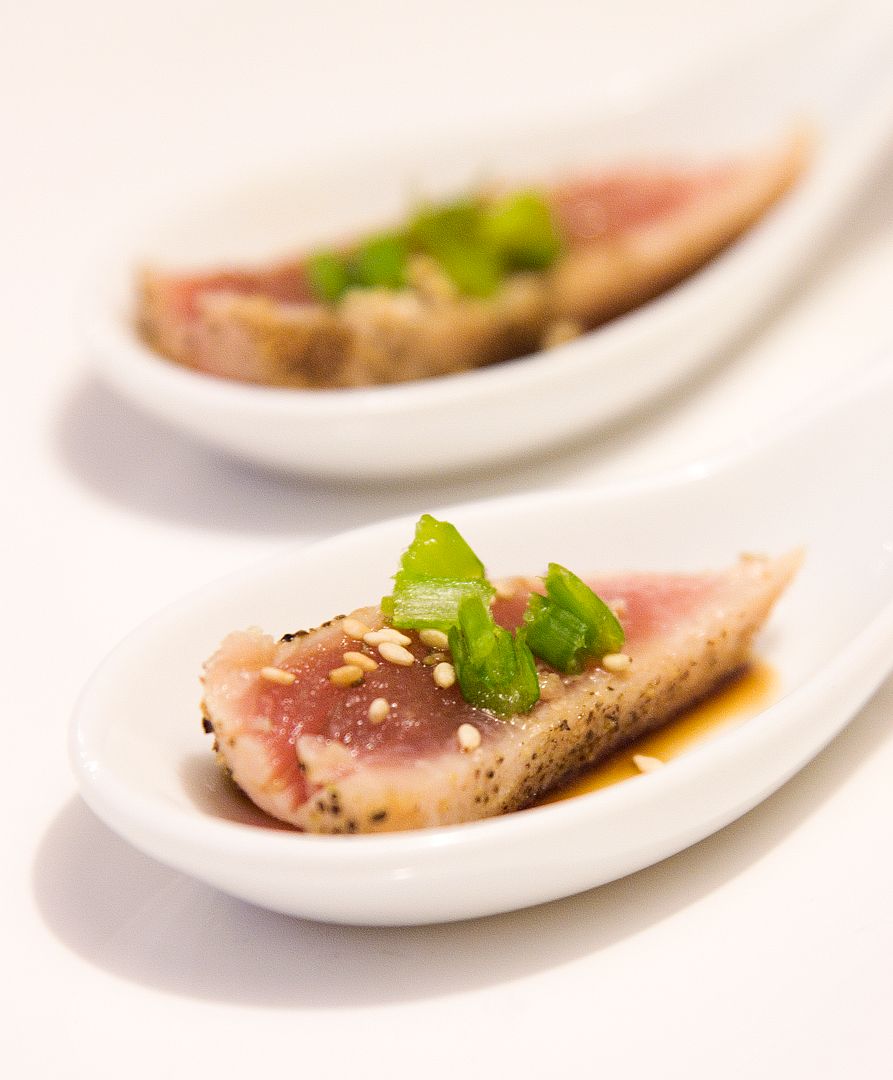
Seared tuna served with ponzu sauce and chopped scallion
Lunch: Noodles with soup base, plus tons of spinach (not included in recipe)
Ingredients?
Some sushi grade tuna
Some ponzu sauce
Some toasted sesame seeds
Some "finely" chopped scallion
Some sriracha sauce if preferred
Some olive oil
Some sea salts
Some black pepper
(Use freshly ground black pepper if possible, sadly mine's been packed away)
How?
Season both sides of the tuna with salt and pepper.
Drizzle some oil in the pan, turn to high heat,
Once the oil gets hotter, transfer the fish and sear both sides for about 30 seconds each,
You can definitely sear it till lightly browned.
Remove the fish from heat to a cutting board, let it cool down a wee bit,
Cut into about 1 center meter thick slices,
Serve with some ponzu sauce, finely chopped scallion, a small drop of chili sauce if desired.
So how did I manage to cut the tuna and scallion without a knife?
Well well well, a very dull steak knife can still do the trick,
*if you don't mind suffering from finger cramping afterwards.
-Side note-
Marinate the fish beforehand should make this dish tastier,
Maybe some soy sauce, mirin, grated ginger, and scallion will do.
I would like to fry up some thinly sliced garlic or lotus roots to go with the tuna,
But without a very sharp knife or slicer,
I'd better skip this part just so I can still see all of my ten fingers together.
Cindy's Rating: 6
(Consider this good enough with my limited tools and seasoning)
Japanese curry cube is one of the "must have" ingredients in my pantry,
Let me tell you, after so many trial and errors,
I finally found my all time favorite curry cube:
Golden curry sauce mix "extra hot" by S&B.
Japanese curry - checked.
So that's one less thing I need to worry about,
Now it's the perfect timing for me to venture out and start the whole trial and error thing again,
But this time, with green curry.
As I strolled down the aisles of my local Asian grocery store,
A wee bit overwhelmed by piles of green curry mixes...
But there is was, my little green box with colorful markings stating:
No added MSG,
No preservatives,
No artificial flavoring.
That's it, you're coming home with me!
The recipe on the package requires additional ingredients,
So I also picked up some chicken, bamboo shoots, and coconut milk on the way out,
It's gonna be one creamy and spicy lunch!
Semi-instant green curry meal -
Ingredients?
Some green curry paste
Some chicken (cubed)
Some bamboo shoots (and/or other vegetables of your liking)
Some coconut milk
Some hot water
Some olive oil
Some rice
How?
First of all, pardon me for my fairly vague ingredient measurements,
I only glanced through the recipe printed on the curry box, but didn't apply the exact amount for my lunch,
It's more of a "go with the flow/palate" cooking style.
So here's what I "vaguely" did,
Heat up some olive oil in the pan, add a couple spoonful of the green curry paste,
Cook till that spicy, pungent aroma comes out, then add the chicken.
Give it a quick stir, cook till the chicken is about 50% done,
Add the vegetables, some more curry paste, and some coconut milk,
Combine well, taste the mixture once the vegetables are cooked through,
Adjust the amount of curry paste, coconut milk, and hot water based on your preference.
Be careful though, green curry can be very spicy if not diluted enough (which I love),
When you feel the taste and consistency is right, serve with steaming hot rice.
This is my very first instant green curry paste meal,
As a result, I can't really tell if the one I used is a good brand or not,
Allow me to do some more experiments and report back to you guys!
Side note:
My green curry lunch was so spicy, but yet so satisfying,
Plus the whole thing was done in 20 minutes, bravo.
Cindy's Rating: 7
After devouring two slices of foie gras with rib eye steaks,
My freezer is now left with four more liver pieces,
I have to finish everything before shipping all the kitchenware back to Taiwan,
That means...seven days for four more foie gras meals!
Is it possible to eat such fatty and oily stuff nearly everyday for one whole week?
Well, with the help of my strawberry guava jam, I believe foie gras should be gone in no time!
Ingredients?
1 piece of foie gras
1 tablespoon of fresh Asian pear (finely diced)
Some strawberry guava jam (black currant jam should do the trick too)
Some toasted sourdough slices (or simple baguette)
Toast the bread slices on both sides,
*I actually brush some extra virgin olive oil on the grill pan beforehand.
Preheat the oven to 365 degrees Fahrenheit.
Sear the foie gras till both sides turn slightly brown,
Transfer to the oven till desired doneness.
This time I cook the foie gras straight from the freezer,
So I left it in the oven for about 5 minutes or so to make sure that the center is well cooked-through.
To assemble,
Transfer the bread slices onto a plate,
Spoon some jam and place the foie gras directly on it,
Serve with finely diced Asian pear.
Foie gras matches well with ingredients that carry some sort of acidity,
It balances out the oiliness from the duck fat,
I actually had this dish for breakfast,
Come on, bread and jam, of course it's good for breakfast ( > _.< )"
Believe it or not,
This will be on my table again tomorrow morning.
So good.
Cindy's Rating: 8
Ding Dong! Here it comes, one gigantic box FedExed overnight to my doorstep -
Let's see what's inside?
2 bags of frozen foie gras!
Yes, this is my little splurge during holiday season,
But no way can a "little" girl like me finish 30 slices of fatty liver all by myself,
It was actually shared among 5 friends,
I guess after we managed to finish everything...
Our blood vessels will start feeling like clogging when seeing foie gras on the restaurant menu in the future..
So what's for lunch?
Seared foie gras and rib eye steak. Served with thyme infused balsamic glaze -
Ingredients (for 2)?
2 slices of foie gras
2 rib eye steaks
Some sea salts
Some freshly ground black pepper
Some olive oil
Thyme infused balsamic glaze:
2 sprigs of fresh thyme
3 tablespoons of balsamic glaze
1 tablespoon of hot water
1/2 teaspoon of honey
Additional thyme sprigs for garnish
How?
Preheat the oven to 400 degrees Fahrenheit.
Add the ingredients for the balsamic glaze to a small pot,
Turn to medium low heat and just let it simmer for about 3 minutes.
For the steaks,
Season both sides with sea salt and pepper.
Brush some olive oil on the grill pan, turn to high heat,
Wait till the pan turns very hot,
Transfer the steaks over and sear both sides for about 2 minutes each,
Move the grill pan and the steaks to the oven for about 5 minutes,
Once that's done, remove from heat and let it rest for at least 5 minutes.
For the foie gras,
Similar to steaks, season both sides with salt and pepper,
Use another pan, this time we don't need to drizzle any oil,
Simply sear both sides of the foie gras till lightly browned,
It should take less than 1 minute to sear both sides.
(And you'll see fats gradually melting away from the liver, mmm yummm)
Depending on the thickness and doneness you would like the foie gras to be,
You can choose to transfer them to the oven for addition 1 or 2 minutes,
Or eat them the way it is, as long as the center is not frozen anymore.
Plate the steak first, top with foie gras,
Drizzle some thyme infused balsamic glaze on the side,
A tiny final touch, garnish the food with fresh thyme sprigs.
Eating like a queen here..
Maybe I'll have salad the whole day tomorrow...
Cindy's rating: 8
Announcement:
I'm officially a proud owner of food processor!
It was one of the awesome deals I got during Black Friday,
$69.99 for a 7-cup white processor,
As I search through the internet now - just to make sure my $$ was saved,
The cheapest offer comes in $99.95, hooray Black Friday!
Eager to see how good this baby works,
The very next day, I made pesto again,
This time not with a blender, but with this new addition in the kitchen,
Ecstatically, no more excessive shaking of my blender.
Ingredients (for 2 large portion)?
Pesto:
1 small package/18 g/66 oz of basil
3 garlic cloves
1/2 cup of Parmesan
1/2 cup of toasted pine nuts
2/3+ cup of olive oil
Some sea salts
Some freshly ground black pepper
Pork chops:
2 thick-cup pork chops
Some sea salts
Some freshly ground black pepper
Some smoked paprika
Some olive oil
Pasta:
Enough pasta of your choice for two people
1 medium/small carrot
1/3 onion
1 tablespoon of unsalted butter
1 teaspoon of red pepper flakes
Some sea salts
Some freshly ground black pepper
Some olive oil
(Pot of hot water plus some regular salts)
Poached Eggs:
2 Eggs
Some rice vinegar
(and a pot of hot water)
How?
Let's make the pesto first (I just can't wait to try out my food processor!),
Simply, yes, nice and easy,
Roughly chop the basil, cube or grate the Parmesan,
Peel and roughly chop the garlic cloves, toast the pine nuts,
Toss all these ingredients into the food processor.
Give it a few pulses,
Add some salts and pepper,
Now slowly pour in olive oil while mixing at the same time,
I used at least 2/3 cup of olive oil,
You'll have to be the judge for the exact amount,
Just keep pouring if the mixture appears too dry.
For the pork chops,
Season both sides with some salts, pepper, smoked paprika, and brush with oil -
In the meantime,
Preheat the oven to 375 degrees Fahrenheit,
Boil a big pot of water for the pasta,
Once boiled, add a spoonful of salts and cook the pasta according to package instruction,
Later on, drain well and set aside.
Brush additional olive on a grill pan, turn to high heat,
When the grill gets sizzling hot,
Sear both sides of the pork chops for about 3 minutes each,
Once that's done, transfer the whole thing into the oven for 10 minutes,
So that the center part can be cooked through.
After 10 minutes, remove from oven and let the meat rest for at least 5 minutes.
For the pasta,
Finely chopped the onion and carrot first.
Have a pan or skillet ready, drizzle some olive oil, turn to medium high heat,
Toss in chopped onion and sprinkle some salts and red pepper flakes,
Cook till the onion turns translucent, then add the carrot,
Sprinkle more salts and wait till the carrot softens.
Add the drained pasta into the pan, give it a quick stir,
Turn the heat off and mix in 1 tablespoon of butter,
The pasta can be on the light side, which is totally fine,
Why? Remember the pesto sauce we made earlier?
Just pour that all over the pasta and it'll be very delicious!
As for the poached egg yolk,
Ok...I admit, it was meant to be poached egg, I mean the whole thing,
Somehow it got messed up, the egg white was like all over the place,
At least I still ended up with wonderful poached egg yolks?
Not sure if I'm the best instruction giver on how to poach eggs,
But here's how I, or how you suppose to cook it:
Add some vinegar into a pot of water, bring to a boil then turn to medium low heat,
Crack the egg into a container first,
Now swirl the water and make a whirlpool in the middle,
Slowly drop the egg to the center, let it slowly cook the egg for few minutes,
Afterwards, remove the egg from water, preferably with a slotted spoon.
Time for plating,
Lay some pasta first, then top with thick and juicy pork chop,
Spoon some fresh pesto sauce over the meat,
Here's the important part,
Drop your perfectly poached egg (cough* cough* I mean egg yolk) on the pork chop,
Break it while the yolk is still warm,
Seeing the yolk gradually running down the meat onto the pasta,
What a wonderful scene.
This dish is definitely not hard to make,
I guess the only difficult step is poaching the eggs...hmm....
Plus many dishes piling up in the sink...don't we all hate the aftermath in the kitchen?
Cindy's Rating: 8