Showing posts with label Cindy's Homemade Food-Tamagoyaki. Show all posts

Jul 30, 2025

Dashimaki Tamago だし巻き卵

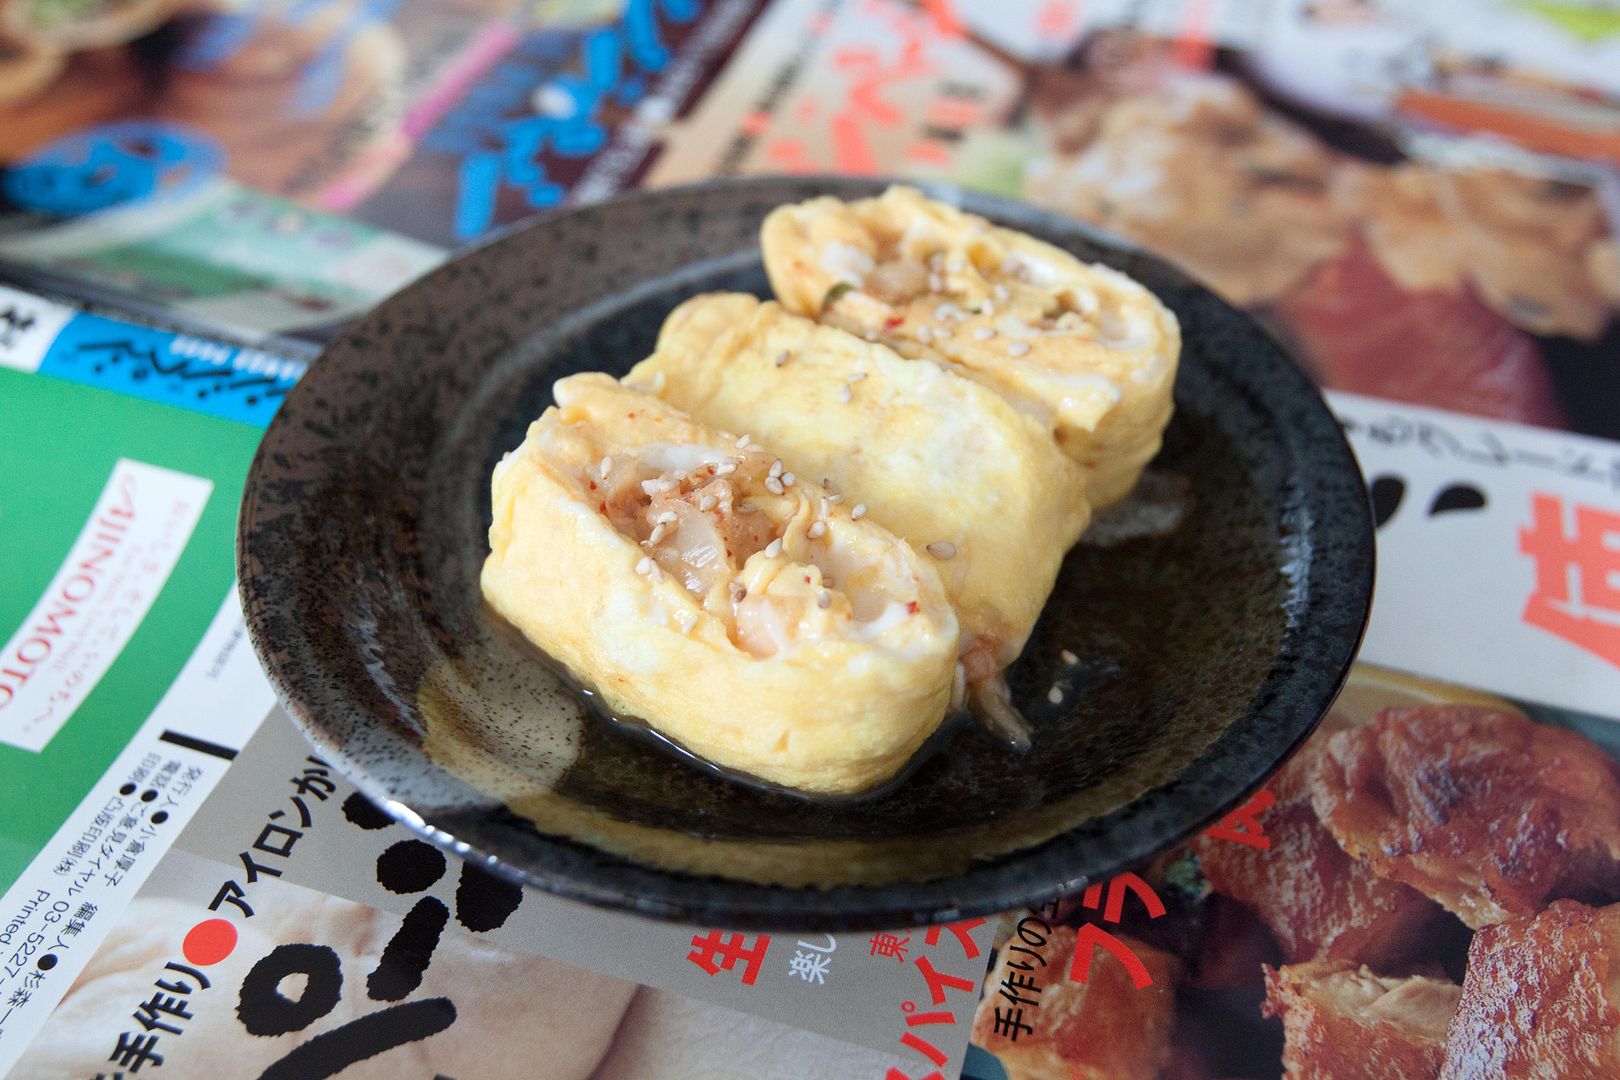
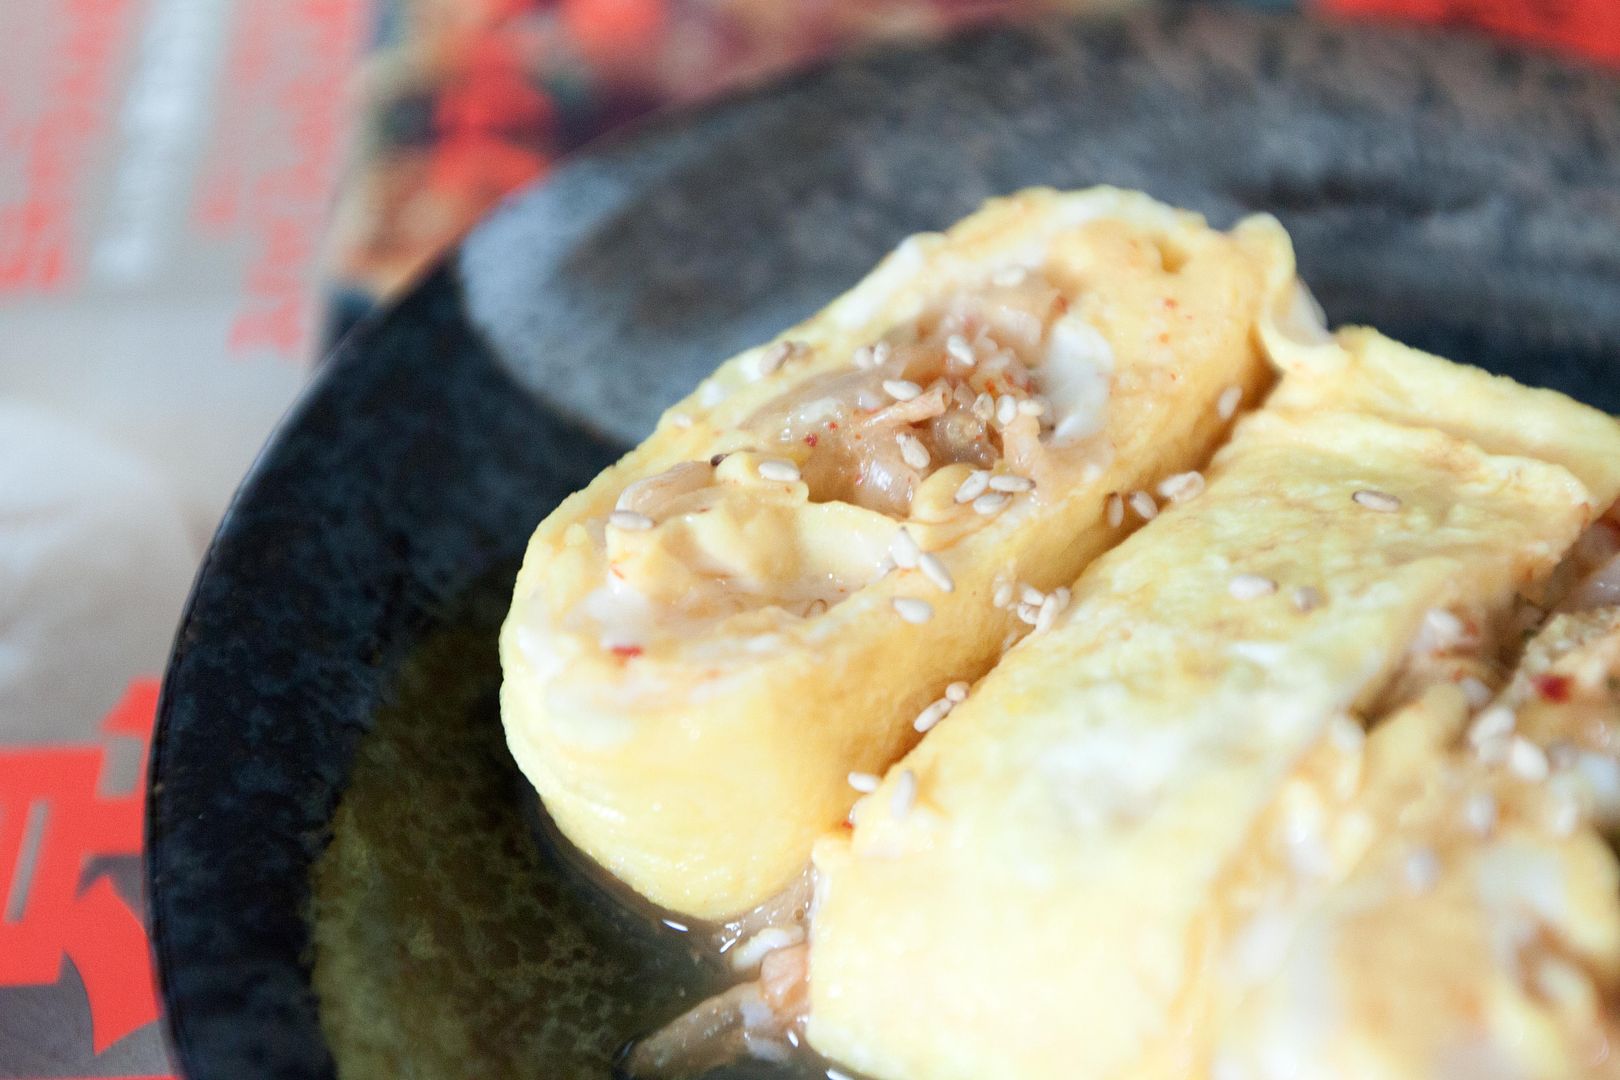
So what's the difference between a tamagoyaki and a dashimaki tamago? Well, they are basically the same thing, just that the dashimaki tamago has more Japanese stock mixed in, so the texture is more pillowy or juicy so to speak.


I also think that Dashimaki tamago has a more mouthful name. Sometimes I would just explain this dish to others as dashi tamagoyaki, easier to be understood by westerners. 


Dashimaki tamago だし巻き卵 - 


Dashimaki tamago だし巻き卵


Ingredients (about 3 to 4 pieces)?

  • 4 eggs
  • 1 teaspoon Japanese tsuyu
  • 1 teaspoon mirin
  • 1 teaspoon granulated sugar
  • Some olive oil

Dashi/Japanese stock:

  • 800ml drinkable water
  • 1 medium piece kombu
  • 10 grams katsuobushi (bonito flakes)


How?

Start with homemade Japanese stock/dashi. Use a medium pot and add in one medium piece of kombu. Use a scissor to cut into smaller pieces if the size doesn't fit. Pour in 800ml of drinkable water and turn on the heat.


Keep it just under boiling temperature. Once hot enough, turn-off the heat and let the kombu soak in there for an hour.


Soaking kombu in warm water for Japanese dashi

Later on bring the pot close to boiling temperature again. Once achieved, heat-off and add in 10 grams of bonita flakes. Soak for couple minutes.


Soaking kombu and katsuobushi for Japanese dashi

Drain out the ingredients and keep the stock, that'll be our basic Japanese stock/dashi. Wait till cool enough before using it dashimaki tamago, at least cool enough so that it won't cook the egg when beating together.


For the egg mixture, crack 4 eggs to a bowl, I used a measuring cup instead. Also add in 4 tablespoons of dashi, 1 teaspoon of Japanese tsuyu, 1 teaspoon of mirin, and 1 teaspoon of granulated sugar. Beat till the sugar has been fully dissolved.


Beaten eggs with ingredients for dashimaki tamago

Use a tamagoyaki pan, also have a piece of paper towel folded into a square on the side. Drizzle just a little bit of olive oil to the pan and use that paper towel to evenly smear the oil throughout the area.


Switch to medium or medium low heat and wait till the pan warms up a little. Scoop some egg mixture to the pan and sear till the bottom almost set. Start rolling the egg from the outside then inward, to create almost a tube in the end. 


Push that tube outward then use the paper towel again to smear some more oil to the empty area. Scoop some egg mixture to the empty area. Meanwhile lift up the egg tube a bit, so that the newly added egg mixture can flow underneath. It'll help binding the earlier egg tube with the new layer.


Making dashimaki tamago with tamagoyaki pan

So again, wait till the bottom seems set then roll in the tube to form an even bigger tube. By now the shape should resemble a rectangular block more than a tube. Repeat the step one more time if you prefer a bigger sized dashimaki tamago in the end. Once all set, carefully move the dashimaki tamago to serving plate.


Dashimaki tamago だし巻き卵

I'm using single serving tamagoyaki pan here, so the final portion is perfect for one serving. If you're using bigger tamagoyaki pan, most of the time you can slice the final egg block and turn into few individual servings.


Dashimaki tamago だし巻き卵

You'll definitely have way more dashi left after making dashimaki tamago. You can use that as a stock for other dishes. What I did this time is that I used the leftover dashi to cook the rice, substituting the usual plain water. It'll give you a lightly flavored rice as a result, gentle yet won't overpower any other dishes served with the grains.


Other tamagoyaki recipes:


Jul 23, 2024

Stronger Tasting Nori Tamagoyaki With a Brush of Sesame Oil

Have you ever tried nori sheet? Also known as roasted seaweed? It's a popular ingredient in Japan, let it be used in cooking or just a simple snack. You can also find all sorts of varieties such as a big square sheet, smaller rectangular pack, threaded, powdered form, and more.


For this tamagoyaki recipe, I think the rectangular shape snack pack should be the easiest to work with. Otherwise take the big nori sheet and cut to desired size yourself, wouldn't take long and you can enjoy the trimmings while making the tamagoyaki.


Stronger tasting nori tamagoyaki with a brush of sesame oil -


Nori tamagoyaki with a brush of sesame oil


Ingredients (for one serving)?

  • 3 eggs
  • Some dried nori sheet
  • 1 tablespoon Japanese tsuyu (I used quadruple-condensed version)
  • 1 teaspoon chicken stock
  • 1/8 teaspoon salt
  • Some sesame oil


How?

Take a bowl and break in three eggs. Also add 1 tablespoon of tsuyu, 1/8 teaspoon of salt, and 1 teaspoon of chicken stock. Beat till evenly blended.


Trim the nori sheet if needed. It has to fit inside the tamagoyaki pan you're using. Remember to cut it slightly smaller than the inner edge of the pan.


Sizing and trimming the nori sheet for tamagoyaki

Prepare a small bowl and drizzle some sesame oil inside. Fold a paper towel to smaller squarish piece. Also have a set of chopsticks or tongs ready by its side. 


Convenient tools when making tamagoyaki


We are going to use the paper towel as oil absorbent and use the chopsticks or tongs to handle it, then brush the oil to the pan during the cooking process.


To begin, soak the paper towel with some sesame oil and evenly wipe the surface of the tamagoyaki pan. Switch to medium heat and pour in some egg mixture, the amount used should be enough to form 1mm thickness layer of seared egg.


Once the bottom is about semi-firmed but the top still somewhat soft and semi-cooked looking, lay down the nori sheet.


Adding nori sheet to first layer of tamagoyaki

Then from outer side towards yourself, start rolling the egg in. That means you'll have a rolled egg close to you and showing most of empty pan on the other side.


Brush more oil to the empty area. 


Reapplying sesame oil to tamagoyaki pan

Pour a bit more egg mixture over. Gently lift first rolled egg so the newly added egg mixture can flow underneath. Once cooked and firmed up, these two batches will then stick together.


So again, when the second batch start showing semi-firm bottom and slightly soft top, add more nori sheet and this time roll the egg roll from yourself outward.


Repeat one more time. In the end, make sure the final rolled up egg seemed slightly browned on the top and bottom. Then carefully move to a clean cutting board.


Use a sharp knife and slice the tamagoyaki to serving size pieces.


Nori tamagoyaki with a brush of sesame oil

It's uncommon to make the tamagoyaki with sesame oil, but why? The result was so delicious, and the aroma paired so well with nori sheet. In fact, sometimes you'll even find nori sheet snack sold in sesame oil flavor, especially in Korea, so the combo totally makes sense.


My recipe only calls for small portion of tamagoyaki. But do keep in mind that three eggs gives you about such amount showed in my pictures. So I guess it's safe to say that one egg will yield about one big bite. 


Extended reading:


Sep 5, 2021

Kanikama and Shiso Tamagoyaki 蟹肉棒紫蘇玉子燒

Once you get a hang of making tamagoyaki, it's actually not that hard and can be done fairly quickly. The best part is that it makes a great side dish for lunch box/bento. With some creativity, the flavor and ingredient combo can go on and on. 


However, there is only one thing that I need to be frank with you, it's an easy recipe especially if you've already mastered the skill of making tamagoyaki. But the preparation for this flavor combo particularly can be quite strenuous. Kanikama, the crab stick so to speak. The crab sticks need to be breaking down into individual threads, and repeat that for a total of 7 to 8 sticks.


Kanikama and shiso tamagoyaki 蟹肉棒紫蘇玉子燒 - 


Kanikama and shiso tamagoyaki


Ingredients (about 6 to 7 individual rolls)?

  • 6 eggs
  • 10 shiso leaves
  • 7 to 8 kanikama
  • 1 teaspoon tripled condensed Japanese tsuyu
  • 1 teaspoon mirin
  • Small pinch salt
  • Small pinch sugar
  • Some olive oil or other preferred cooking oil


How?

Kanikama, or known as crab sticks, despite the name suggests, its main ingredients usually contains mostly fish instead of crab meat. If you get to choose, try using the ones without artificial coloring, but don't need to go super high-end for the actual crab meat either. 


Tamagoyaki ingredients including kanikama and shiso leaves

Let's get the hardest part over with first. Defrost the kanikama prior. Remove the wrapping if any, then break into individual threads. Repeat for 7 to 8 kanikama.


Julienne the shiso leaves. Perhaps give it a few extra chops to get smaller pieces.


Break the eggs and beat together with 1 teaspoon of Japanese tsuyu, 1 teaspoon of mirin, small pinch of salt, and small pinch of sugar. Once blended, add in kanikama threads and chopped shiso. Mix gently. 


Beaten egg with kanikama and shiso leaves

Before the actual cooking process, prepare a small bowl with some oil inside. Also prepare a set of chopsticks along with a small folded kitchen towel. We need to use the chopsticks to grab the oil-absorbed kitchen towel to brush the tamagoyaki pan once a while, so have it ready by your side can be a great helper.


Take the tamagoyaki pan and brush the surface with some oil. Use medium heat. Scoop in some egg mixture and wait till the very bottom starts to set. Starting from the side farthest away, carefully folding the egg towards yourself, it'll eventually shape like an almost rectangular tube.


Brush the empty space with some more oil. 


Making tamagoyaki


Pour more egg mixture over the empty space. While cooking this second layer, remember to lift up the bottom of the tube we've got already. So that the new egg mixture can flow under, in the end it'll be like a seamless connecting point for the first roll of egg mixture and the newly added egg mixture.


Making kanikama and shiso tamagoyaki

When the second layer is about to set, this time, folding the tube outward, like rolling it outward to get an even bigger rectangular tube. Repeat the process again, 3 layers should be good enough, especially we even added some solid ingredients within. You can use a spatula to help setting up the shape in the end.


Transfer tamagoyaki to cutting board, slice into individual serving pieces. However, before the knife goes down, check on the folding pattern and make sure you slice it correctly, so that the rolling pattern can present in full circle, instead of cutting it halfway through.


Kanikama and shiso tamagoyaki

Adding solid ingredients to the egg mixture can be slightly trickier while making tamagoyaki. It takes practice, but should get a hang of it after a few tries. The worst case is that you will still end up with some nicely seasoned scrambled egg, just not the rolled up shape.


Kanikama and shiso tamagoyaki

If unsure, use 6 to 7 crab sticks to begin with, so you'll get more liquid beaten egg instead of solids, easier to work with that way.


Slightly sweet and a light brush of shiso aroma. If you timed it well, the very center of the tamagoyaki remains somewhat moist. Before cooking it, I can already imagine the flavor is going to be great, but the final result really blew me away, it was so tasty. Maybe I should upgrade to a bigger tamagoyaki pan in order to make more in one batch, to satisfy all the hungry mouths in the family at once. 


Another recipe using kanikama:


Jul 11, 2017

Bento Side Dish Recipe - Kimchi Tamagoyaki

I've made cheese tamagoyaki and mentaiko tamagoyaki before, now it's time for kimchi to shine!

Kimchi tamagoyaki - 


Ingredients (single serving, double the amount if needed)?


  • 2 eggs
  • 1 tablespoon chopped kimchi
  • 1 tablespoon mirin
  • Some olive oil


How?


The steps of making tamagoyaki are about the same even though different fillings are used. Refer to my previous post for a more detailed description with step-by-step pictures on how to roll up tamagoyaki.


Instead of the cheese I used before, just swap it out with chopped kimchi. Also there is no need to add more tsuyu or light soy sauce to the egg mixture since kimchi can be quite salty on its own. 


Kimchi flavored tamagoyaki makes a great addition for bento. Kimchi provides a spicy kick, and the eggs are always comforting, so putting these two together can hardly go wrong. 


So what should I test out with tamagoyaki next?


Other tamagoyaki recipes:


Apr 30, 2017

Just Keep Rolling and Rolling That Mentaiko Tamagoyaki

Last time I made tamagoyaki with oozing cheese inside, this time let's spice it up a bit by using mentaiko (spicy cod roe).

Mentaiko tamagoyaki -


Ingredients  (makes about two full squares/6 rectangular servings)?

  • 4 eggs
  • 2 tablespoons mirin
  • 1 to 2 small sacs mentaiko
  • Some olive oil
  • Some dried seaweed threads 


How?


Remove the roe from the filmy sac. This recipe calls for about 1 tablespoon of spicy fish roe. Also one full square of tamagoyaki uses 2 eggs and 1 tablespoon of mirin. Beat these ingredients together and brush some olive oil to the tamagoyaki pan.


The steps are just about the same as making tamagoyaki with oozing cheese, but swap out the cheese with mentaiko. Use about 1/2 tablespoon of mentaiko for each big tamagoyaki serving.


Once the tamagoyaki is ready, slice each big omelet square to 3 smaller rectangular pieces and serve with dried seaweed threads on top or on the side. 


The salty and spicy cod roe goes very well with rice. In fact, some Japanese restaurants serve a small chunk of mentaiko with white rice, kind of like a mini side dish. With just one extra step by wrapping the mentaiko with egg making it a great addition to bento box. Since it's pretty high in salt content, one little piece goes a long way. 


Now I've tried cheese and mentaiko for tamagoyaki, what's next?


Other tamagoyaki recipe:

Aug 11, 2016

Tamagoyaki with Oozing Cheese Filling, Not Bad for a First Timer

Finally got some time to slightly revamp this site from 3 columns setting to simpler 2 columns. It should feel wider and cleaner, but the best part is that I can now use extra large sized horizontal images. 

Put the hassles away, now it's time to drool over these oozing cheese images - extra large effect!

Tamagoyaki with oozing cheese filling - 


Ingredients (single serving, double the amount if needed)?

  • 2 eggs
  • 1 tablespoon mirin
  • 1/2 tablespoon tsuyu or light soy sauce
  • 1/4 cup cheese blend 
  • Some olive oil
  • Some dried seaweed flakes or threads (options)


How?

Been thinking about buying a tamagoyaki/Japanese omelet pan for a while, but the already fully stocked pantry halted my thought. One day I was strolling down the aisle of a fancy supermarket, found a single-serving tamagoyaki pan for around $22. Stood there for a good 30 seconds then decided to just let it go. Soon after I, wandered to a Japanese grocery store nearby, found the same pan for $12. This time, without any hesitation, this pan is destined to come home with me.

And of course I managed to squeeze out a spot for this yellow pan.


Beat together the eggs, mirin, tsuyu or light soy sauce. Strain if preferred, this will help to prevent any uneven white colored bits on the cooked tamagoyaki. However, since this recipe calls for blended cheese for the filling, which contains paler looking mozzarella, it's unnecessary to strain the egg mixture.

Oil the pan surface, you can simply wipe some olive oil over using a kitchen towel. Turn to medium heat then pour in 1/3 of the egg mixture. Do not wait till the pan turns hot, just pour in the mixture right away and keep stirring it gently.

As soon as the mixture starts to coagulate, add the cheese mix on the edge way from you, but leaving a tiny space to fold in the filling. Use chopsticks or a small spatula to fold in the mixture two to three times, it'll look like a rectangular block close to your end.


So now you're left with semi-cooked egg mixture wrapped with cheese on the edge close to you, the remaining surface of the pan remains clean. Push that egg block towards the other edge.


Pour in 1/3 more egg mixture to the empty area. Quick tip here, carefully lift up the edge of the already cooked rectangular egg block so the newly added mixture binds better with it. 

Stir the newly added mixture if needed but don't make it into scrambled eggs. Fold the egg mixture again, starting from the already cooked block towards yourself, should be two or 3 folds again. 

Repeat the steps for the last 1/3 of the egg mixture. You should be left with a fatter looking rectangular block once finished. Press gently and shape the mixture if needed, but remember, don't overdone any of the above steps since the egg mixture cooks fairly quickly. Tough and fully cooked tamagoyaki is a no-no. 

Transfer onto a serving plate. 


Cut into larger bite size pieces. Garnish with dried seaweed flakes or dried seaweed threads right before serving.


Not bad for a first-timer. Still need to work on it but guess making tamagoyaki isn't that intimidating. I've already got many possible flavor combinations in my head, it's time to stock up some more eggs!


Other Japanese savory snack/otsumami recipes: